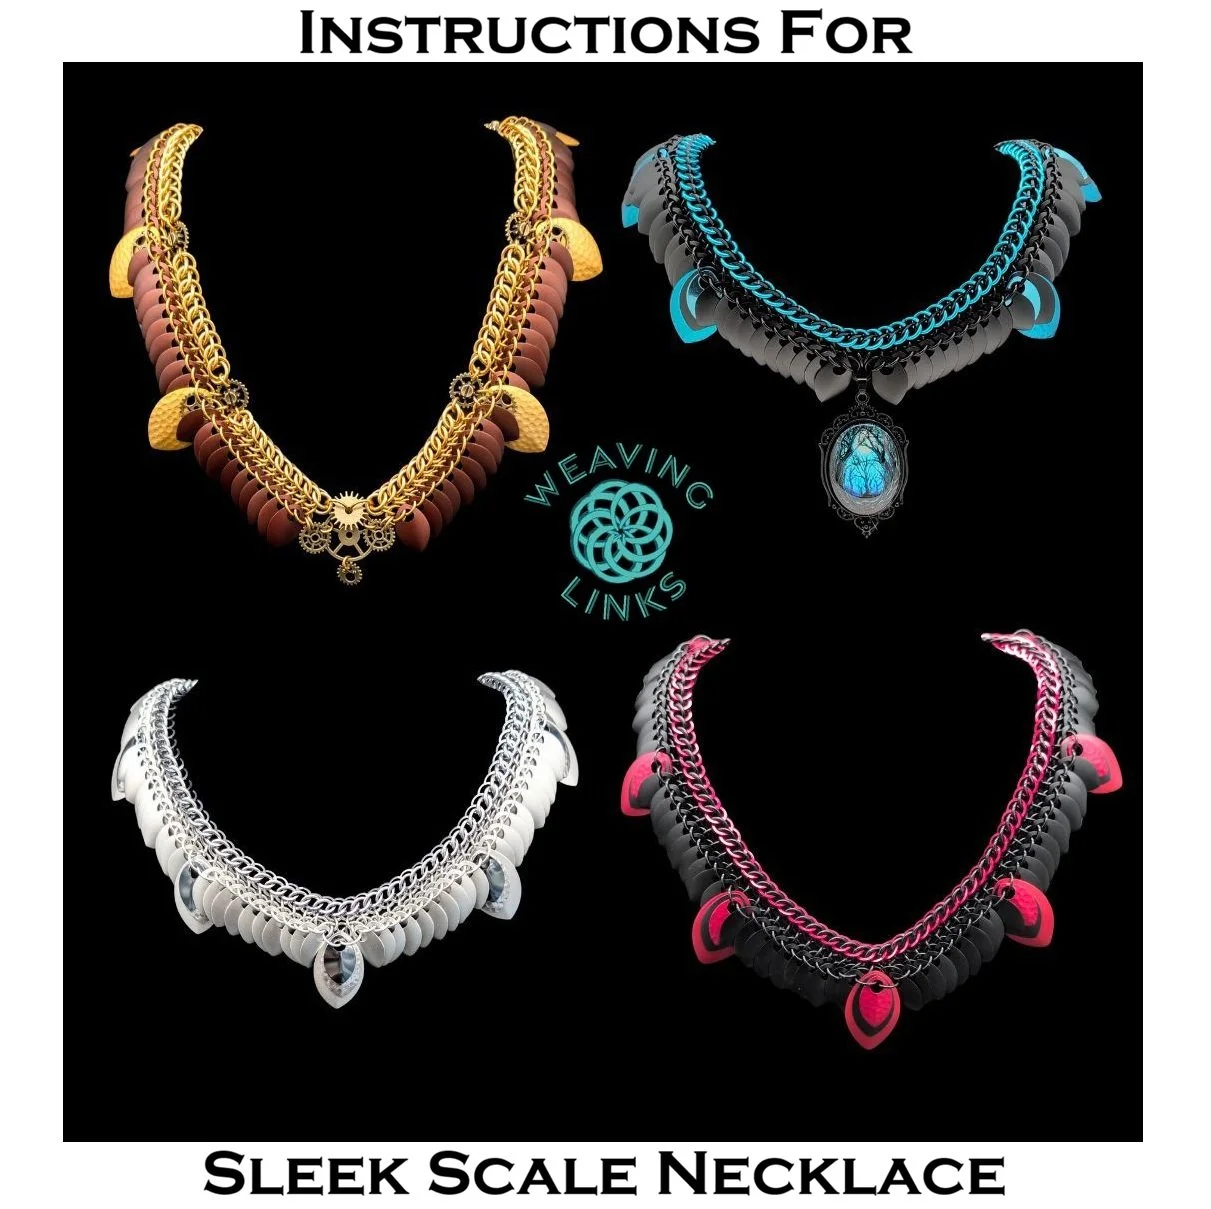
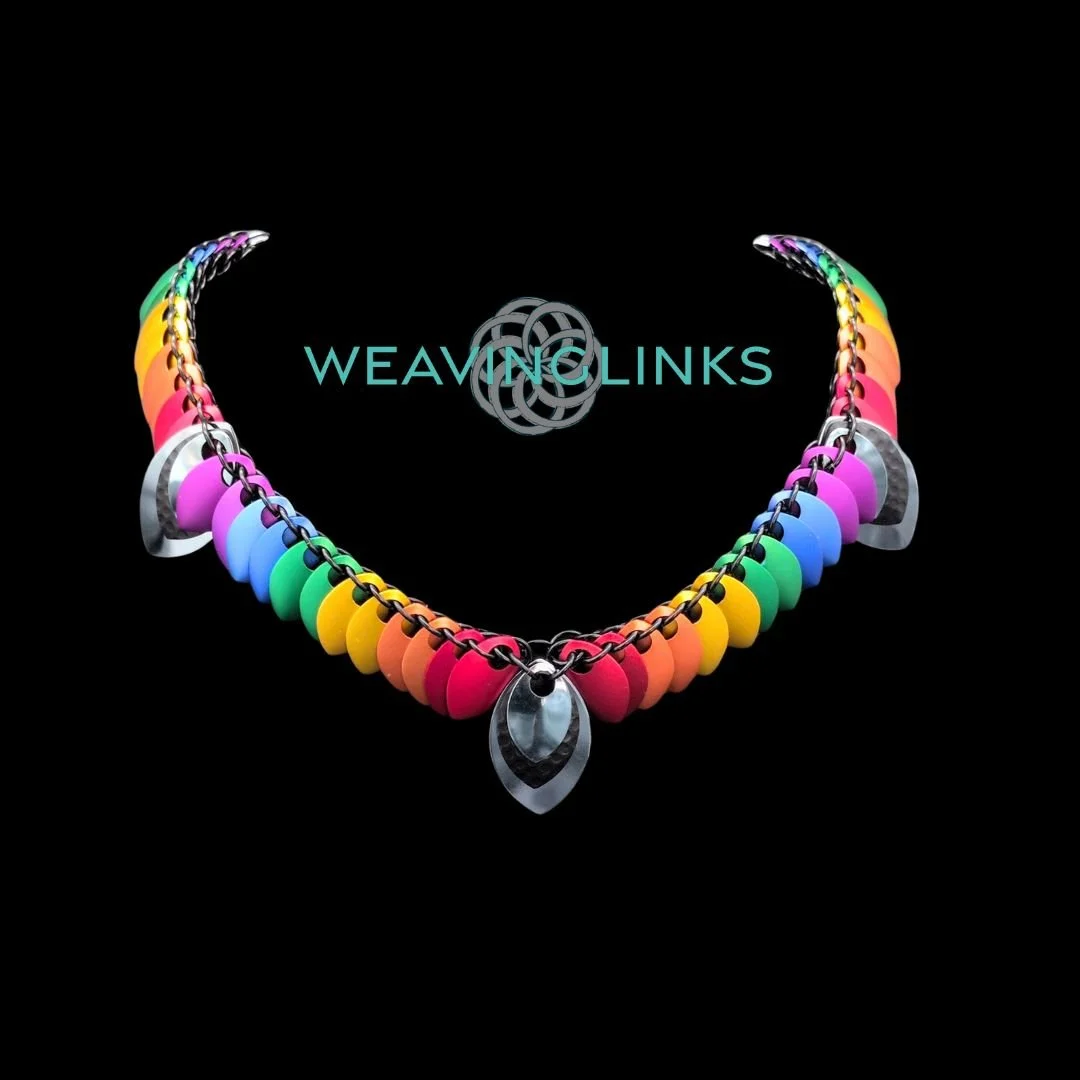
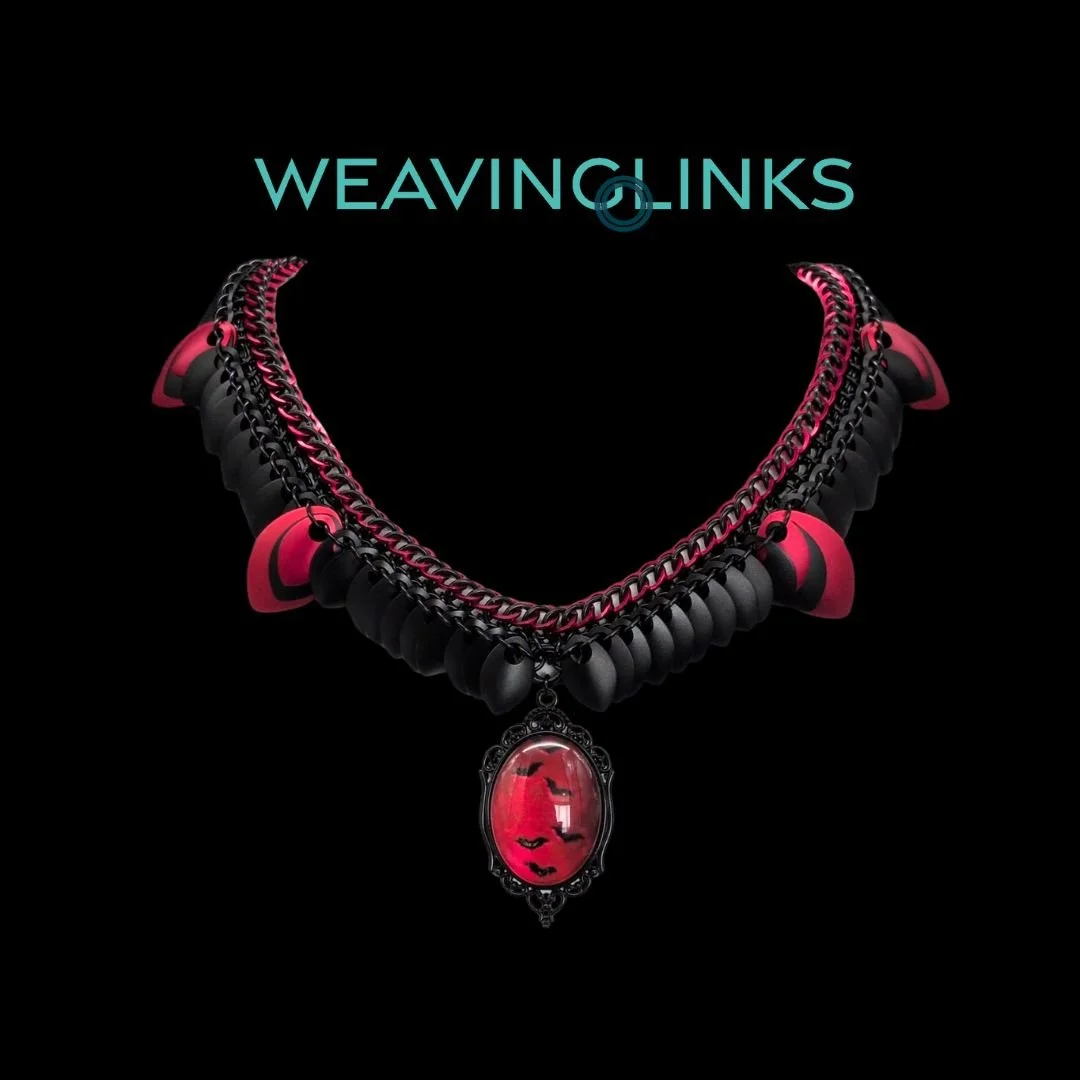
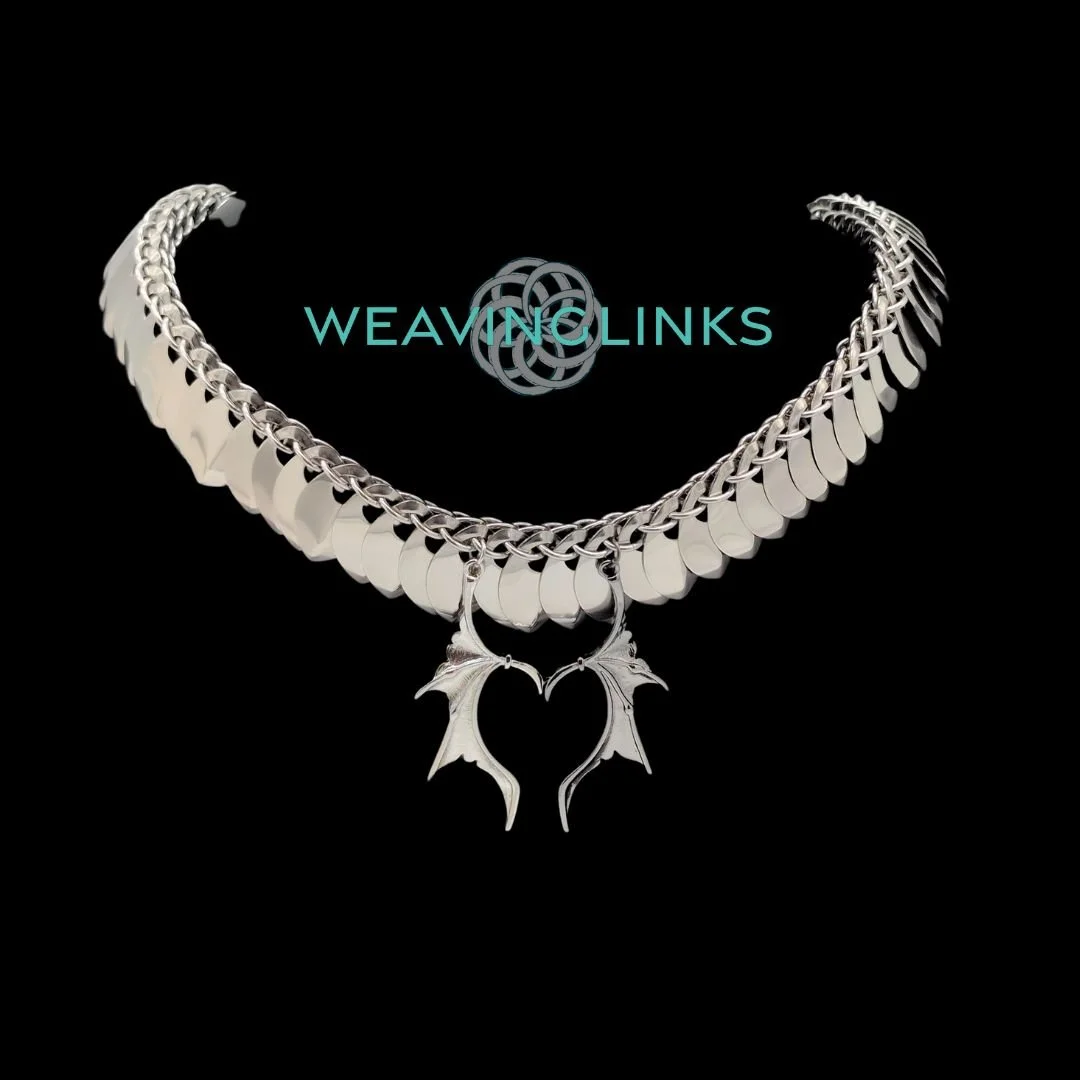
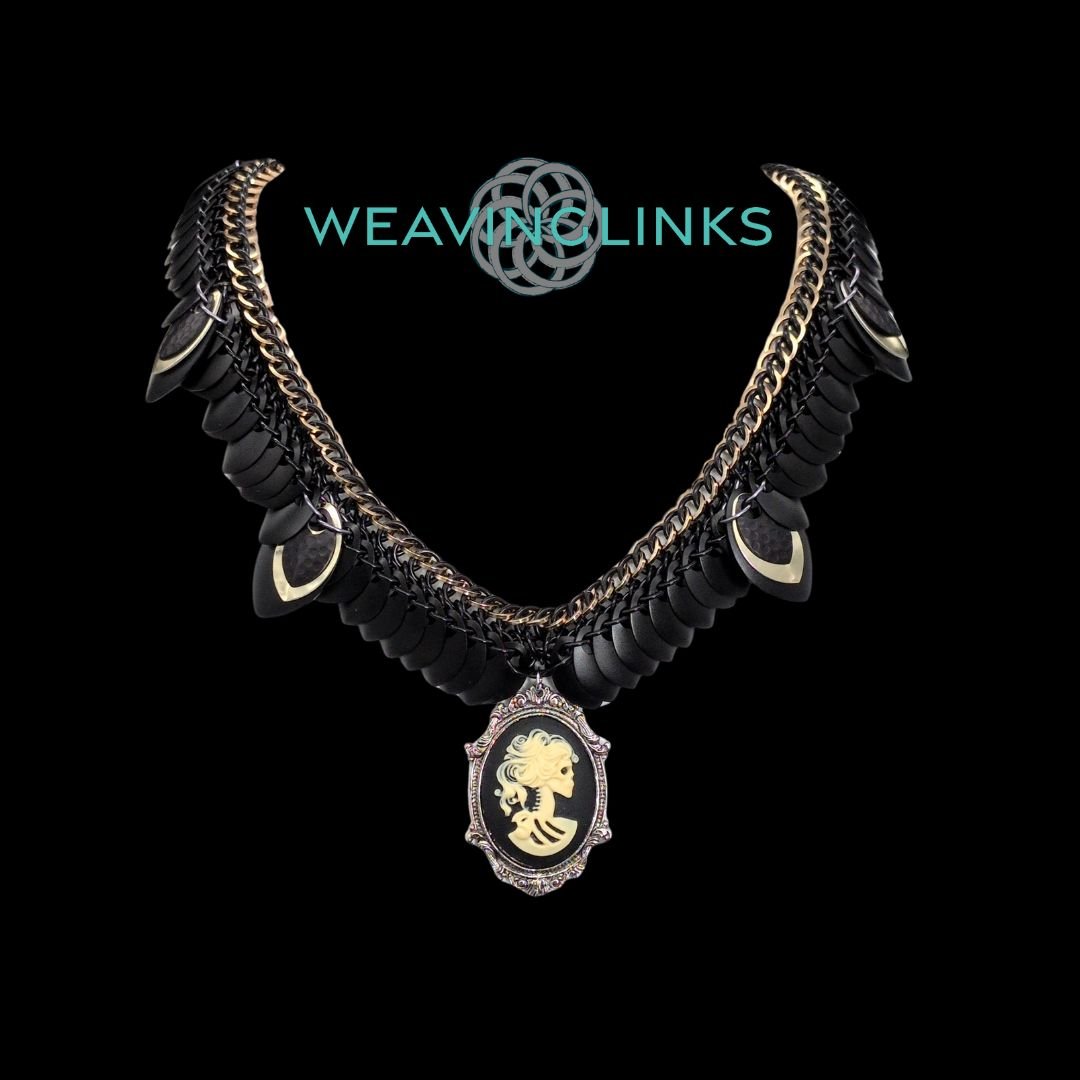
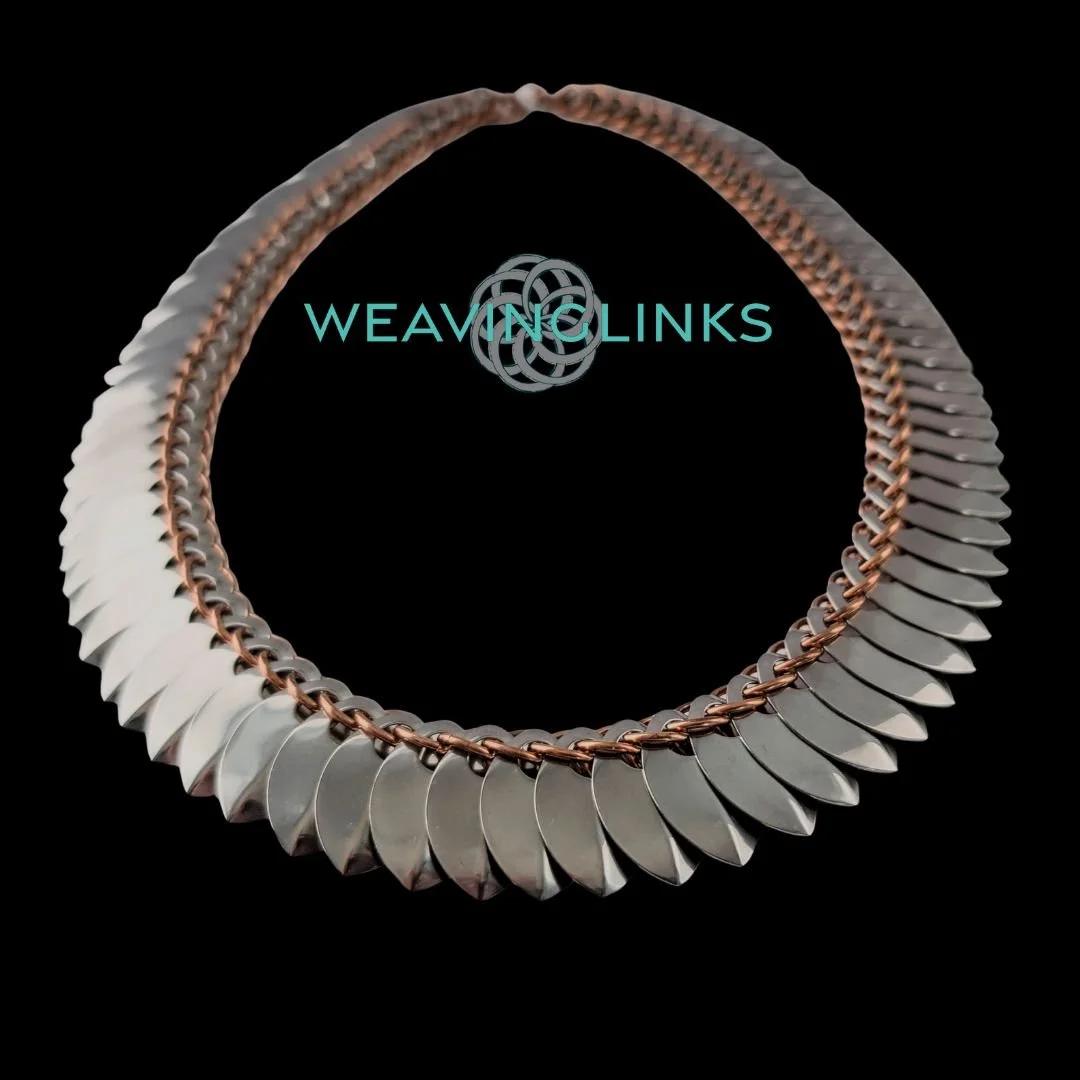

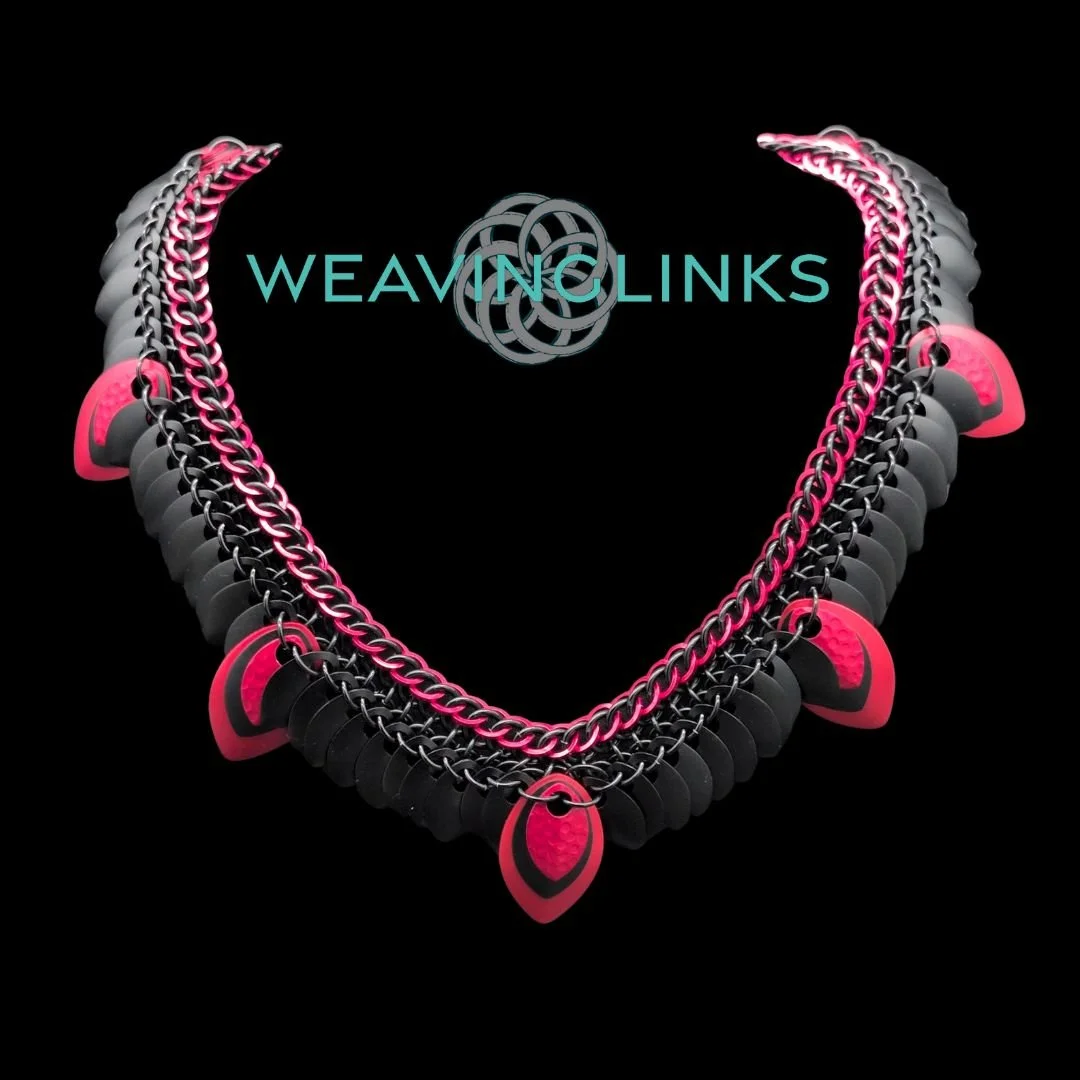
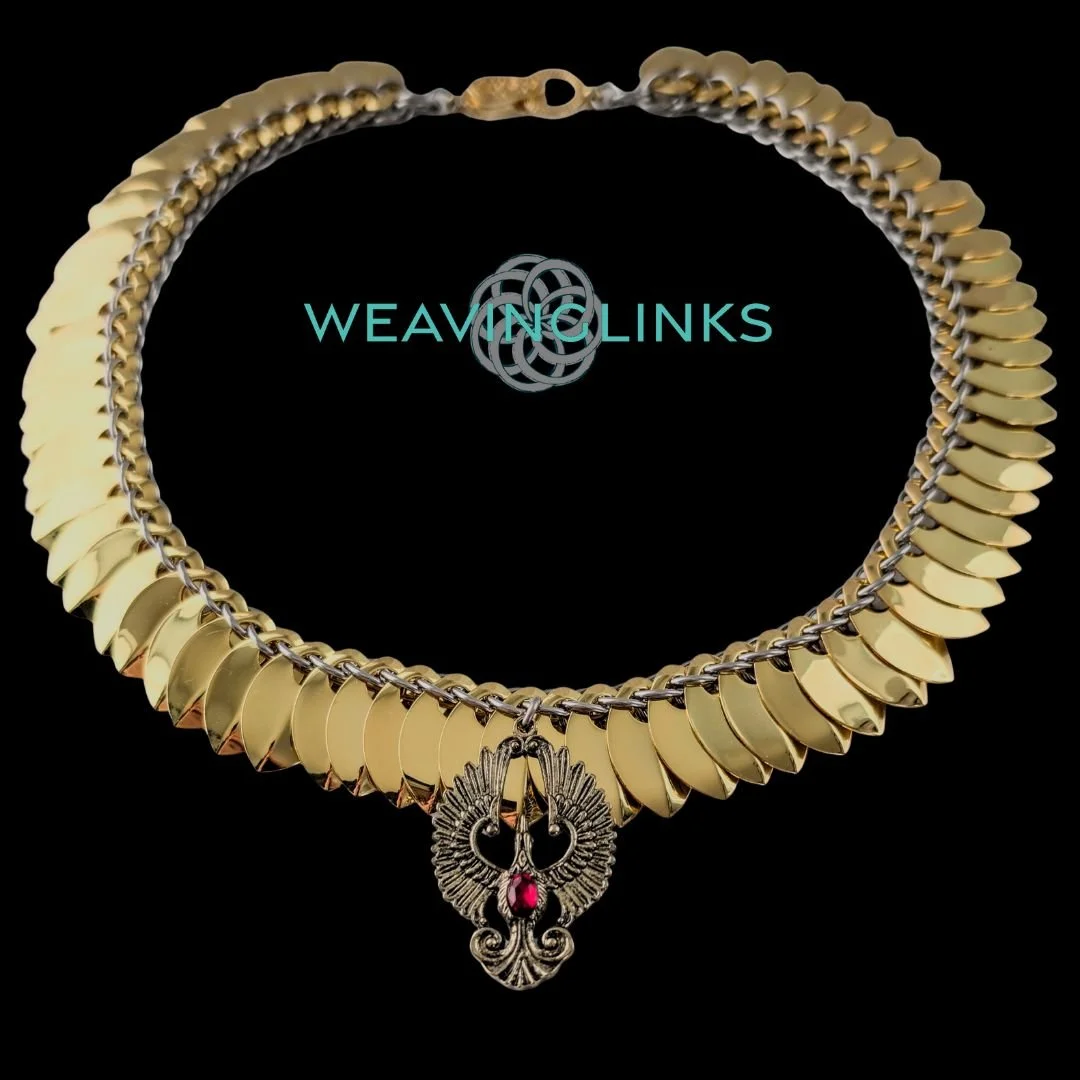
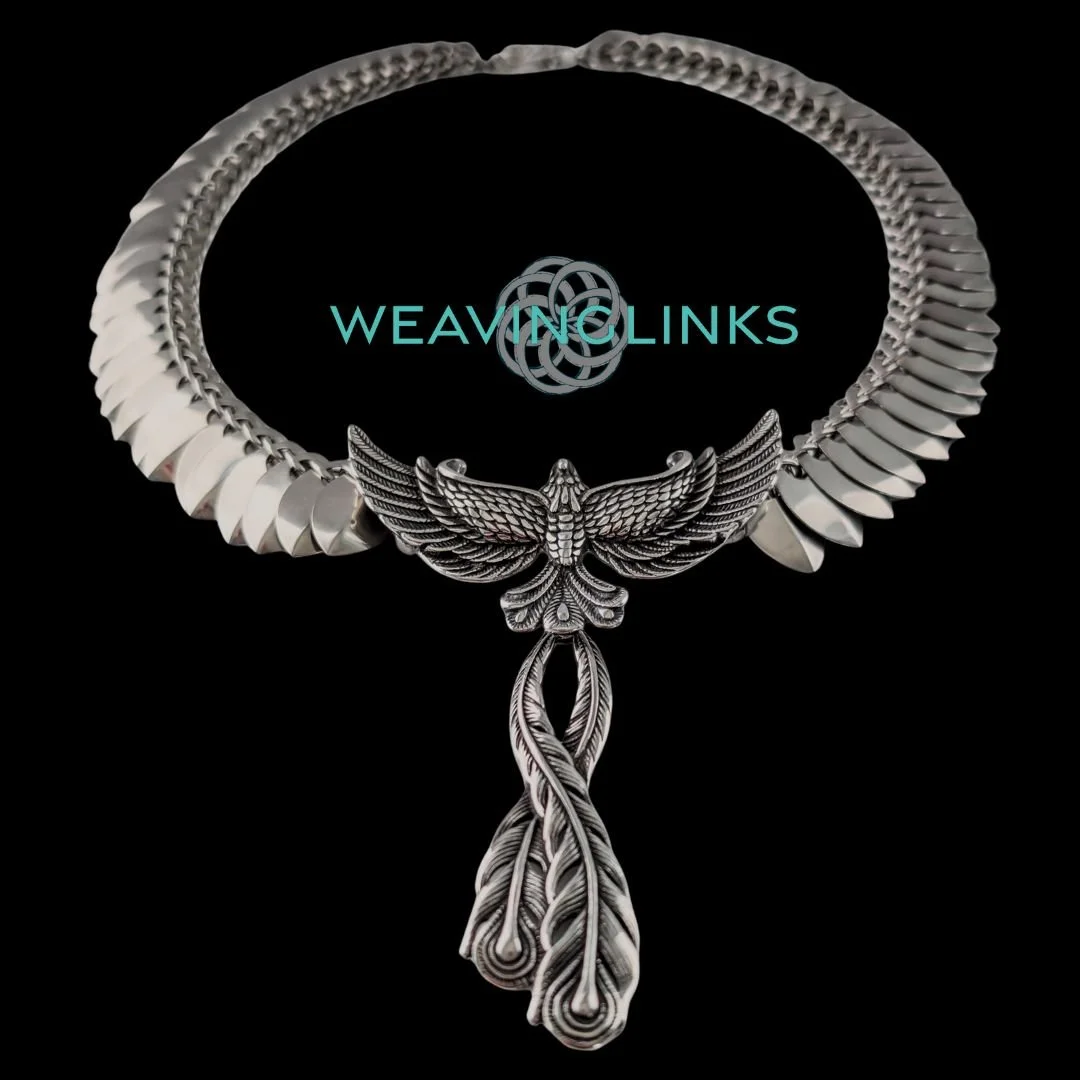
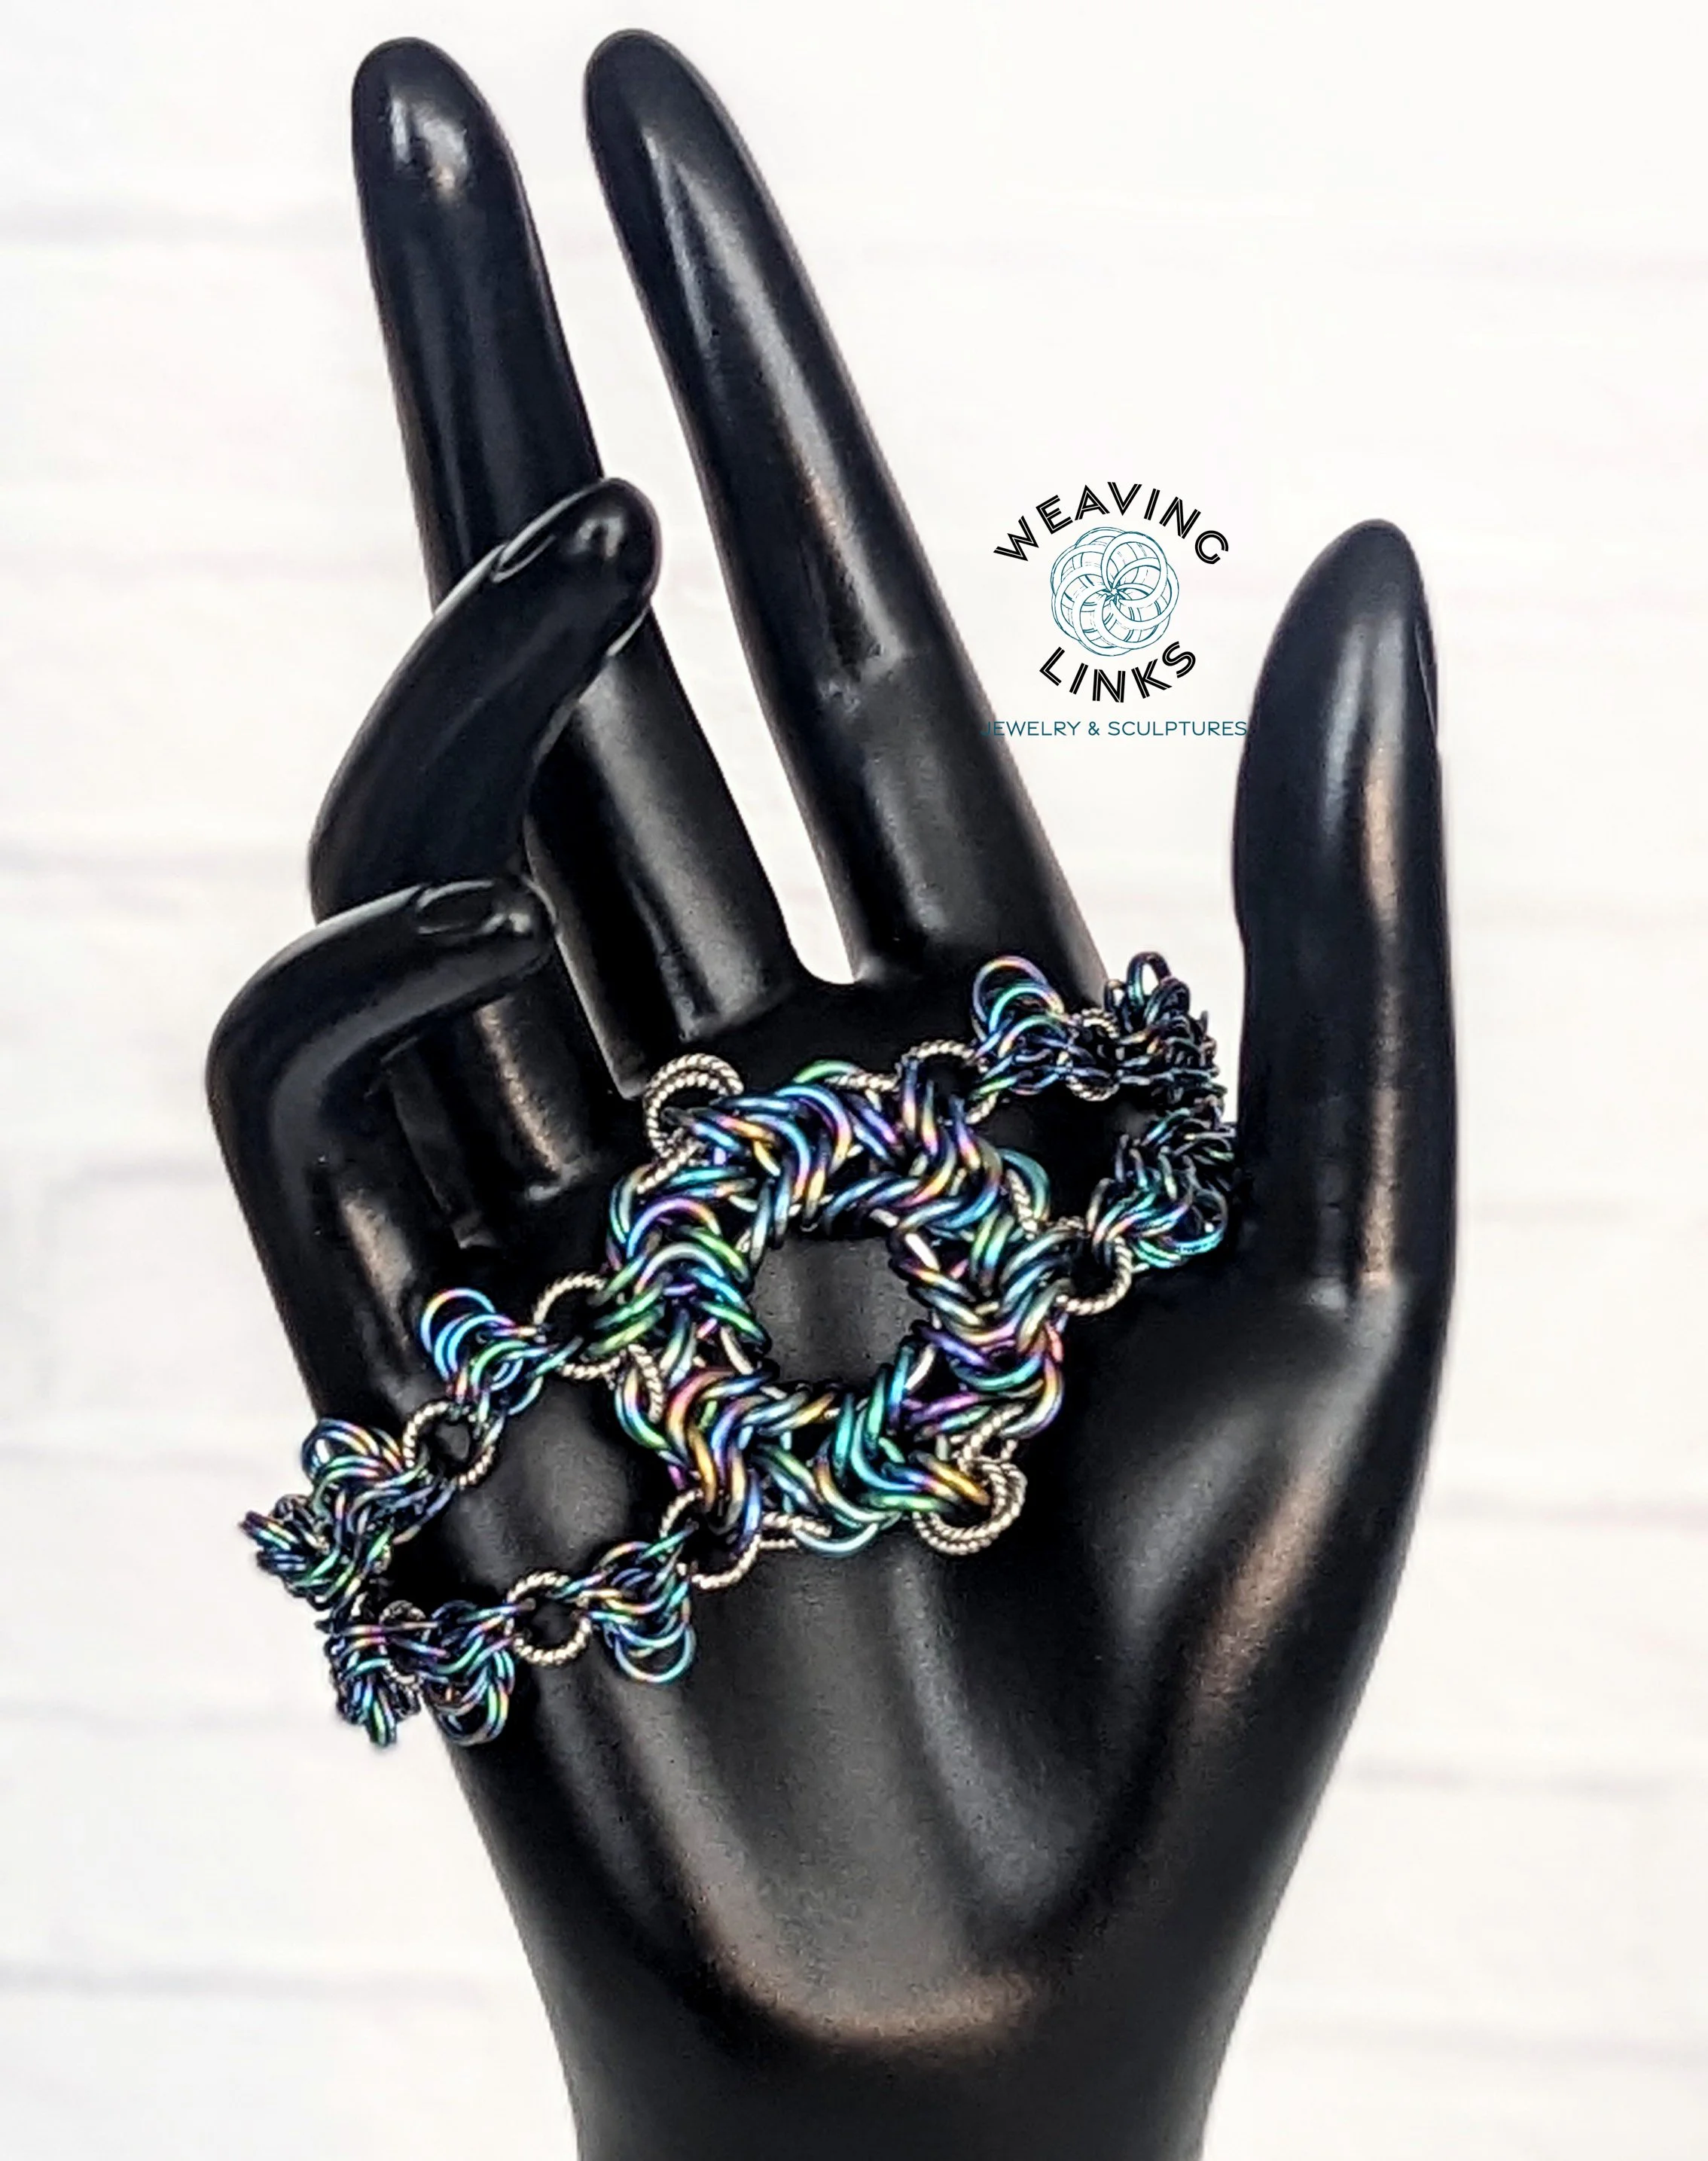
This is a set of instructions for building a scale necklace that has a slimmer profile than the usual scale necklaces. The finished necklace is approximately 20 inches long. There is also ring sizes and instructions to make necklaces with small, medium, and large scales, plus suggested adjustments for varying manufacturers.
This tutorial assumes that you can weave half persian 3 in 1.
These instructions have been tested with rings from Chain Reaction Canada, Chainmail Joe, The Ring Lord, and Weave Got Maille. Scales have been tested from Chain Reaction Canada, Chainmail Joe, The Ring Lord, Weave Got Maille, Steampunk Garage, Meloria Maille, and Draconic Wares.
If you have any questions, please don’t hesitate to send me a message via the contact page on the Weaving Links website, or any of our social media accounts. I’m ALWAYS happy to help!
**This tutorial is for personal use only. It, or its contents, may not be reproduced or publicly shared without prior written consent. You may sell what you make with these instructions if you credit Weaving Links as the designer. **
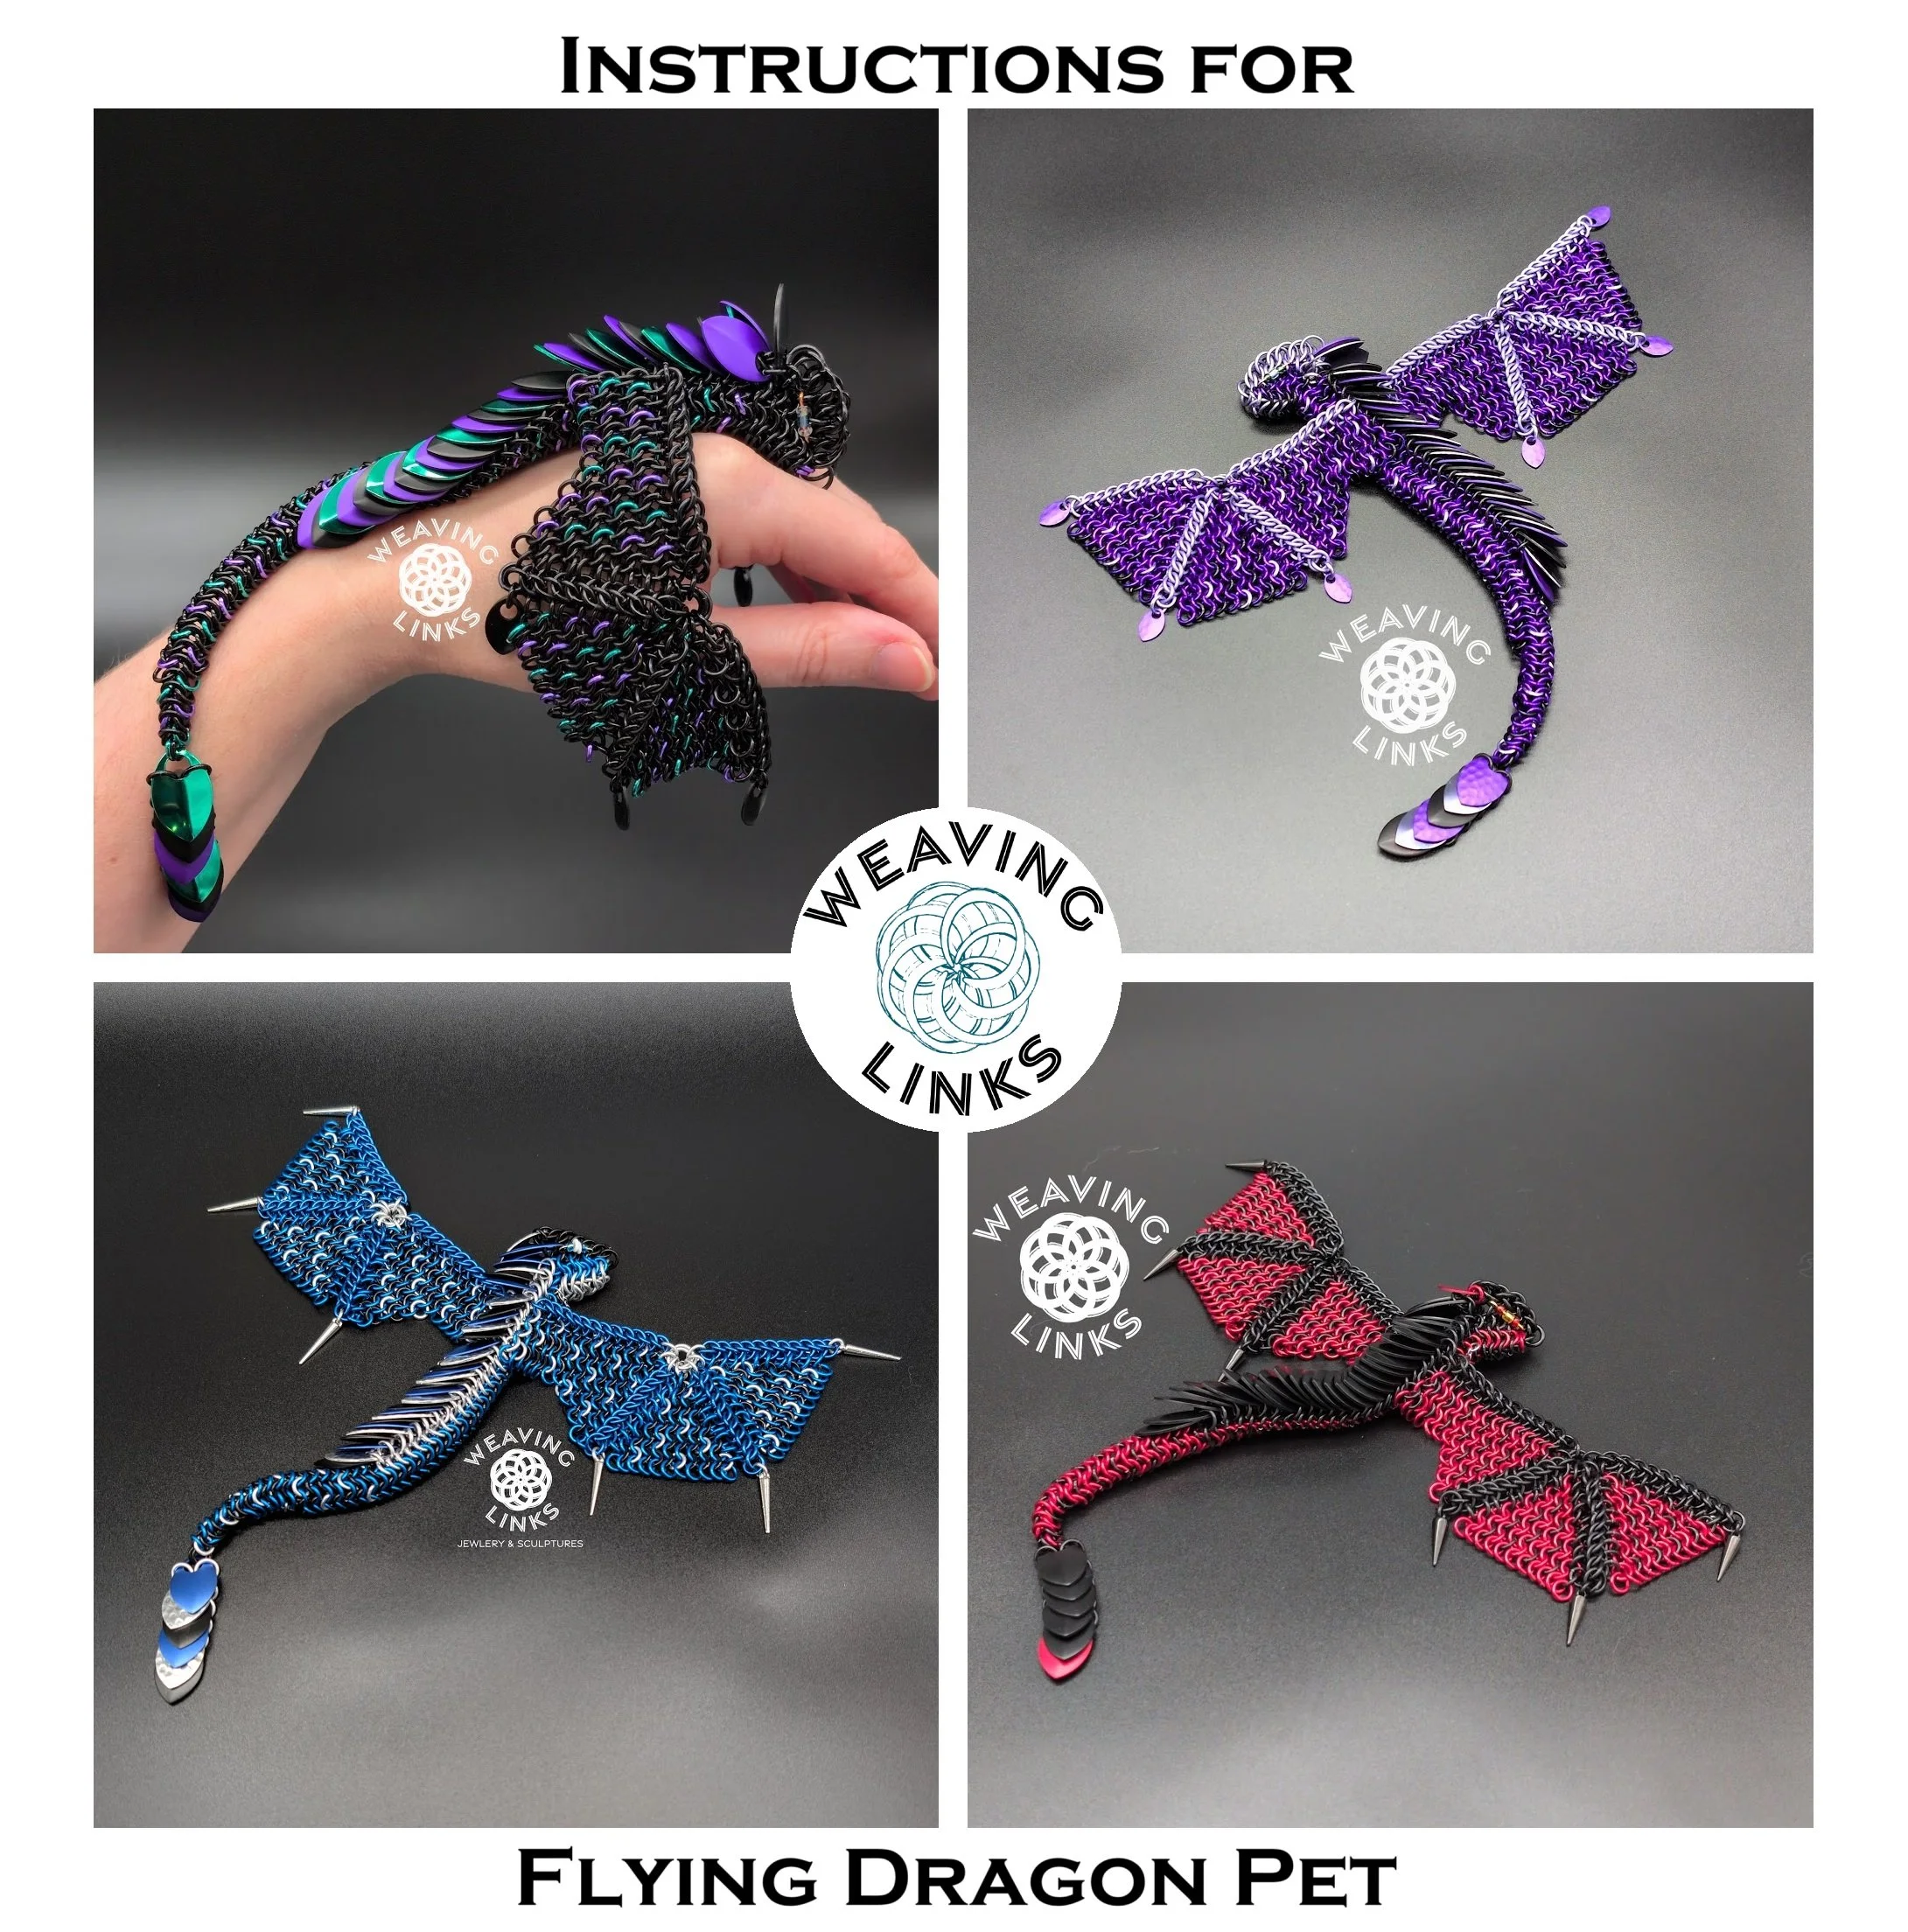

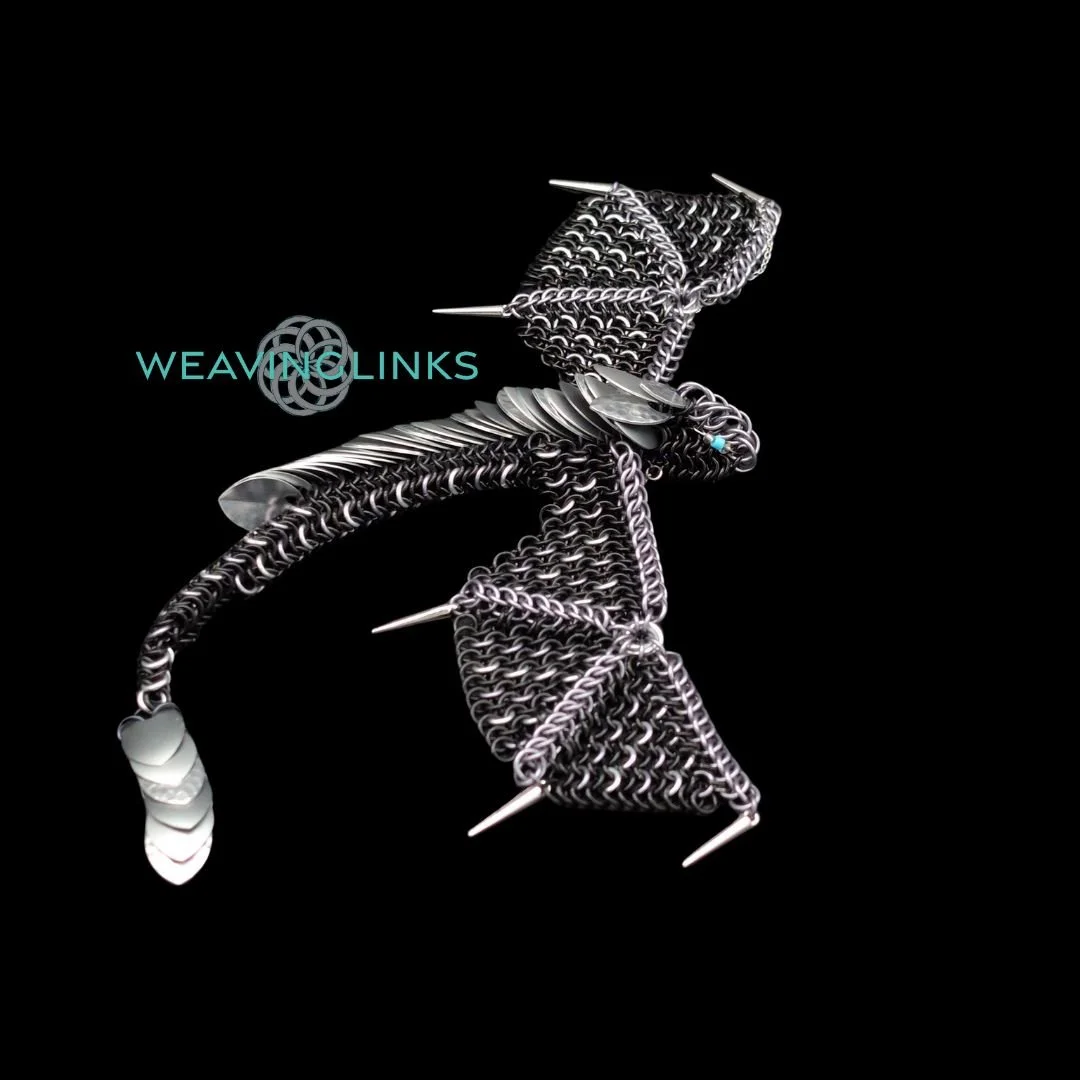
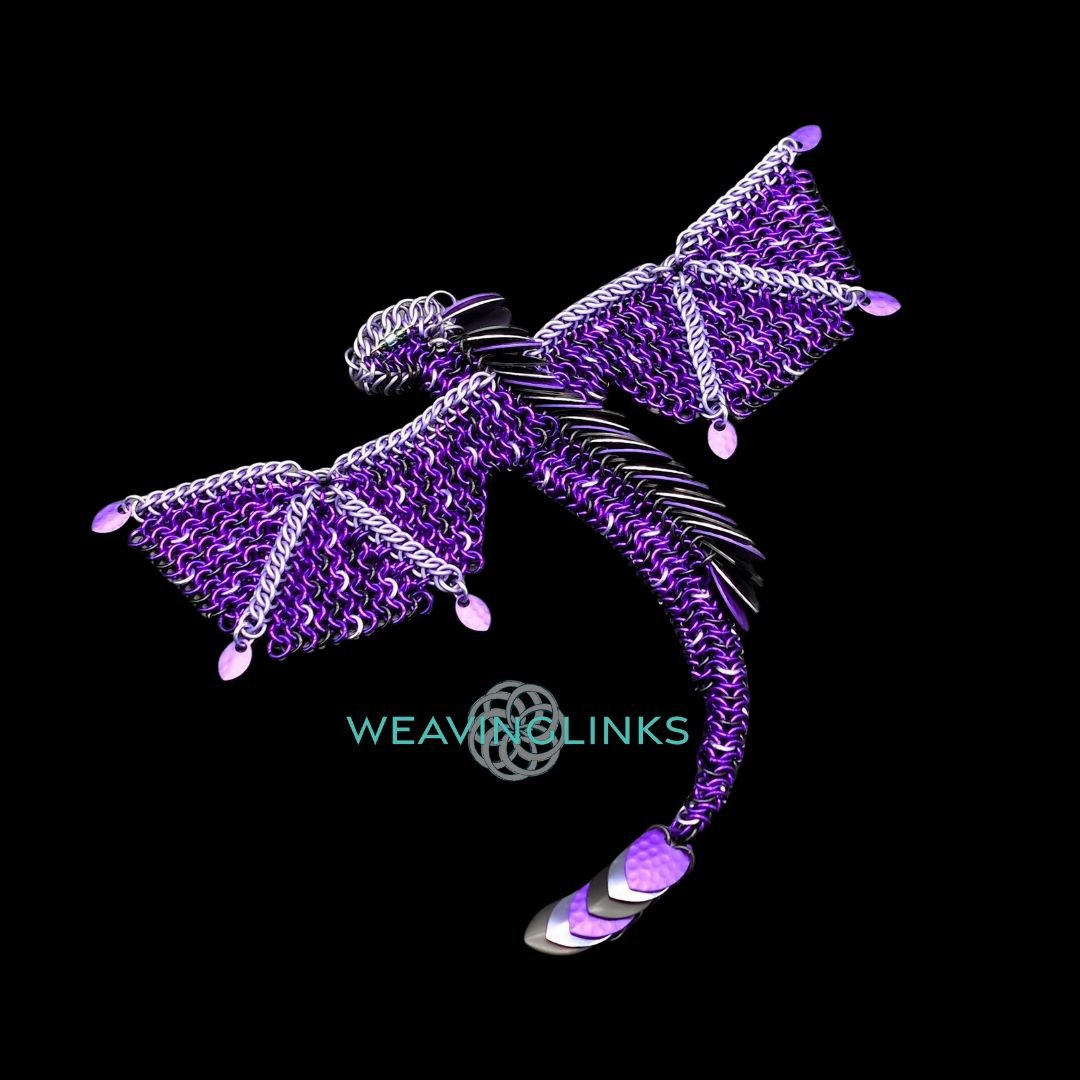


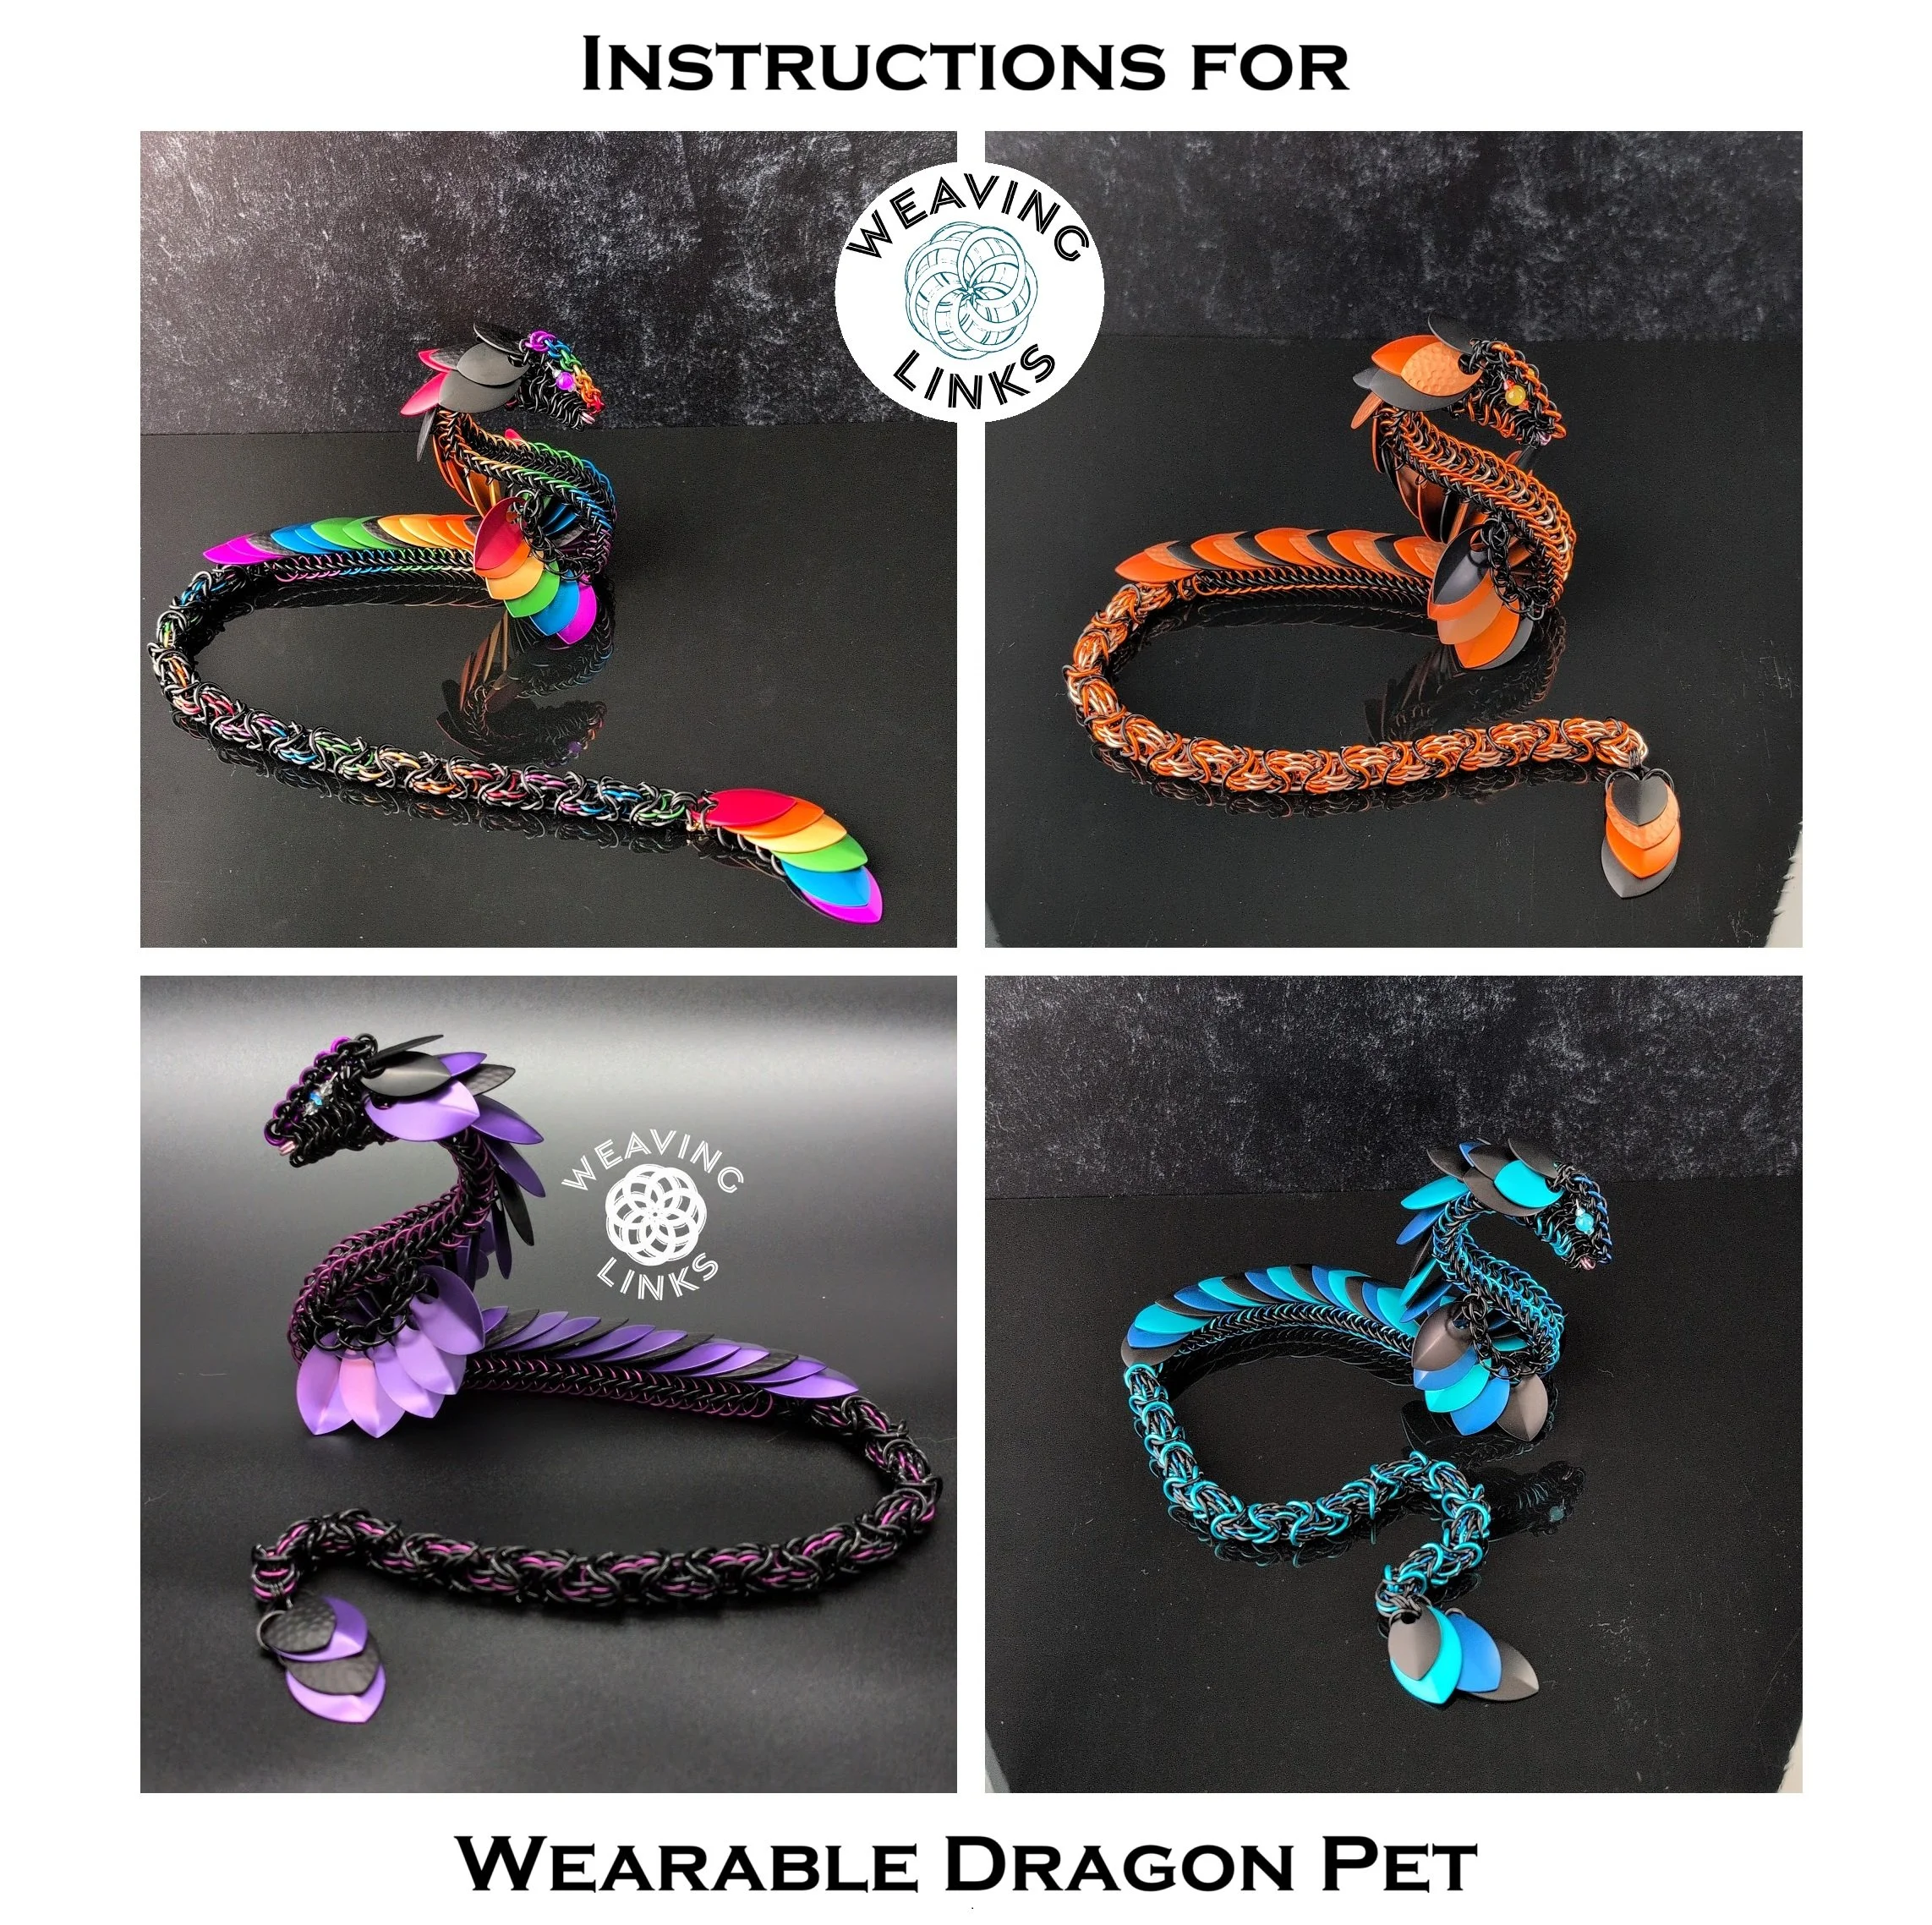
This is a set of instructions for building a dragon pet that attaches to your fingers and thumb. And when you touch your thumb and pinky together, you can make the wings move and your dragon pet fly! This dragon has some difficult spots—some floppy and some tight. Therefore I have classified this tutorial as skill level intermediate.
This tutorial assumes that you can weave Euro 4 in 1, Half Persian 4 in 1, Half Persian 3 in 1, JPL3, and linear scalemail.
This tutorial has been tested with rings from Chain Reaction Canada, Chainmail Joe, The Ring Lord, and Weave Got Maille. Scales have been tested from Draconic Wares, Chainmail Joe, The Ring Lord, and Weave Got Maille.
If you have any questions, please don’t hesitate to send me a message via the contact page on the Weaving Links website, or any of our social media accounts. I’m ALWAYS happy to help!
This tutorial is for personal use only. It, or its contents, may not be reproduced or publicly shared without prior written consent. Also, please do not share photos of all the pieces laid out flat, as that is basically the same as sharing the tutorial. You may sell what you make with these instructions, just credit Weaving Links as the designer.
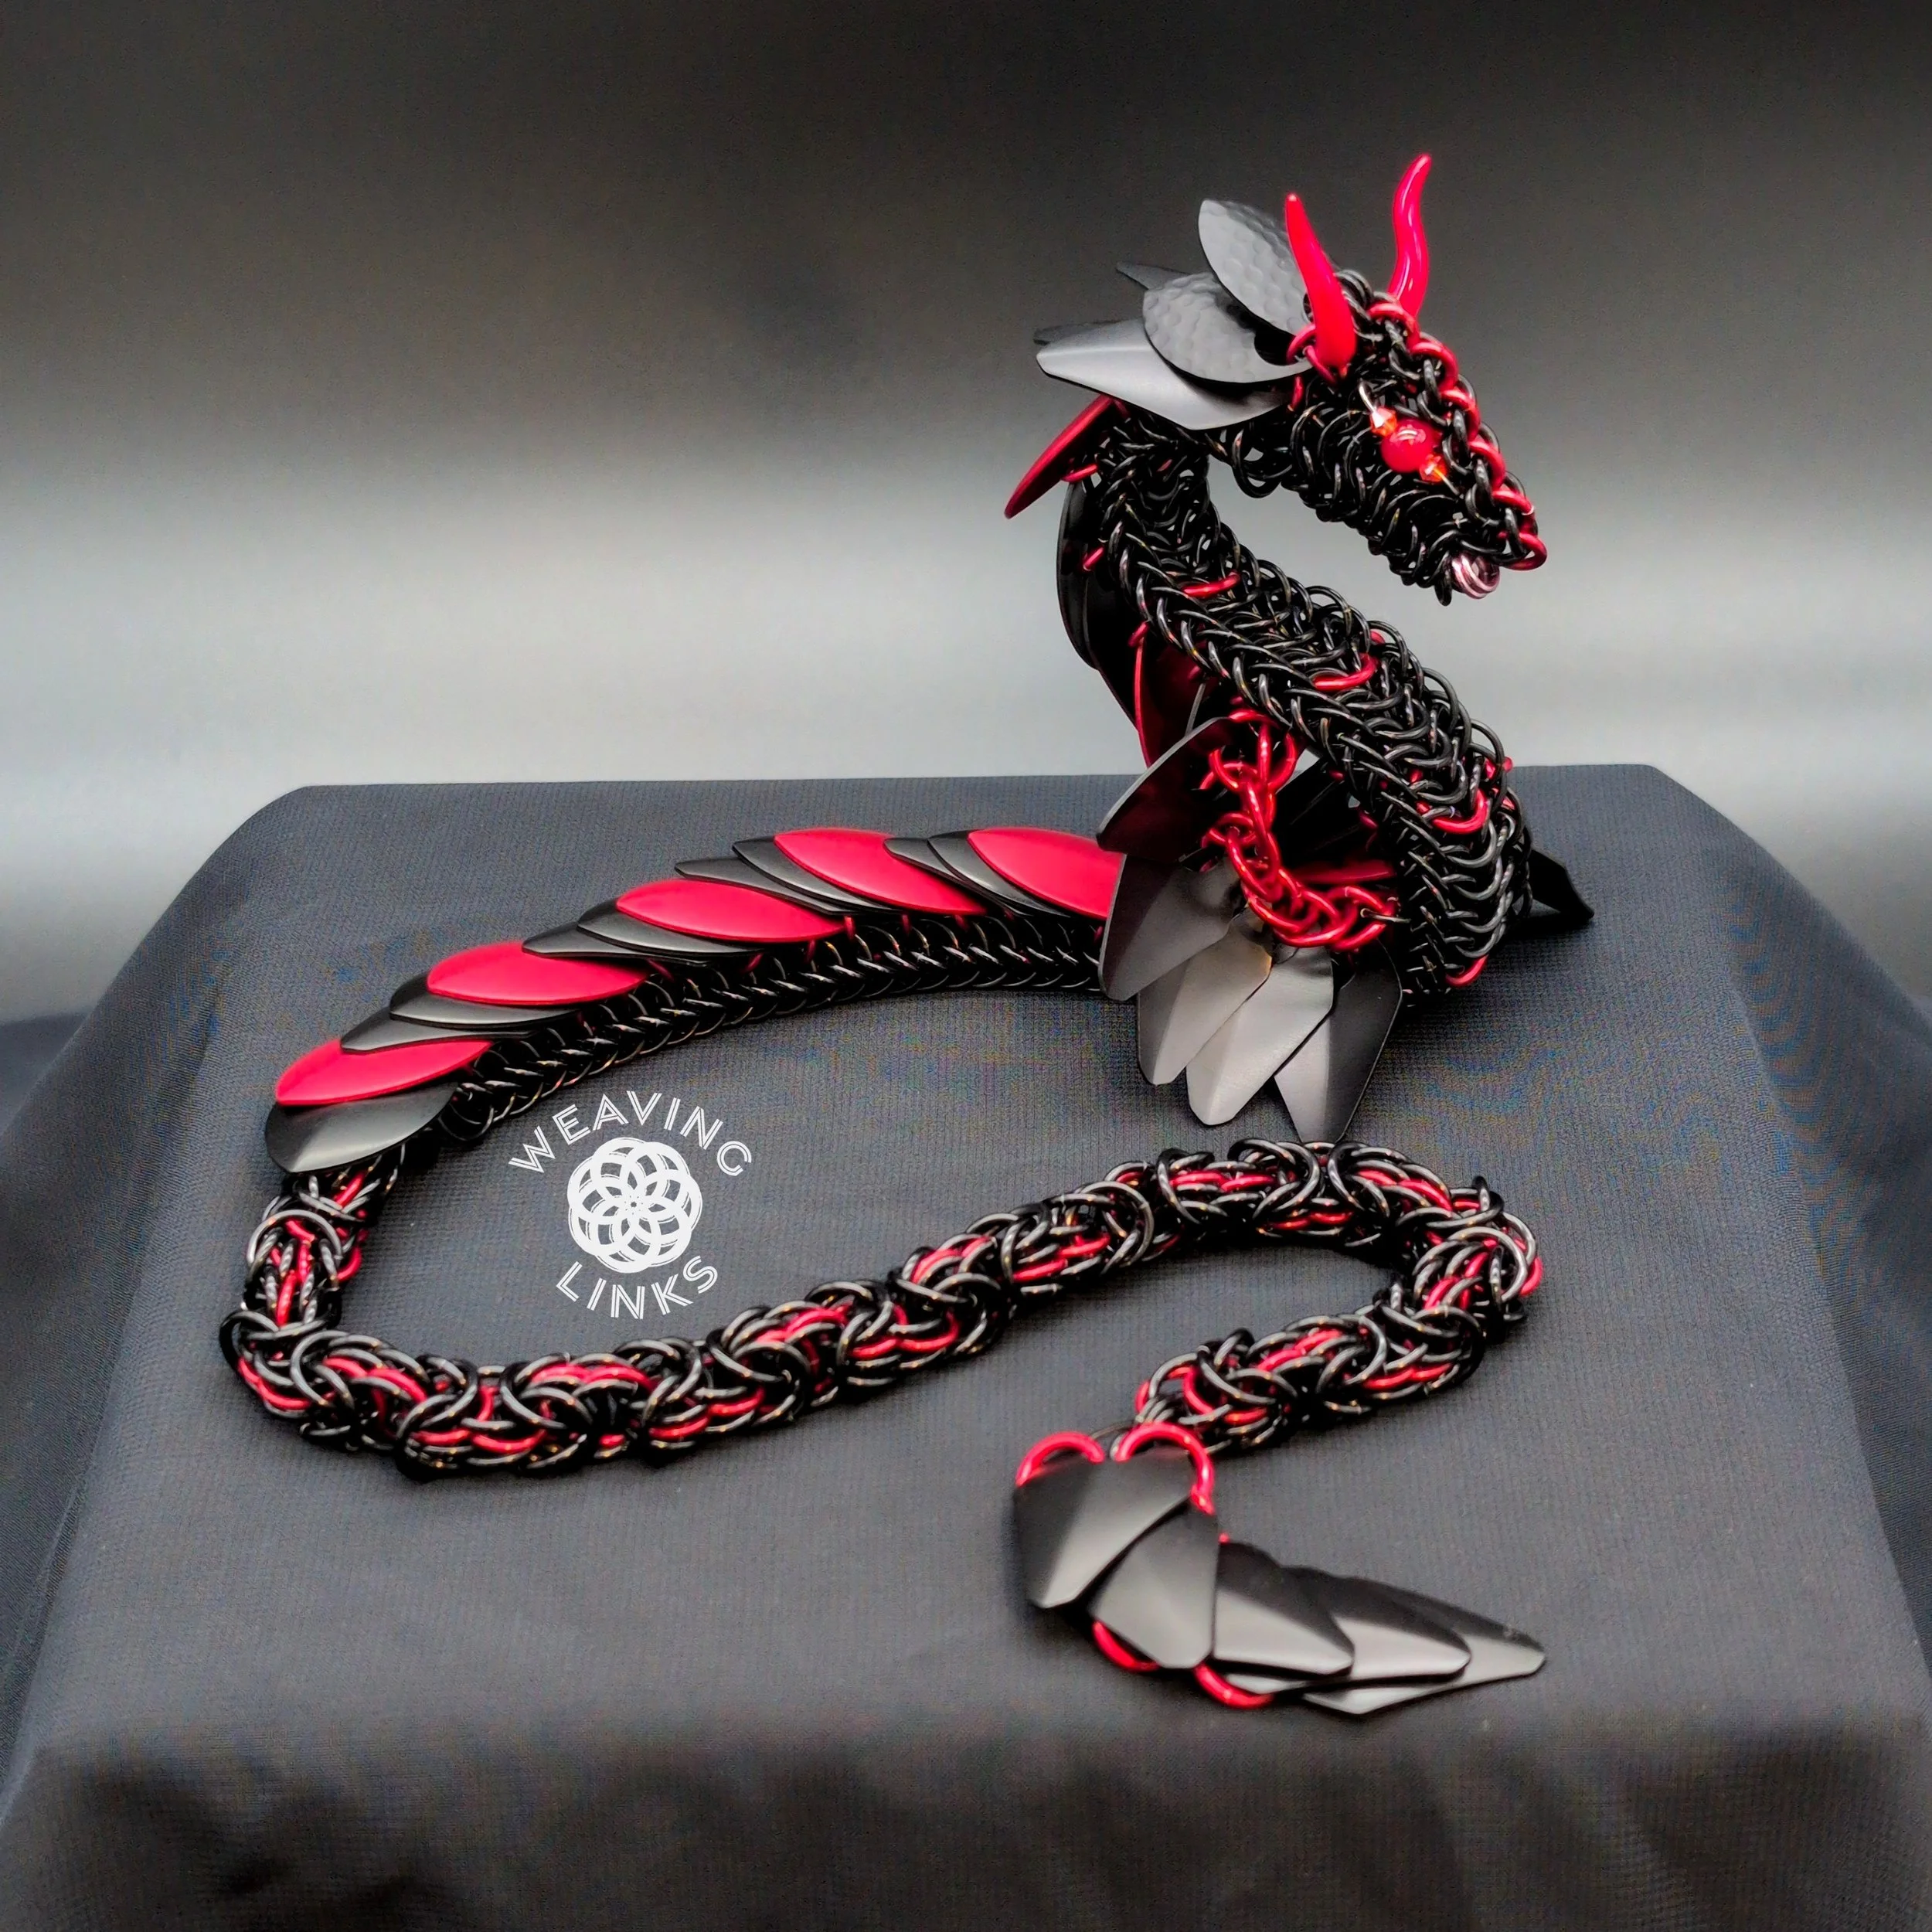
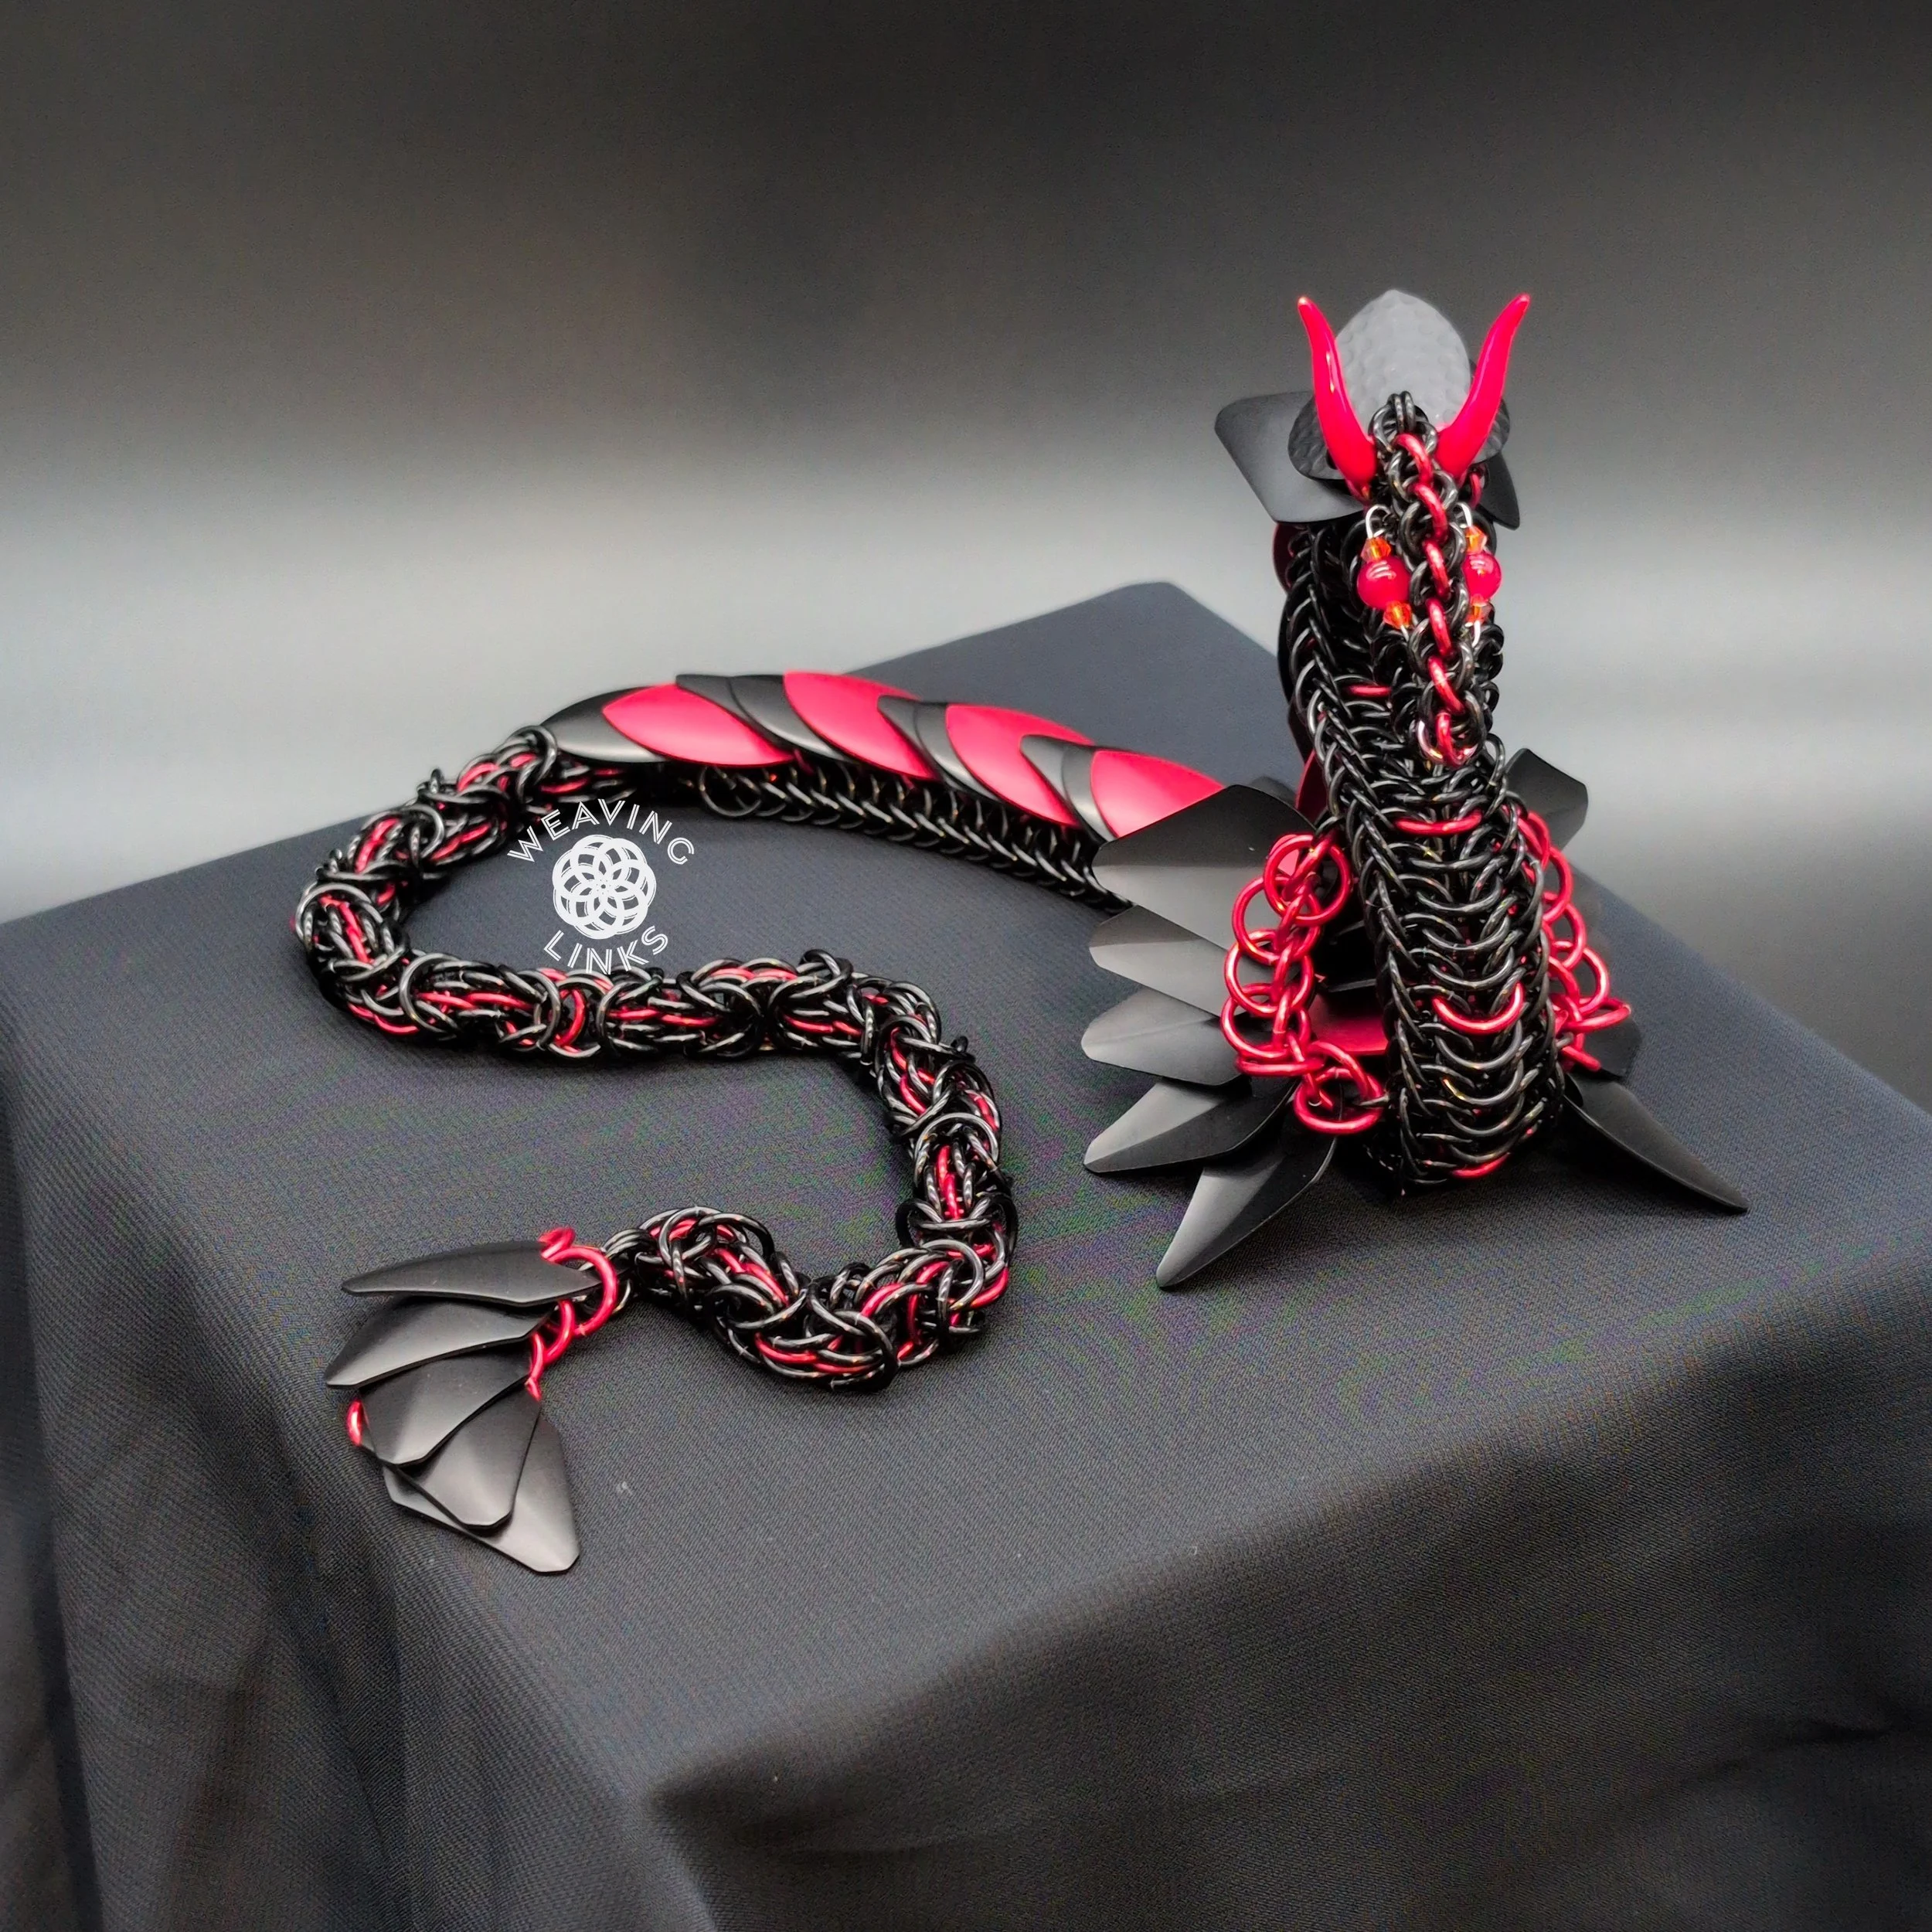
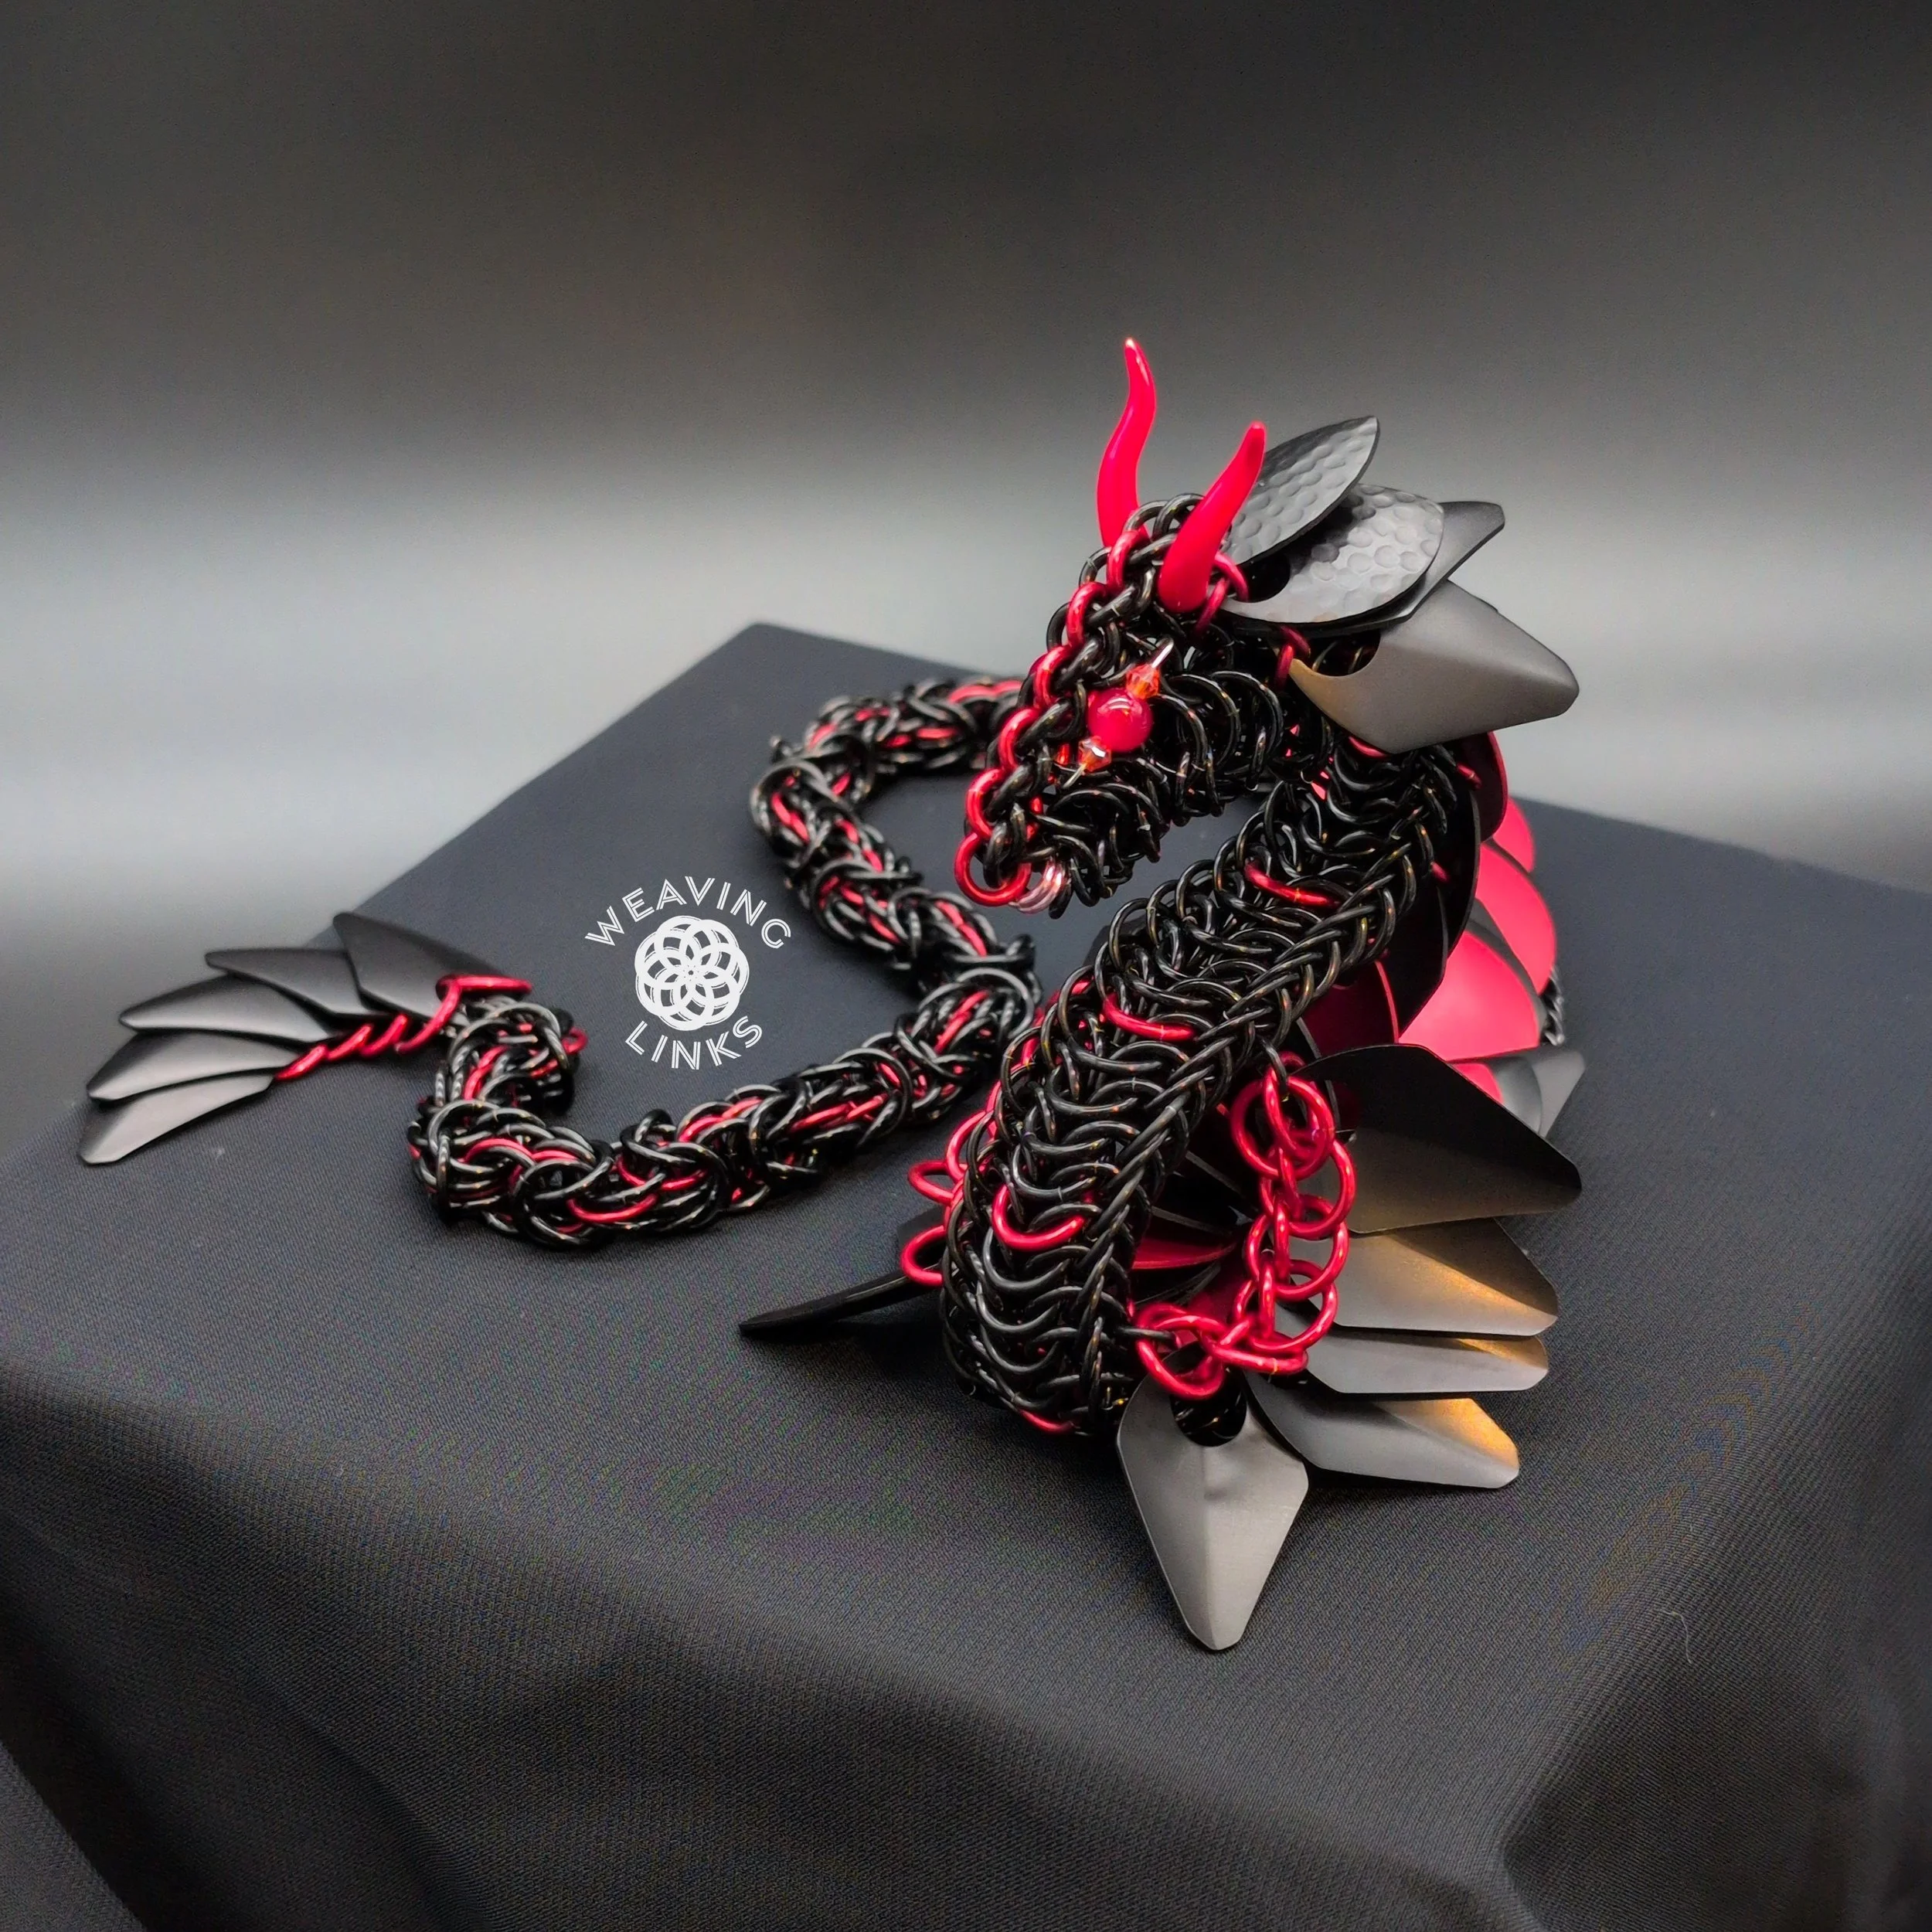
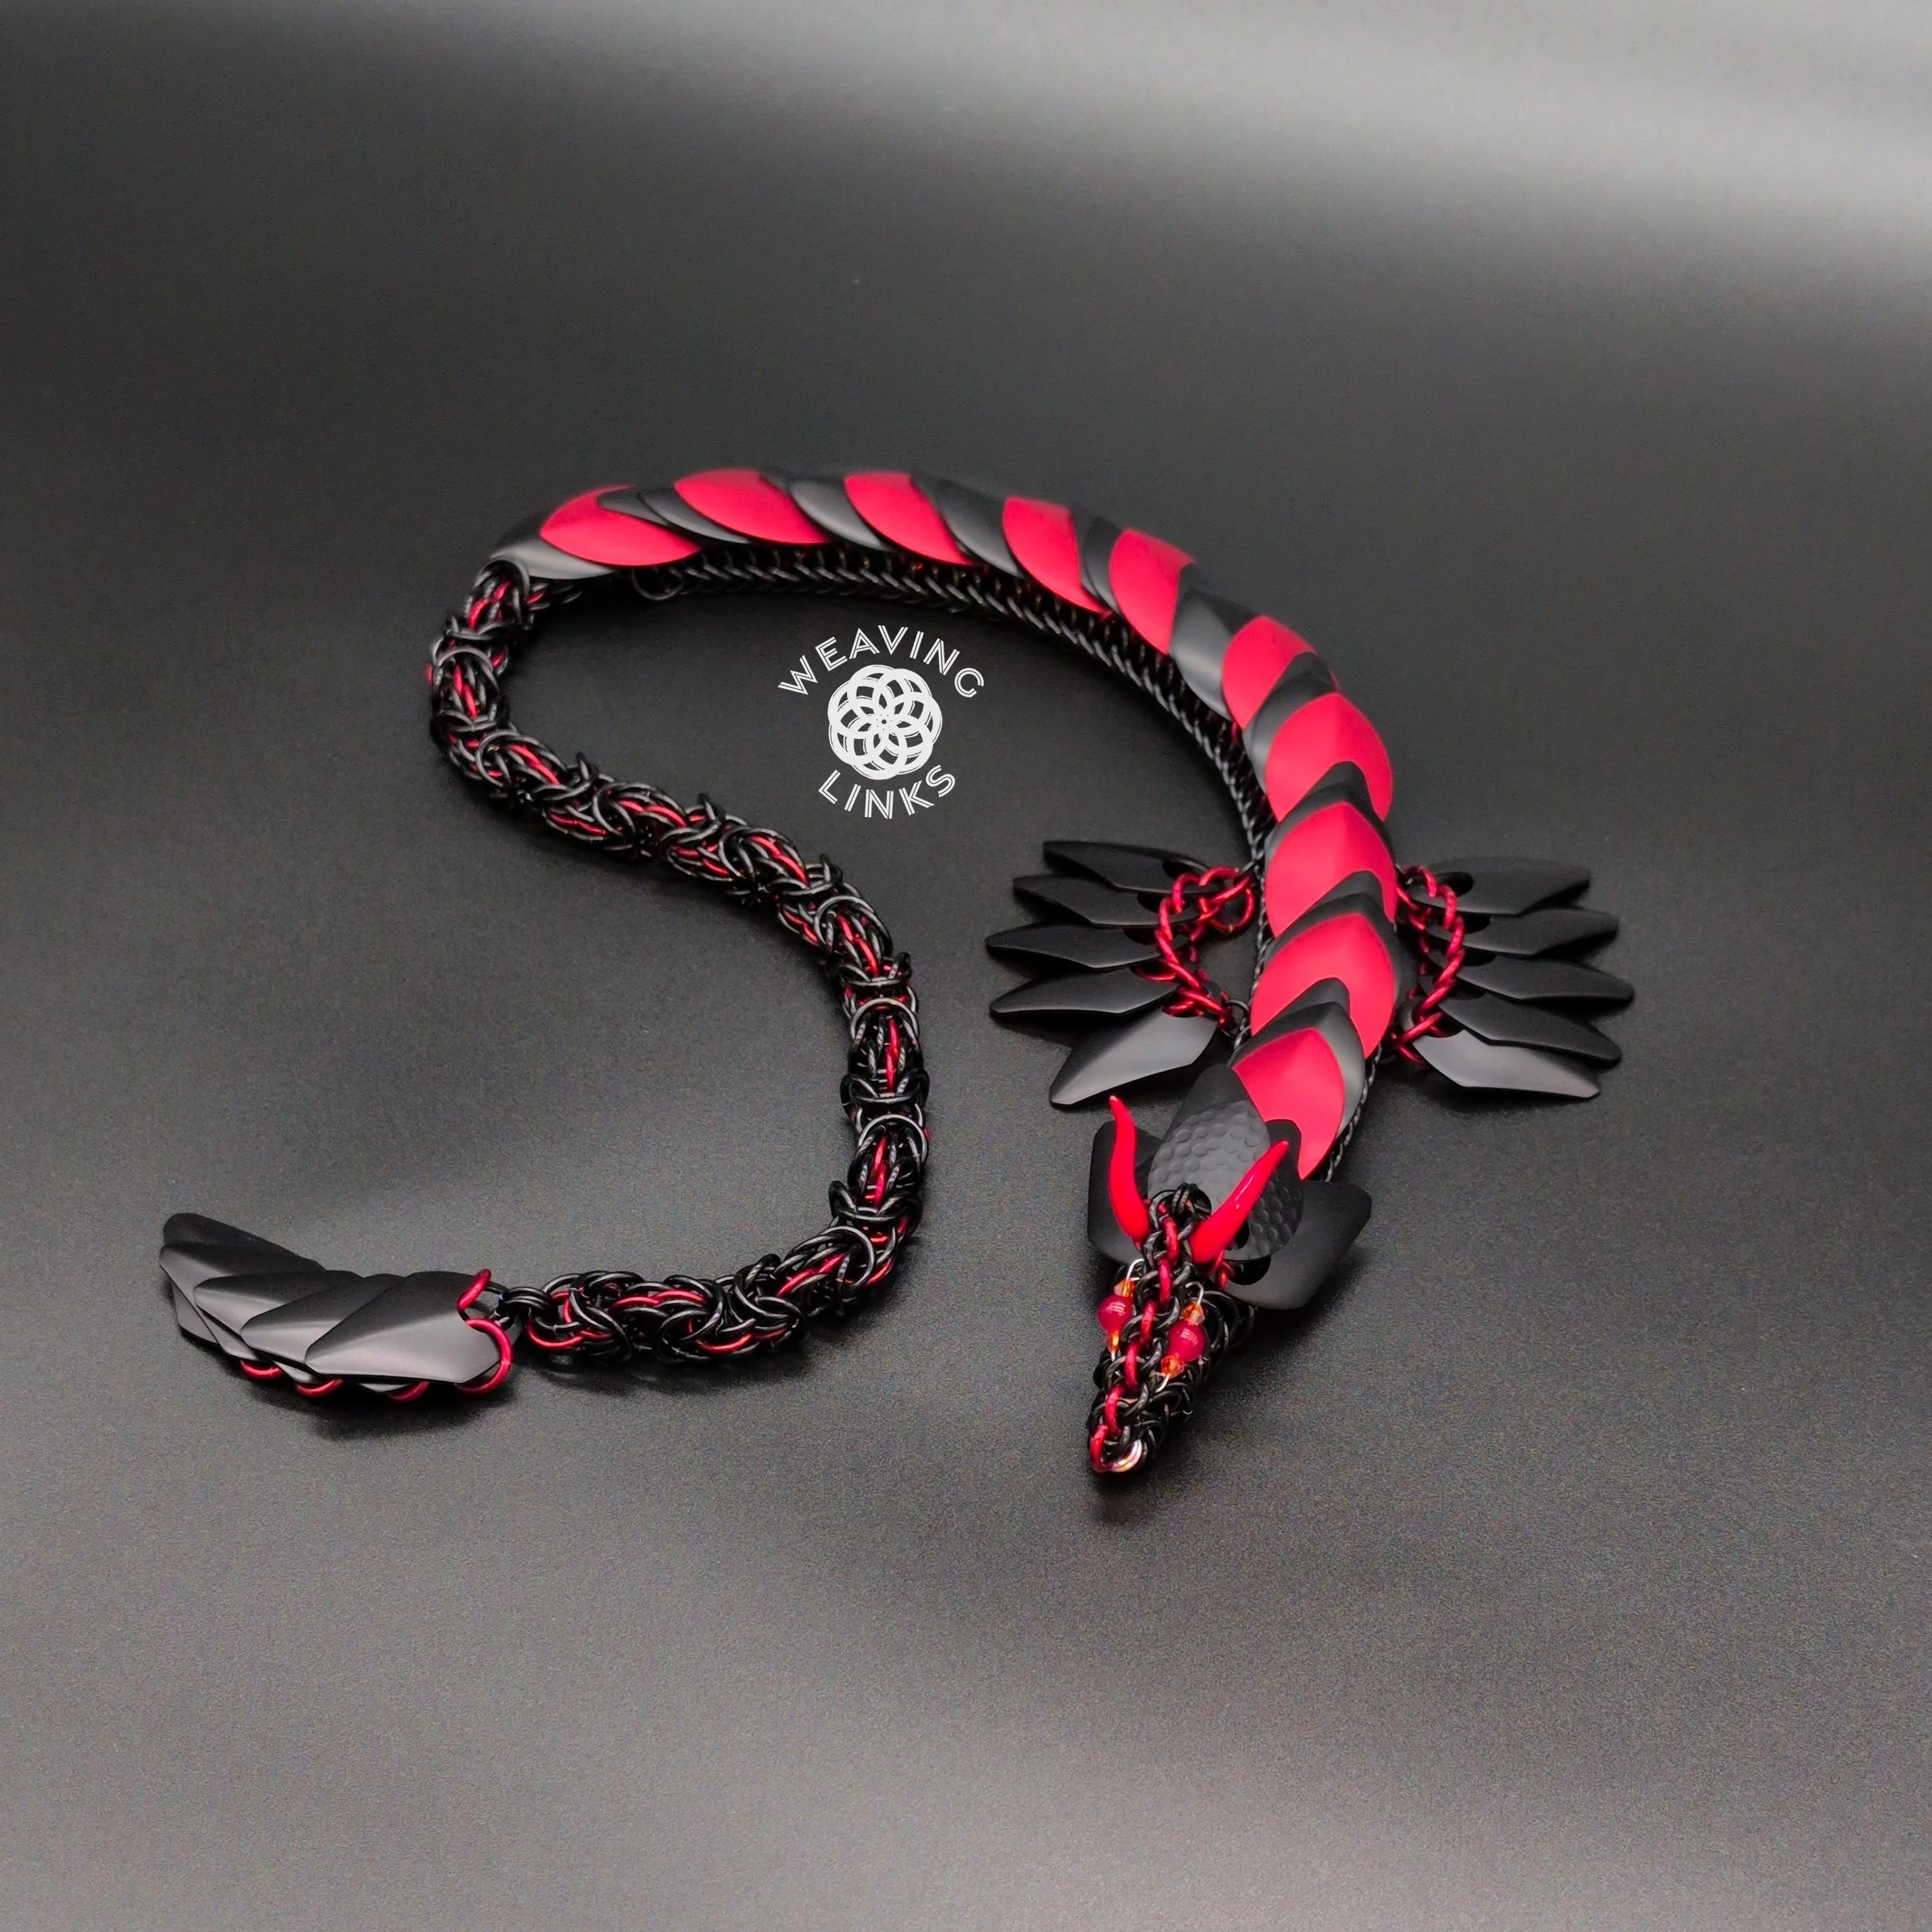
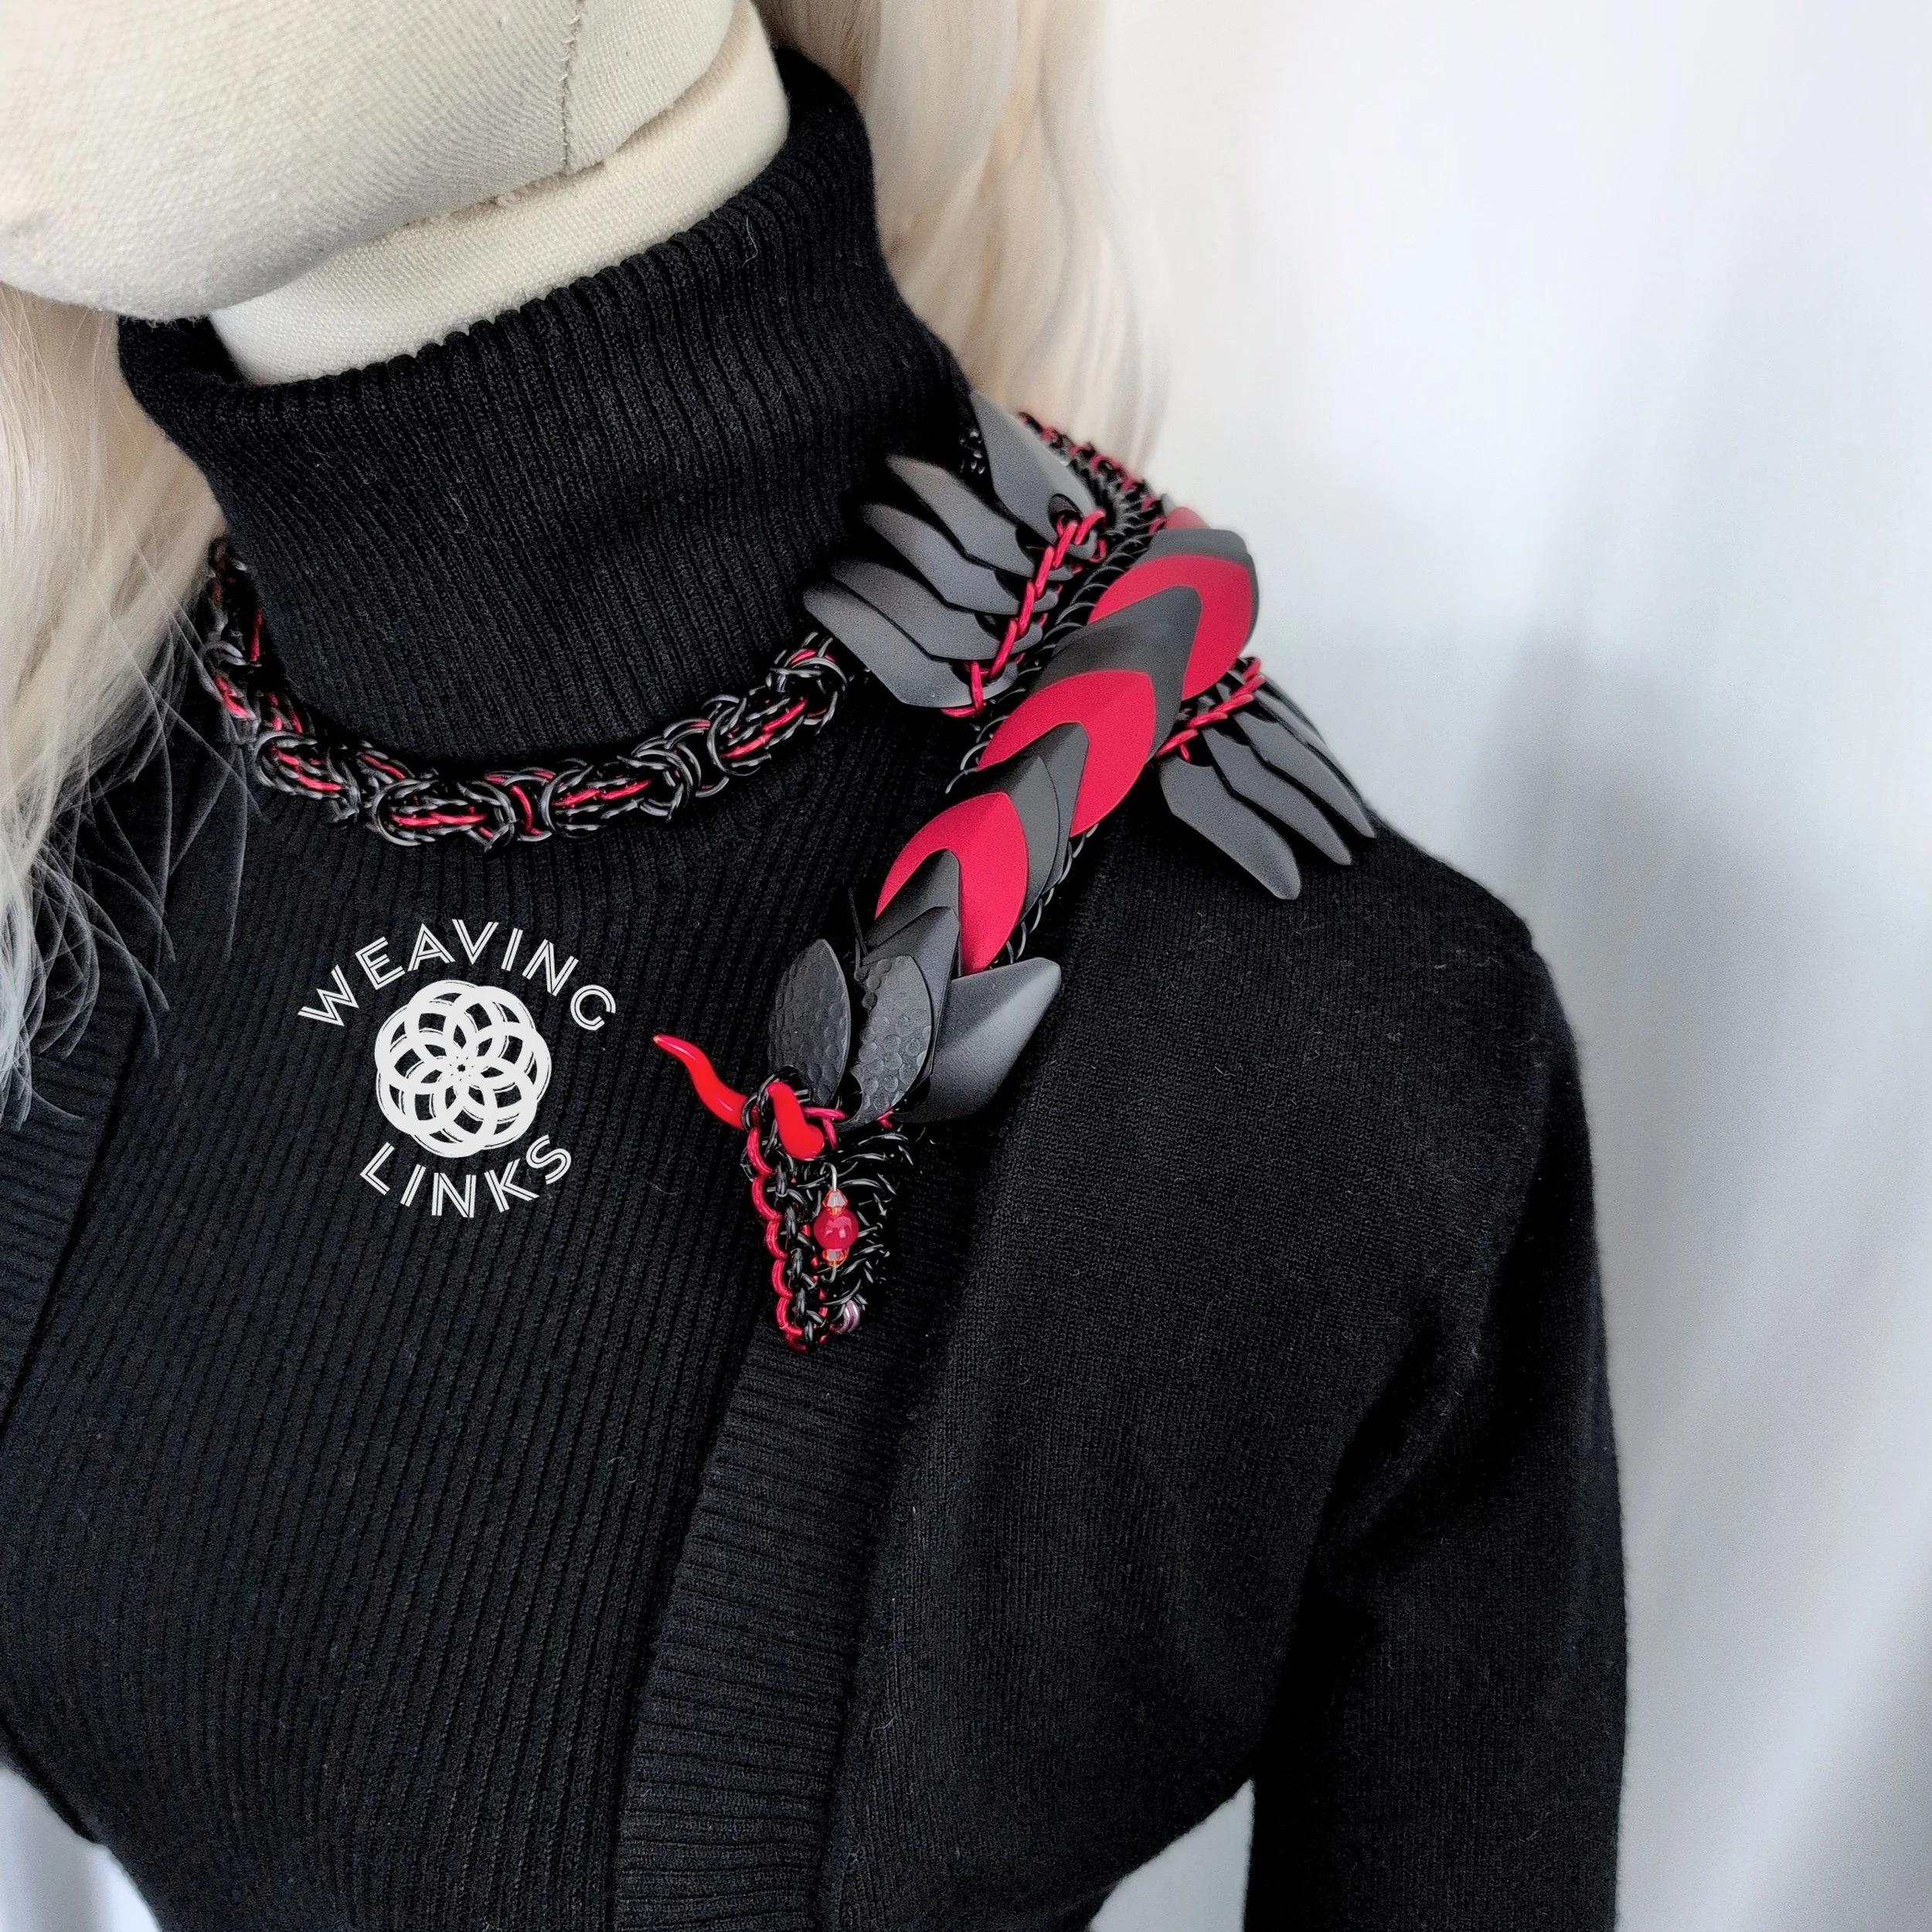


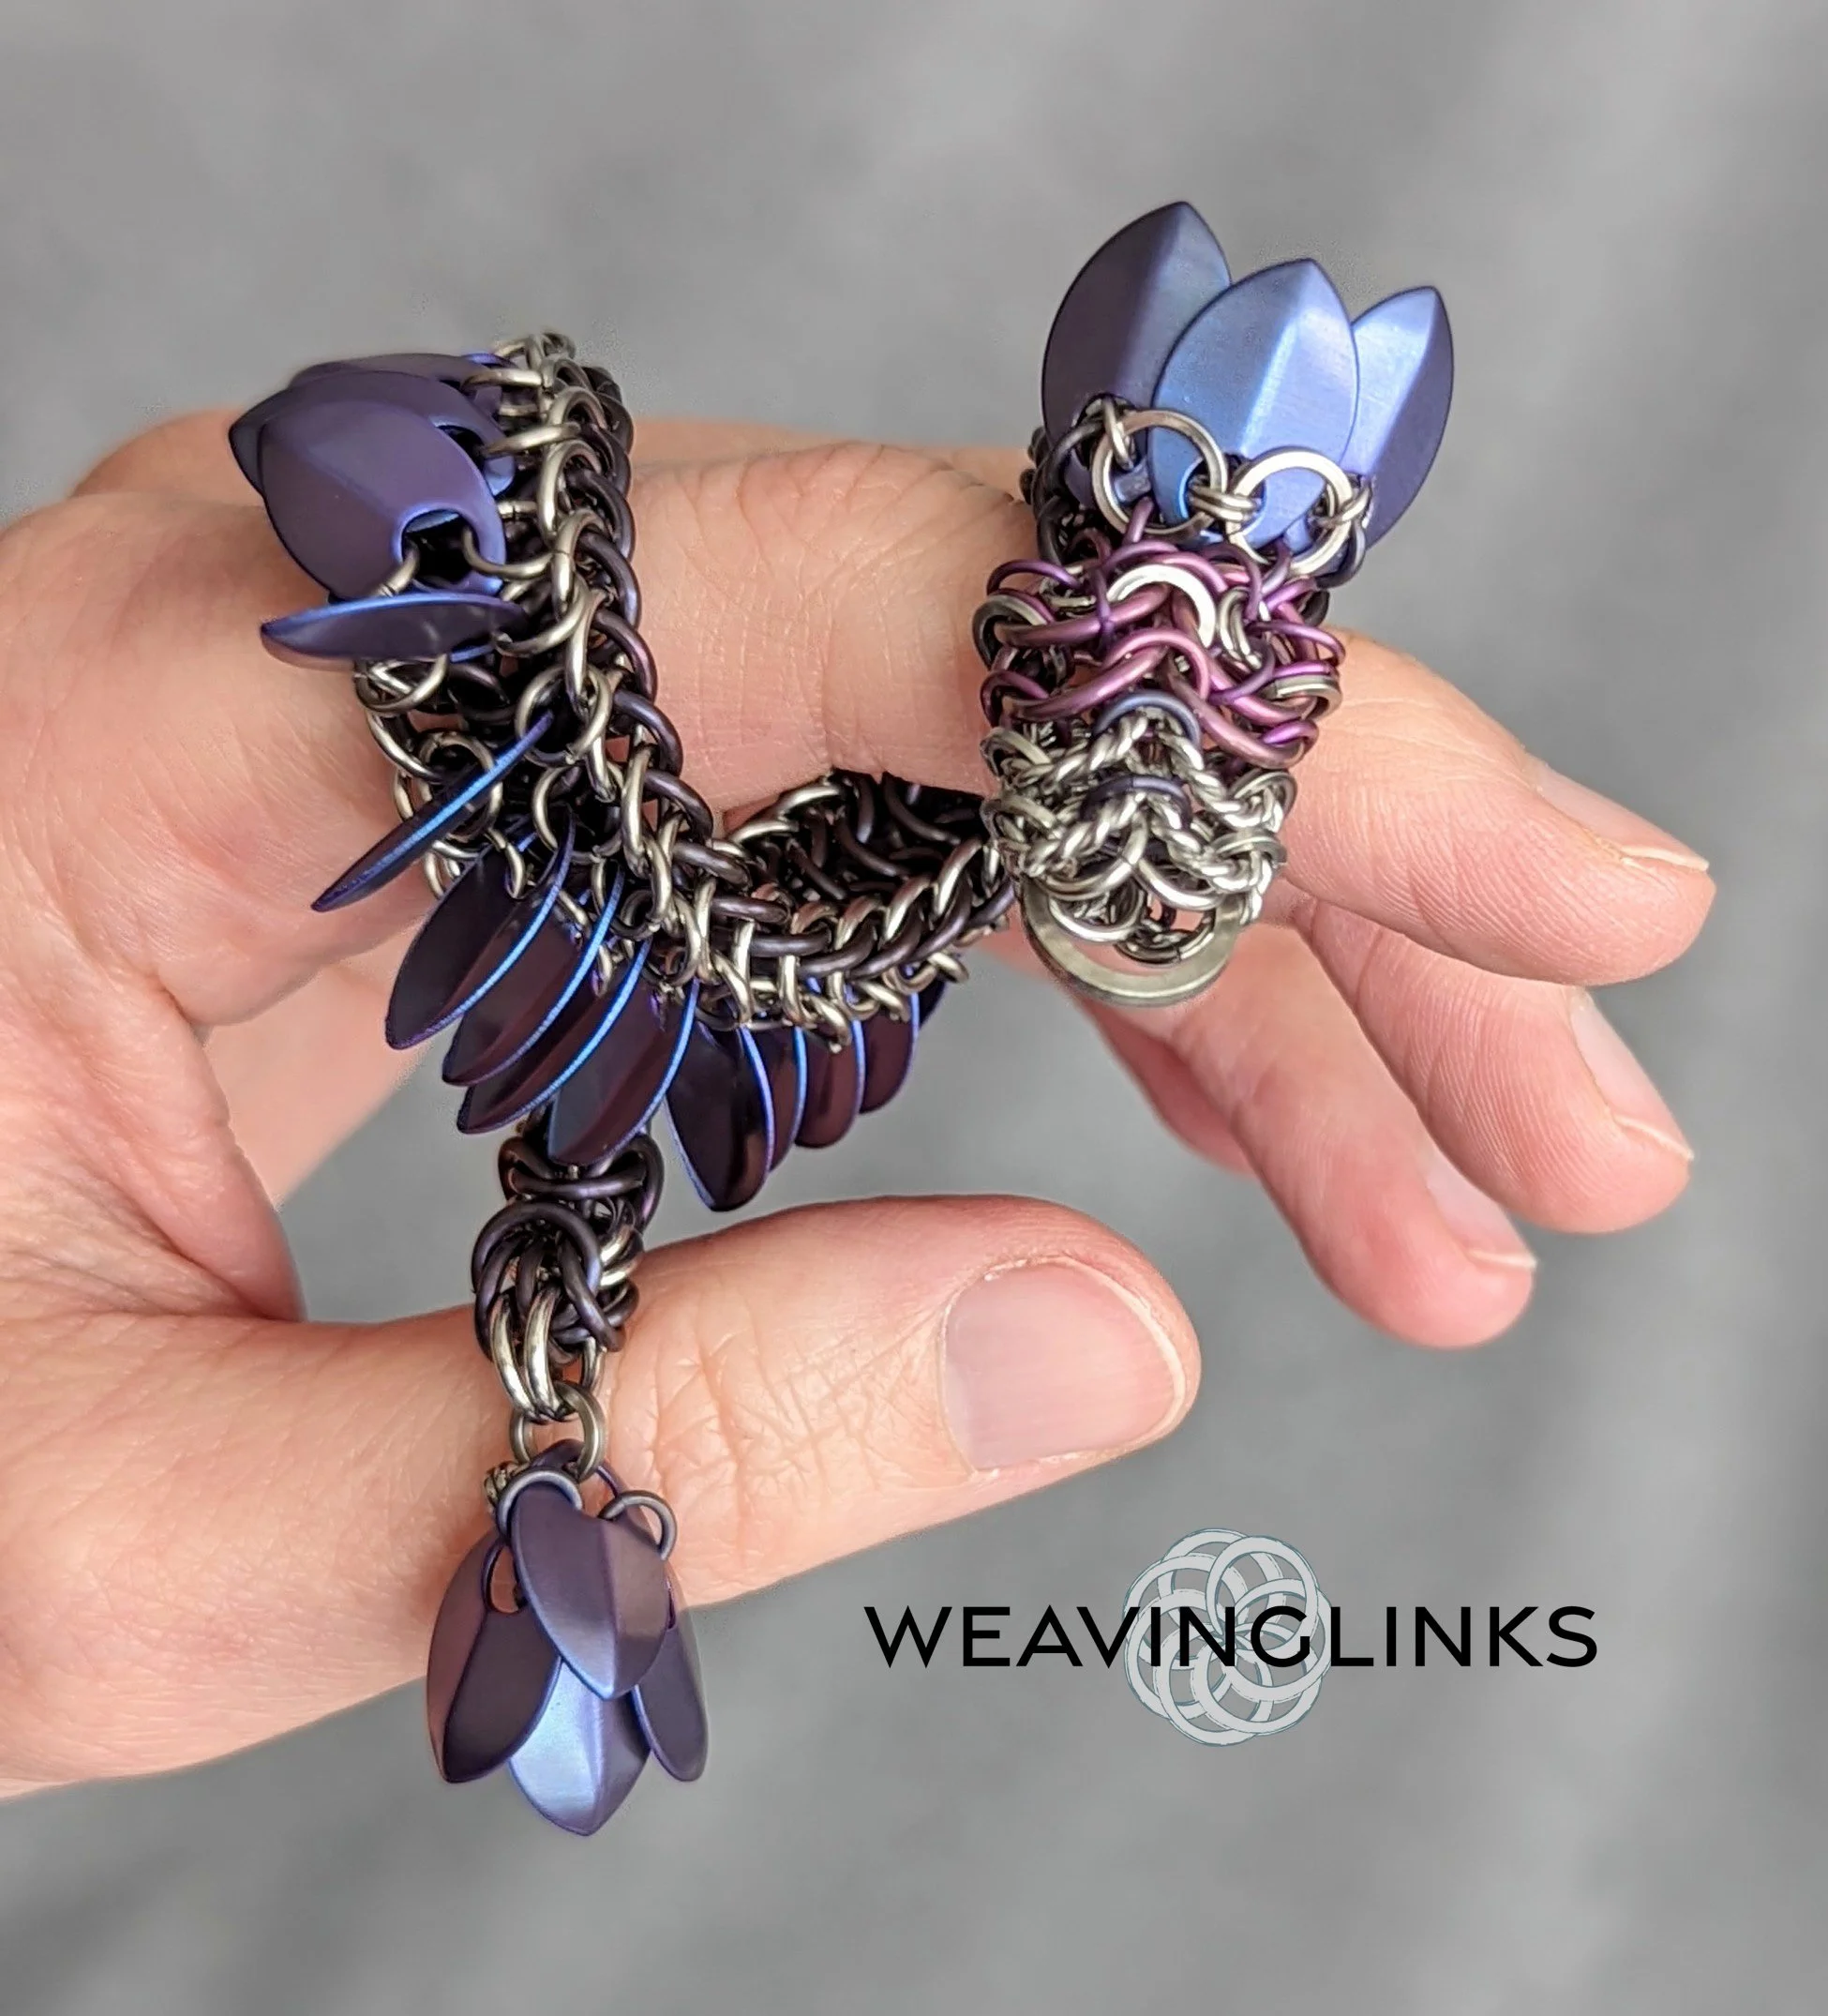
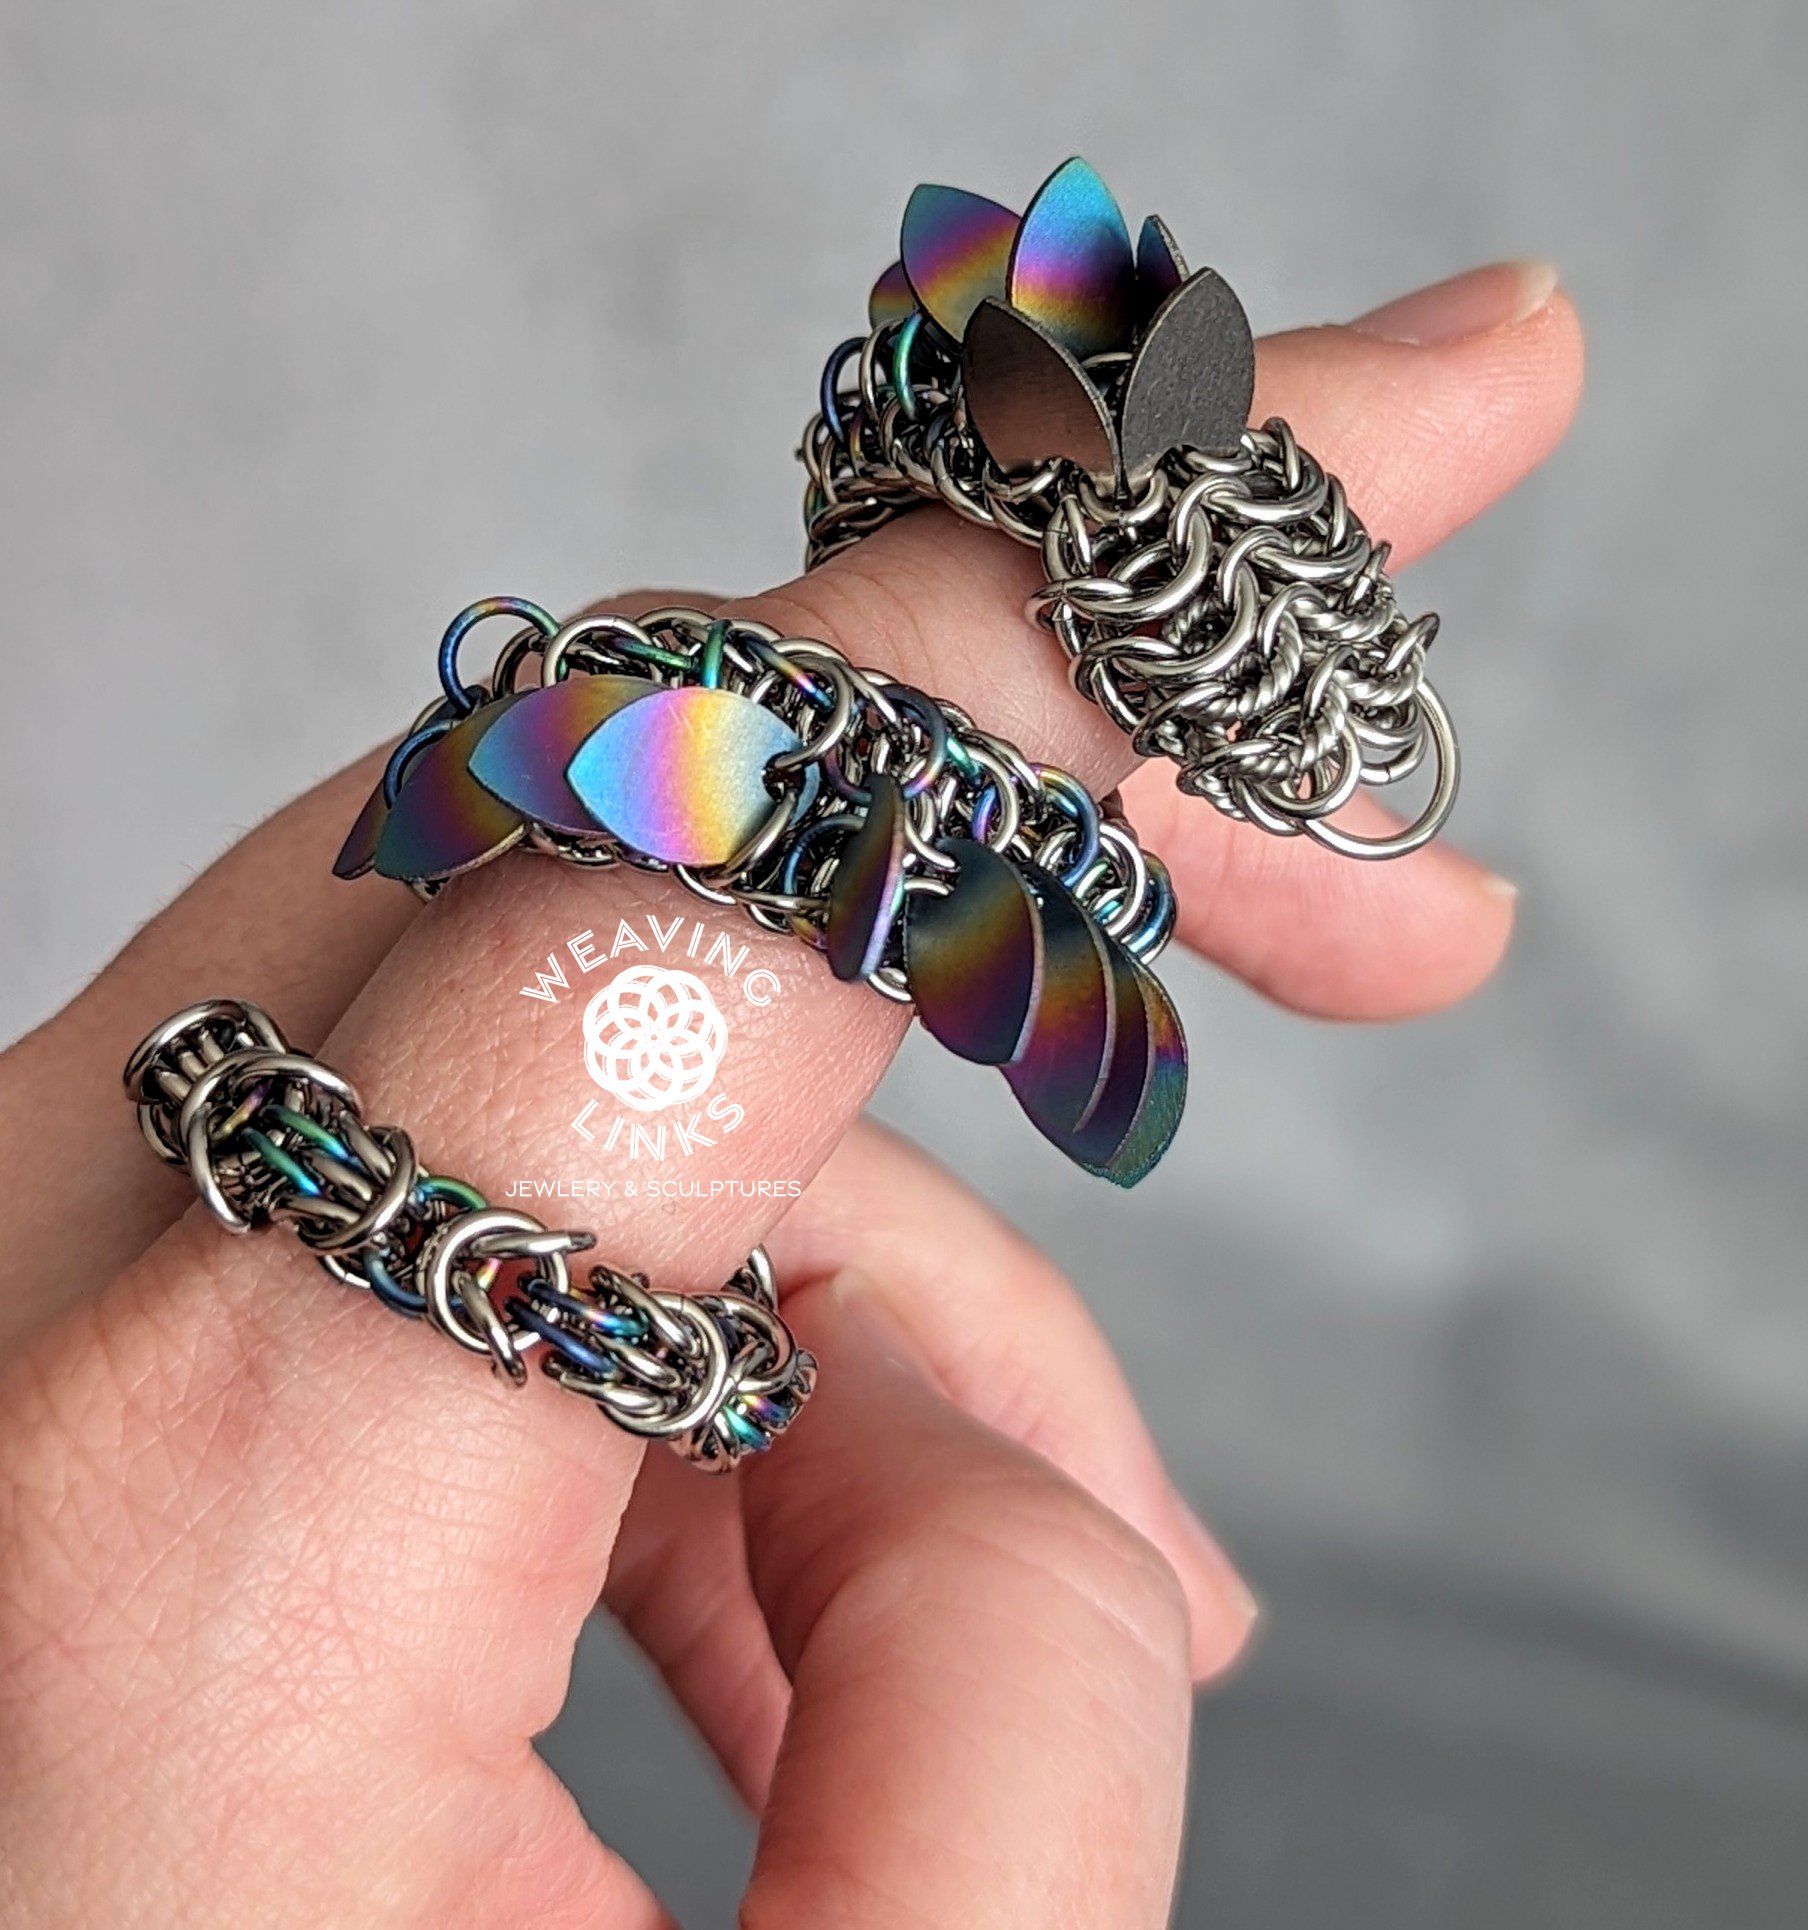
This is a set of instructions for building a dragon pet that you can wear on your hand or around your neck. When you’re not wearing them, they can sit up on their own and look cool. Other dragon designs do not always sit up well after construction is complete--they are sensitive to the varying thickness of anodizing on aluminum. But this dragon will ALWAYS sit up properly. I designed it to work for just about any manufacturer out there, as well as to not be so sensitive to AR. It also only requires four different ring sizes.
When finished, the dragon is flexible, poseable, can sit up tall, or lay down flat. It measures 24 inches from nose to tail.
These instructions contain 34 pages of detailed steps with high resolution photos. It also assumes that you can weave Euro 4 in 1, JPL3, Half-Persian 4 in 1, and be familiar with Byzantine. Some aspects of this dragon are floppy until the last ring is put into place, and some rings go into tight spots. So, I have classified this tutorial as skill-level intermediate.
This tutorial has been tested with rings from Chain Reaction Canada, Chainmail Joe, The Ring Lord, and Weave Got Maille. Scales have been tested from Chain Reaction Canada, Chainmail Joe, The Ring Lord, Weave Got Maille, Steampunk Garage, Meloria Maille, and Draconic Wares.
NOTE: ring and scale sizes not outlined in these instructions have not been tested. If you change the sizes of any of the supplies, it might not work out well. Also, Weave Got Maille measures wire gauge in AWG, so be sure to use their conversion chart before making a purchase for this project.
Have fun! I sure did!
**You may sell the dragons that you make from this tutorial if you credit Weaving Links as the designer. No part of this tutorial may be published or sold without written permission.

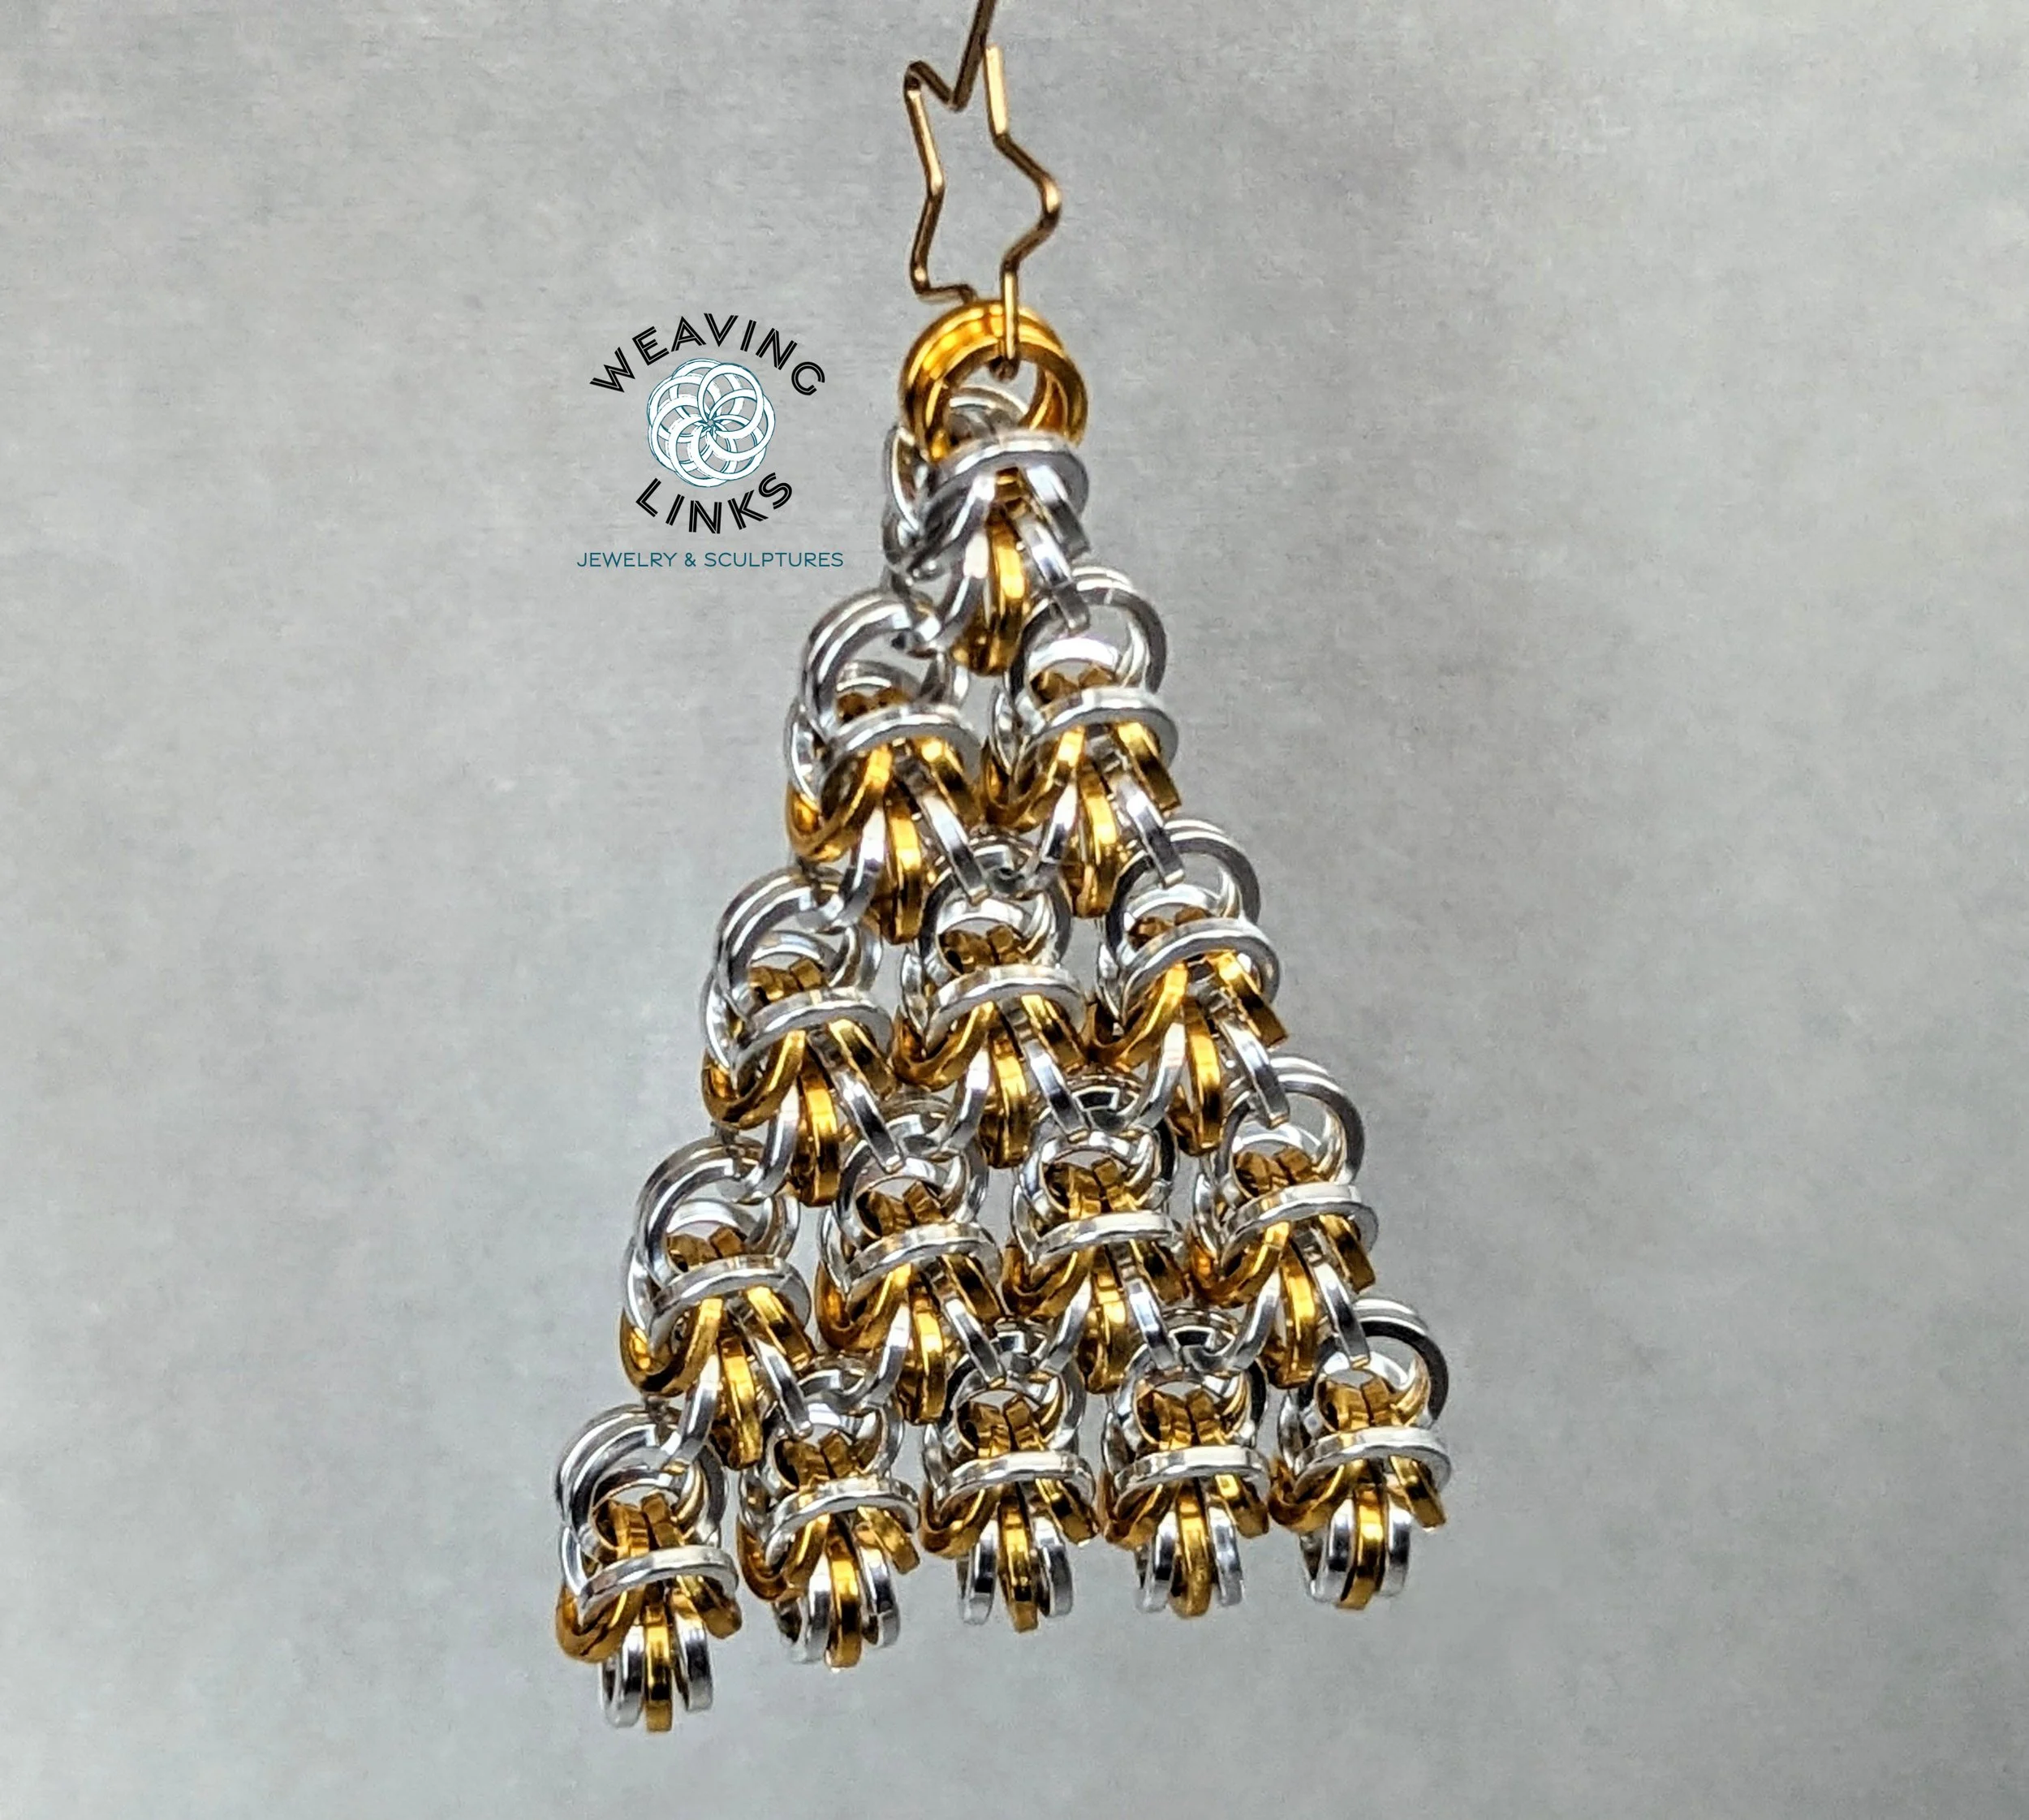


This is a set of instructions for building an ornament in the shape of a tree.
This tutorial assumes that you are familiar with byzantine weave. This is a straightforward design, so I have classified the skill level as beginner. I initially made this ornament with rings made from square wire, but you can make this ornament with regular round wire rings. There are alternative ring sizes in the last section of this tutorial to help you with this.
If you have any questions, please don’t hesitate to send me a message via the Weaving Links webpage, Facebook page, or Instagram. I’m always happy to help!
This tutorial is for personal use only. It, or its contents, may not be reproduced or published without prior written consent. You may sell what you make with these instructions.
Got a special person who need a gift? Not sure what to get them? Let them choose!
They can choose from anything on our website, or they can request a custom item.
Multiple denomination options for your convenience. If you would like something other than what is listed, send us a message.


This is a set of instructions for building four different daisy flower pendants. Two use an 8mm crystal in the center, one a 6mm crystal, and the other uses a 5mm crystal.
These use some very small rings in very small places, and the pendants don’t really hold their shape until near the end. So, I have classified this tutorial as intermediate to advanced.
This tutorial assumes that you can weave byzantine and know how to capture a rivoli crystal. It also assumes you are comfortable working with tiny rings.
This tutorial has been tested with rings from The Ring Lord and Metal Designz. NOTE: other manufacturers, other materials, and different sized rings have not been tested with these instructions. If you change the sizes, it might not work out well.
If you have any questions, please don’t hesitate to send me a message via the Weaving Links Etsy page, Facebook page, or my Instagram.
This tutorial is for personal use only. It, or its contents, may not be reproduced or published without prior written consent. However, you may sell the finished pieces you make and give credit to Weaving Links design.


This is a set of instructions for building two different types of a tiny chainmail dragon. These can be worn as a 14" necklace or wrapped twice around the wrist as a bracelet, and can also sit up on their own.
Skill Level: intermediate
This tutorial specifically shows you how to make these dragons in aluminum. If you would like to use stainless steel or other materials, information for that is here (as well as how to make ear cuffs and headbands):
I recommend making a regular sized dragon before you try this one. There are some very tiny rings that go into awkward spots, so having experience with this will make this project easier.
This tutorial assumes that you can weave dragonback, which is a combination of european 4 in 1 and half persian 3 in 1. It also assumes you can weave byzantine. It also assumes you have familiarity with scalemail. Chainmail101 and The Ring Lord are good resources for these.
This tutorial has been tested with rings and scales from The Ring Lord and Chainmail Joe. Different manufacturers sometimes have slight differences in rings even when they are listed as the same size. So, I have made notes where slight changes in AR affect the quality of the overall dragon and have made suggestions for alternate sized rings. NOTE: Chainmail Joe does not make scales or the smallest sized rings that you will need for this dragon, so you will not be able to get all your supplies from him.
This tutorial is for personal use only. It, or its contents, may not be reproduced or published without prior written consent. You may sell the finished product and give design credit to Weaving Links.


This is a set of instructions for building five different versions of the Serenity Pendant. There are three different sizes made with a mix of stainless steel, copper, and titanium. And, there are two different sizes made with aluminum.
There are lots of very small rings that go into very tight places, so I have classified this tutorial as intermediate to advanced.
This tutorial also assumes that you can weave byzantine and are comfortable capturing rivolis or chatons.
This tutorial has been tested with rings from The Ring Lord and Chainmail Joe. NOTE: different sized rings and other materials have not been tested with these instructions. If you change the sizes or materials, you might need to make adjustments.
If you have any questions, please don’t hesitate to send me a message via the Weaving Links Etsy page, Facebook page, or Instagram.
This tutorial is for personal use only. It, or its contents, may not be reproduced or published without prior written consent. You may, of course, sell what you make.


Skill Level: Beginner
This is a set of instructions for building a wreath ornament with a captured rivoli crystal in the center. I made this after I had just learned the basic principles of capturing rivolis and wanted to practice to make sure I had learned it correctly. Christmas was coming up, so I sat down to make a bunch of ornaments and tried to figure out how to capture rivolis in them. This wreath was one of the results.
This tutorial assumes that you can weave Celtic Visions, or that you are at least familiar with it. If you don’t know this weave, there are free resources which can help you learn it. Chainmail 101 has a free tutorial, and Chainmailbasket.com also has plenty of resources.
This tutorial has been tested with anodized aluminum rings from The Ring Lord and Chainmail Joe. The center ring has been tested with rings from Metal Designz and The Ring Lord. For this wreath, rings from The Ring Lord tend to give a tighter weave than rings from Chainmail Joe. So, I indicate areas where you can make adjustments.
If you have any questions, please don’t hesitate to send me a message!!
This tutorial is for personal use only. It, or its contents, may not be reproduced or published without prior written consent.


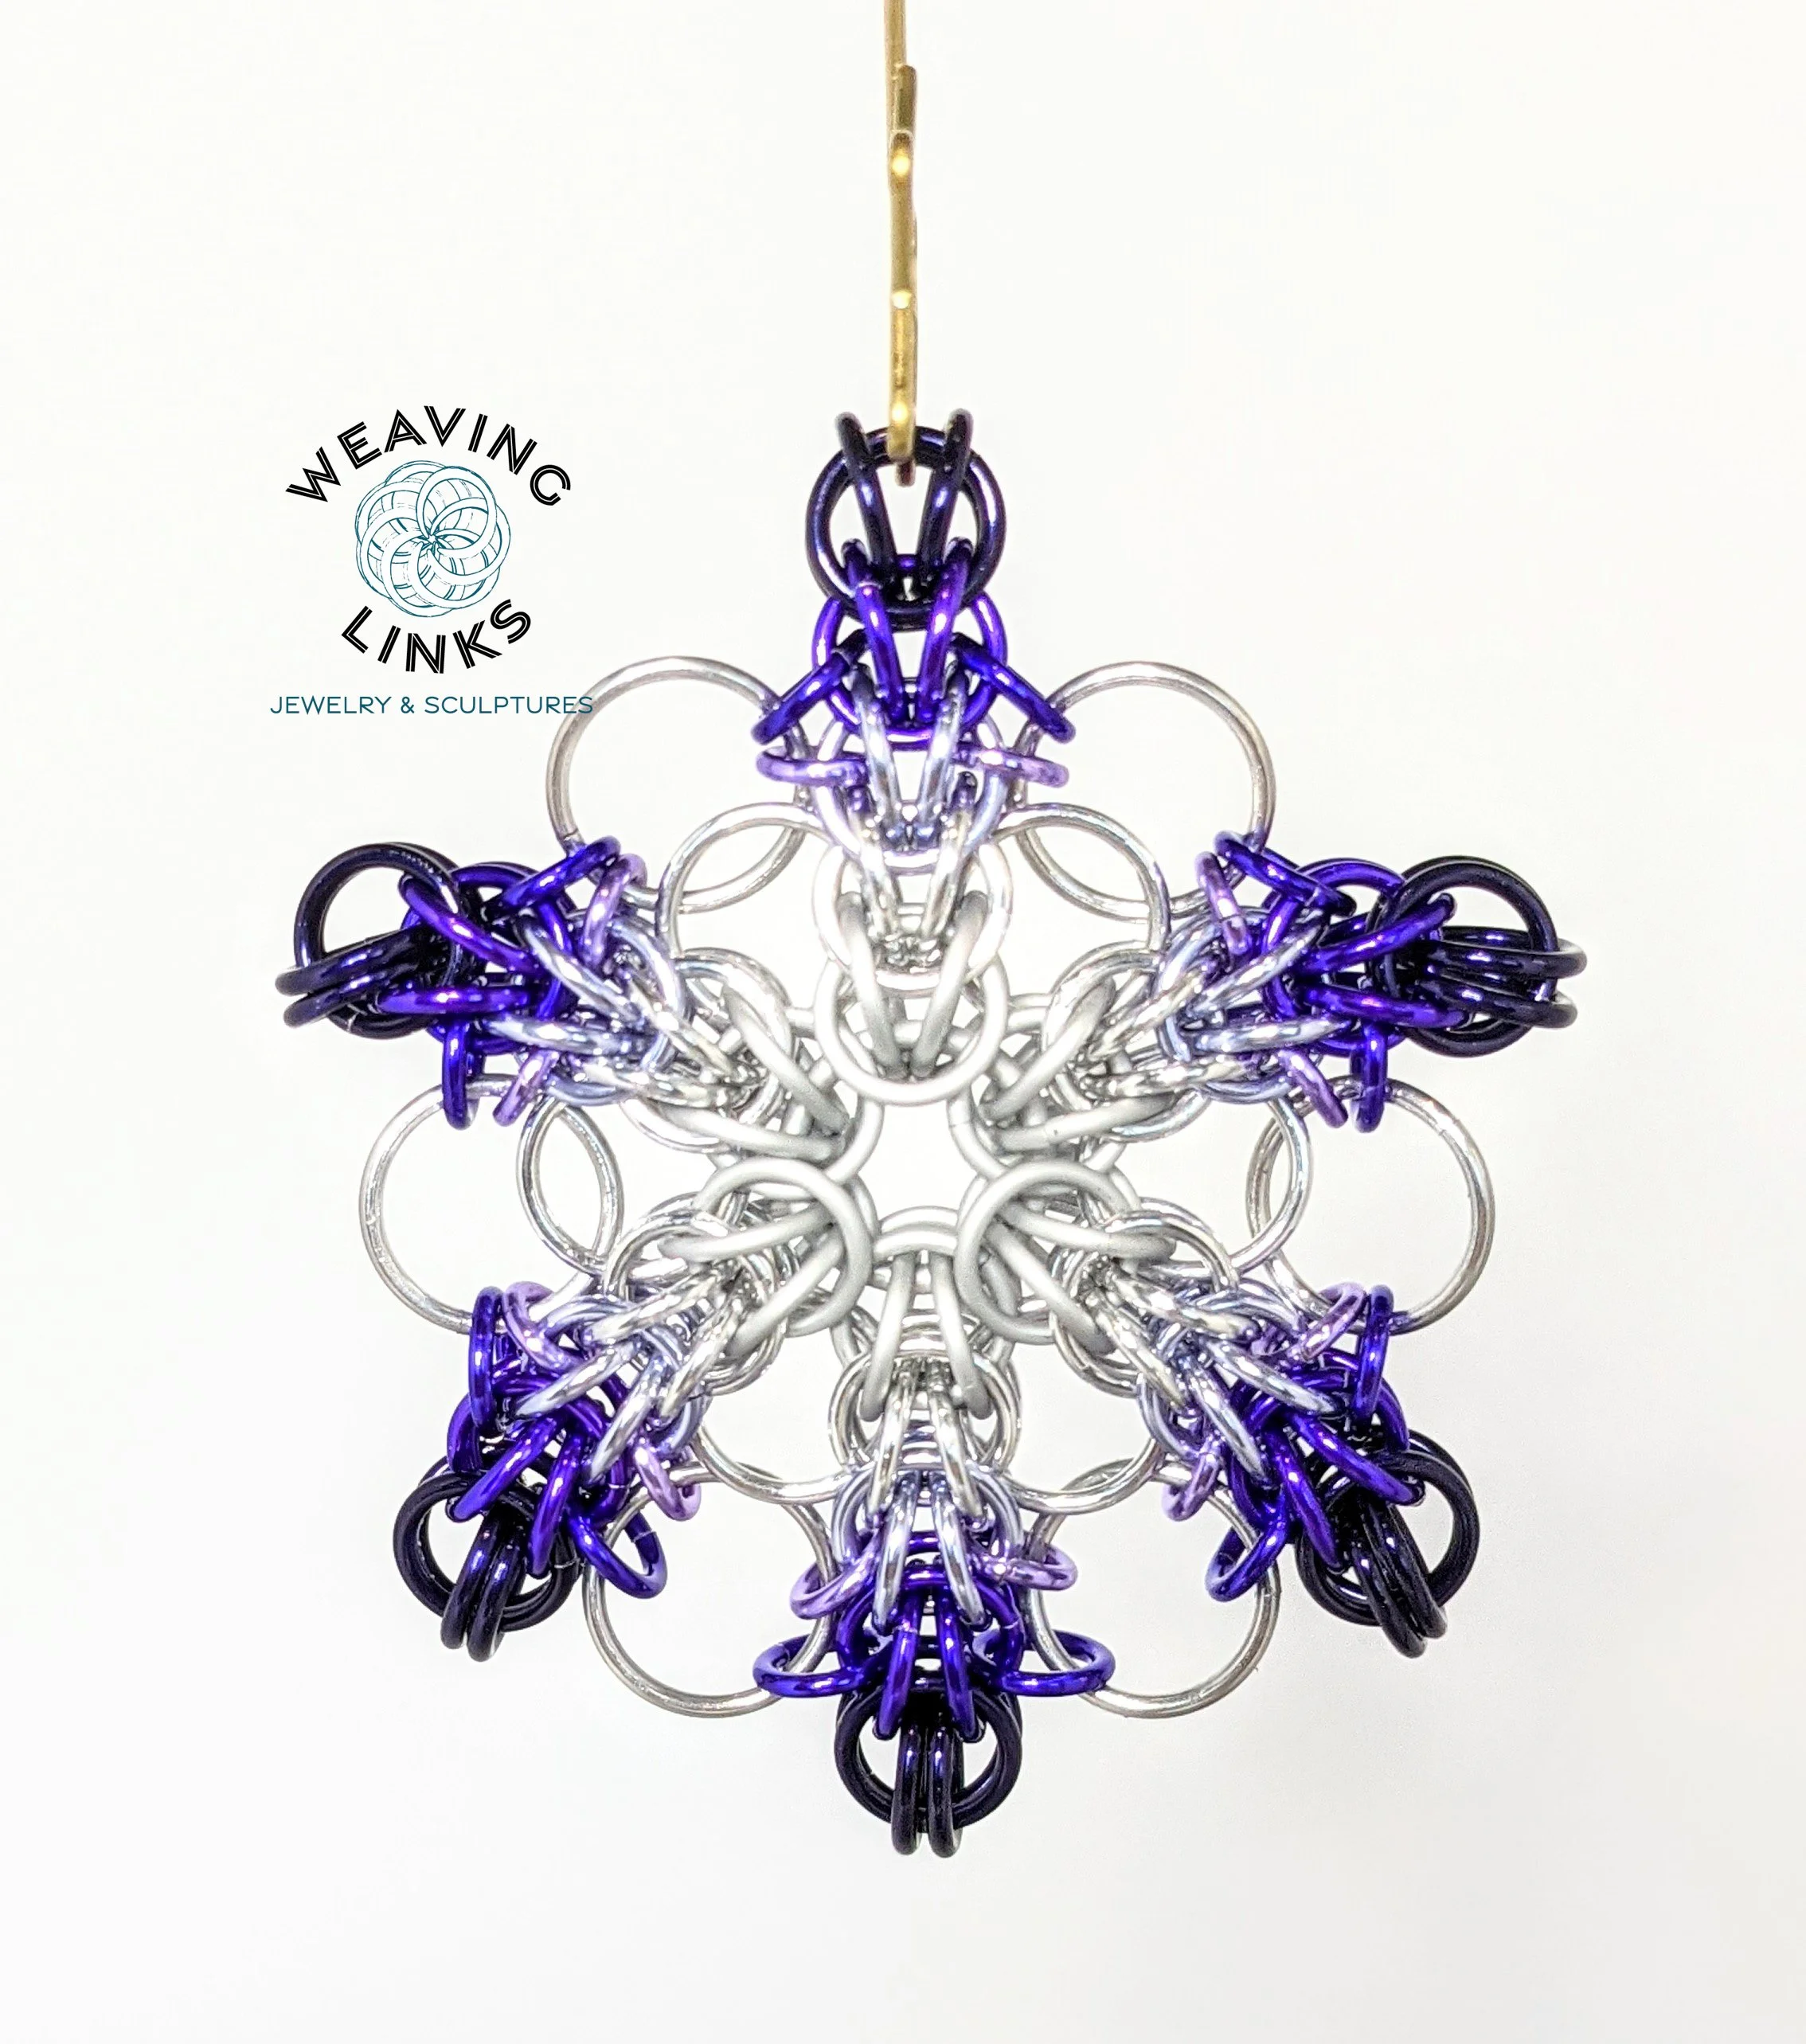


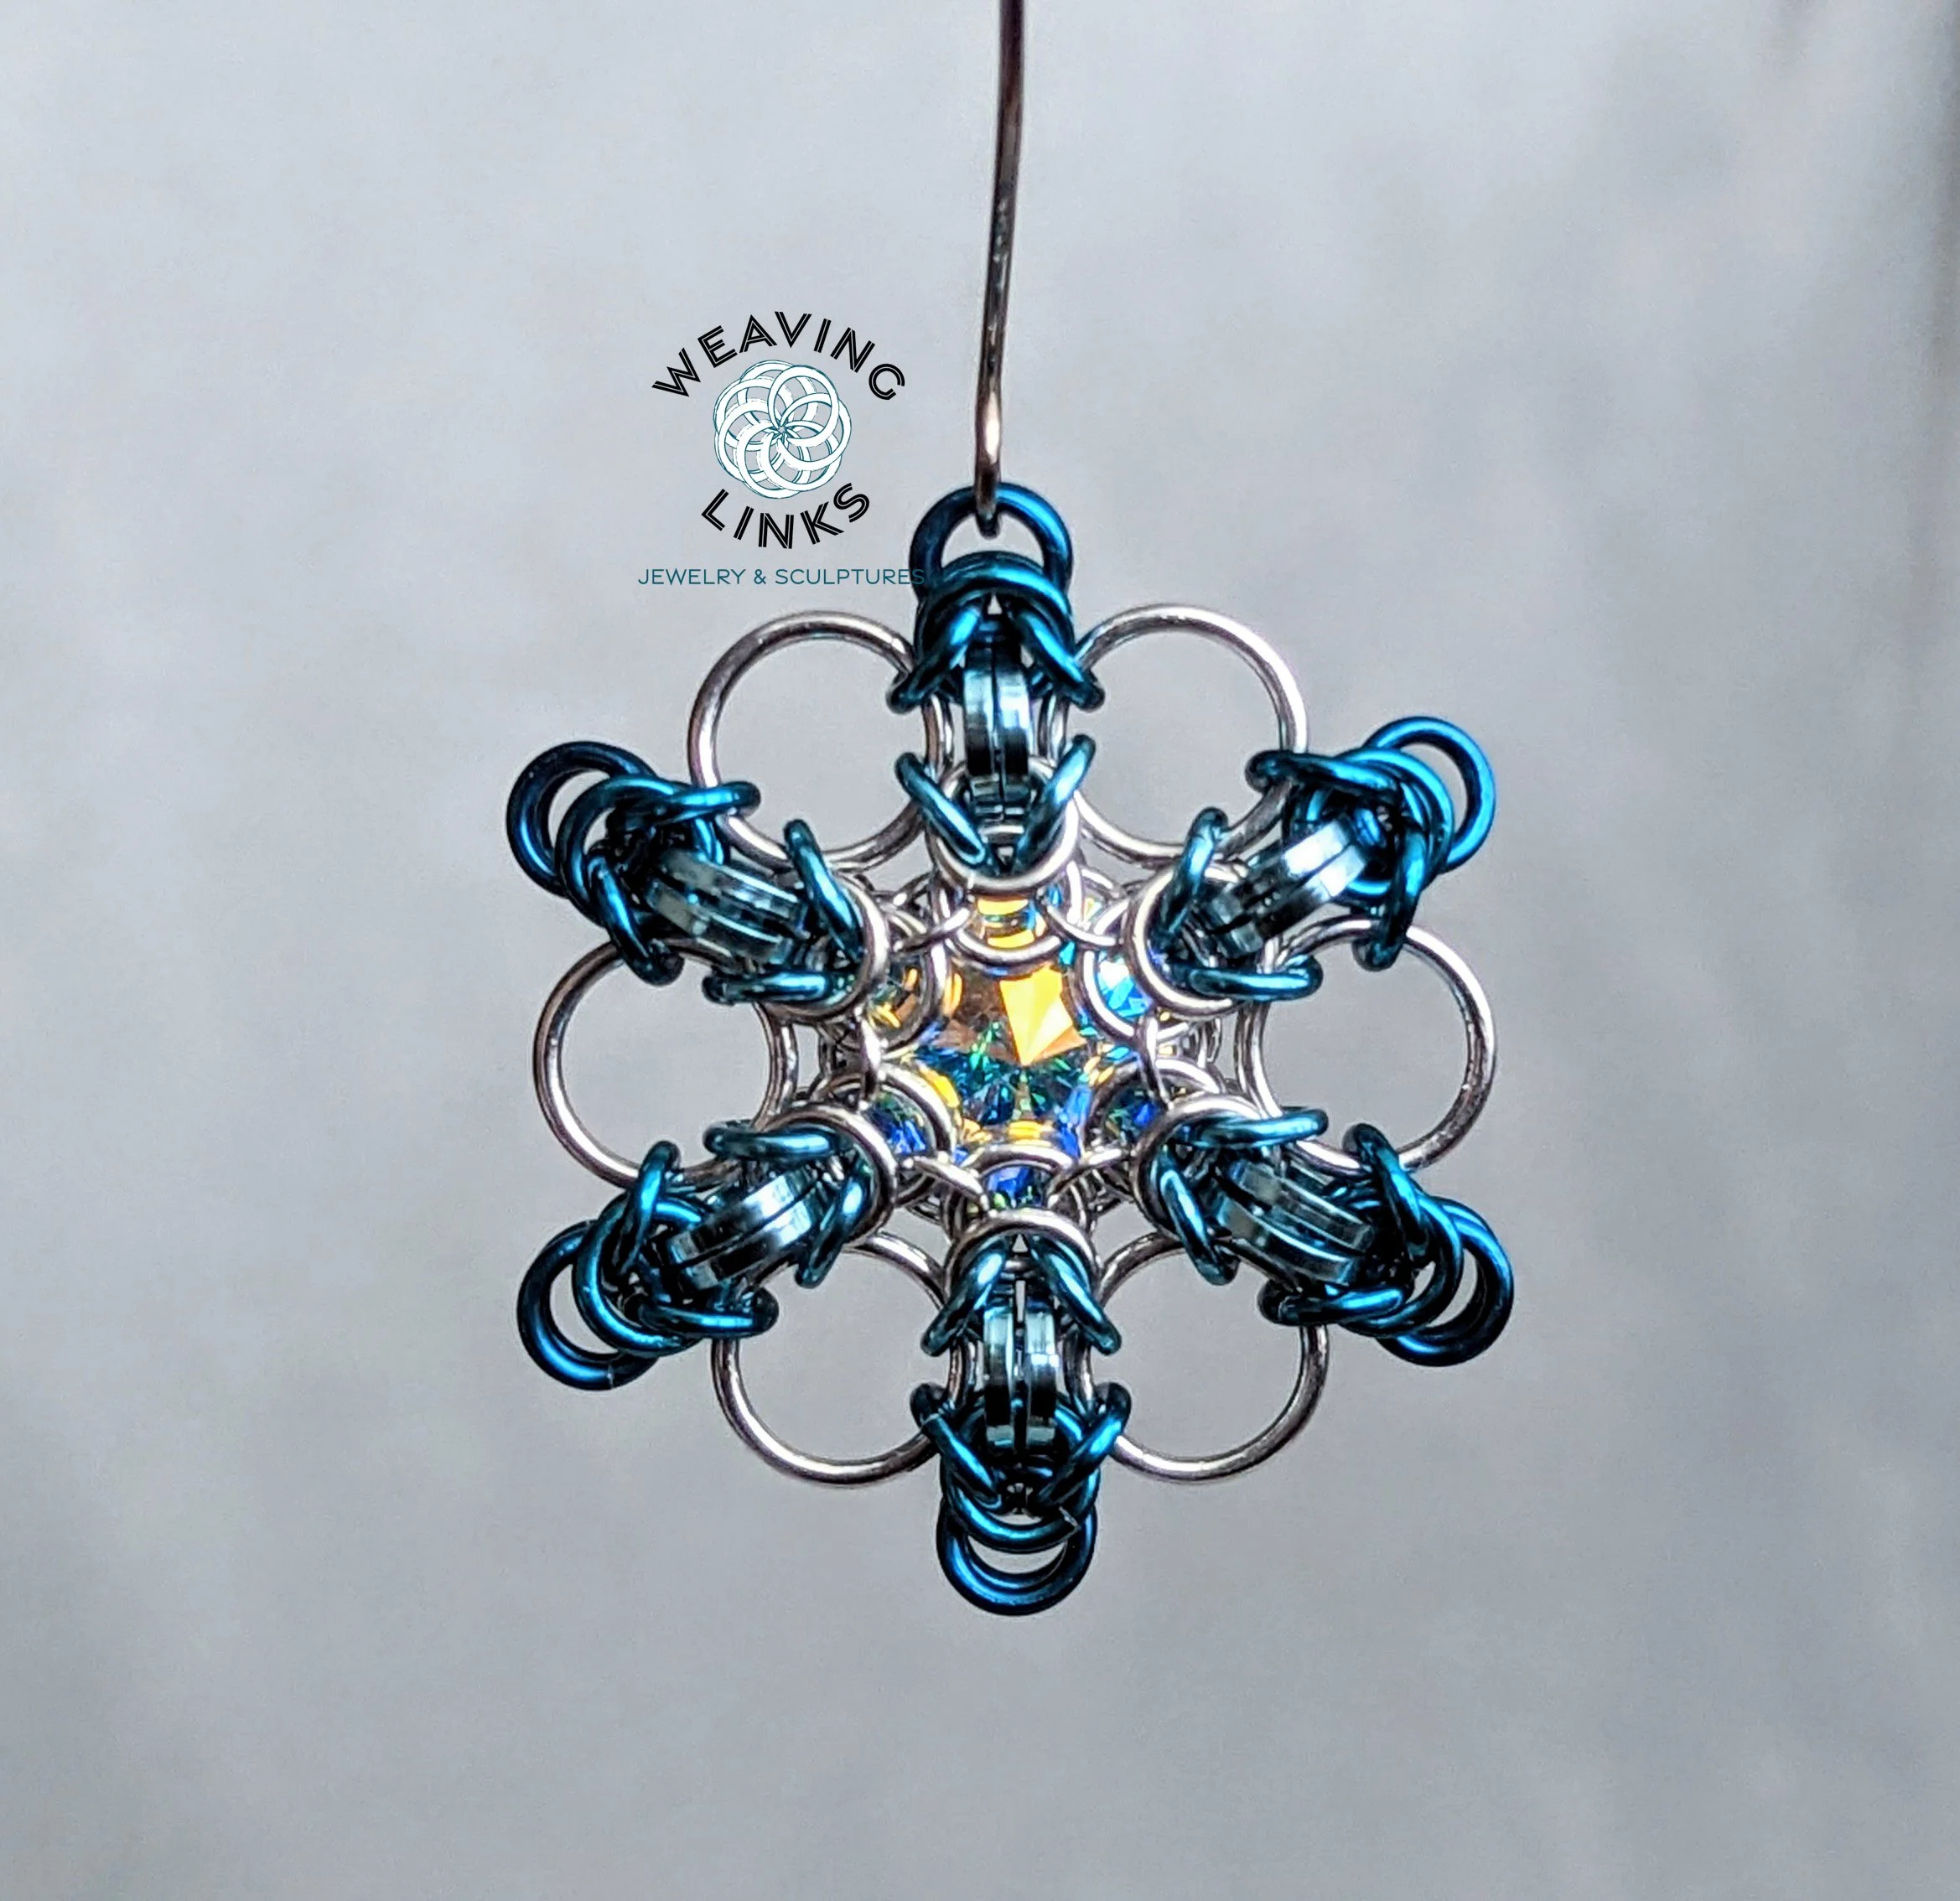
This is a set of instructions for building snowflake ornaments. A wonderful customer asked me to make a snowflake ornament, and, after much fiddling around, this was the result! I like to play with color, so I created an ombre pattern with different shades of blue. Then, I made a steampunk version. There are both versions in these instructions, with multiple color options for each. I illustrate how to lay out the color in two different ways.
Recommended skill level: beginner
This tutorial assumes that you can weave full persian, or are at least familiar with it. If you don’t know this weave, there are free resources which can help you learn it. Chainmail 101 has a free tutorial, and Chainmailbasket.com also has plenty of resources.
If you have any questions, please don’t hesitate to ask. Have fun!!
**You may sell the ornaments that you make from this tutorial, just credit Weaving Links as the designer. No part of this tutorial may be published or sold without written permission.


Skill Level: Experienced Beginner
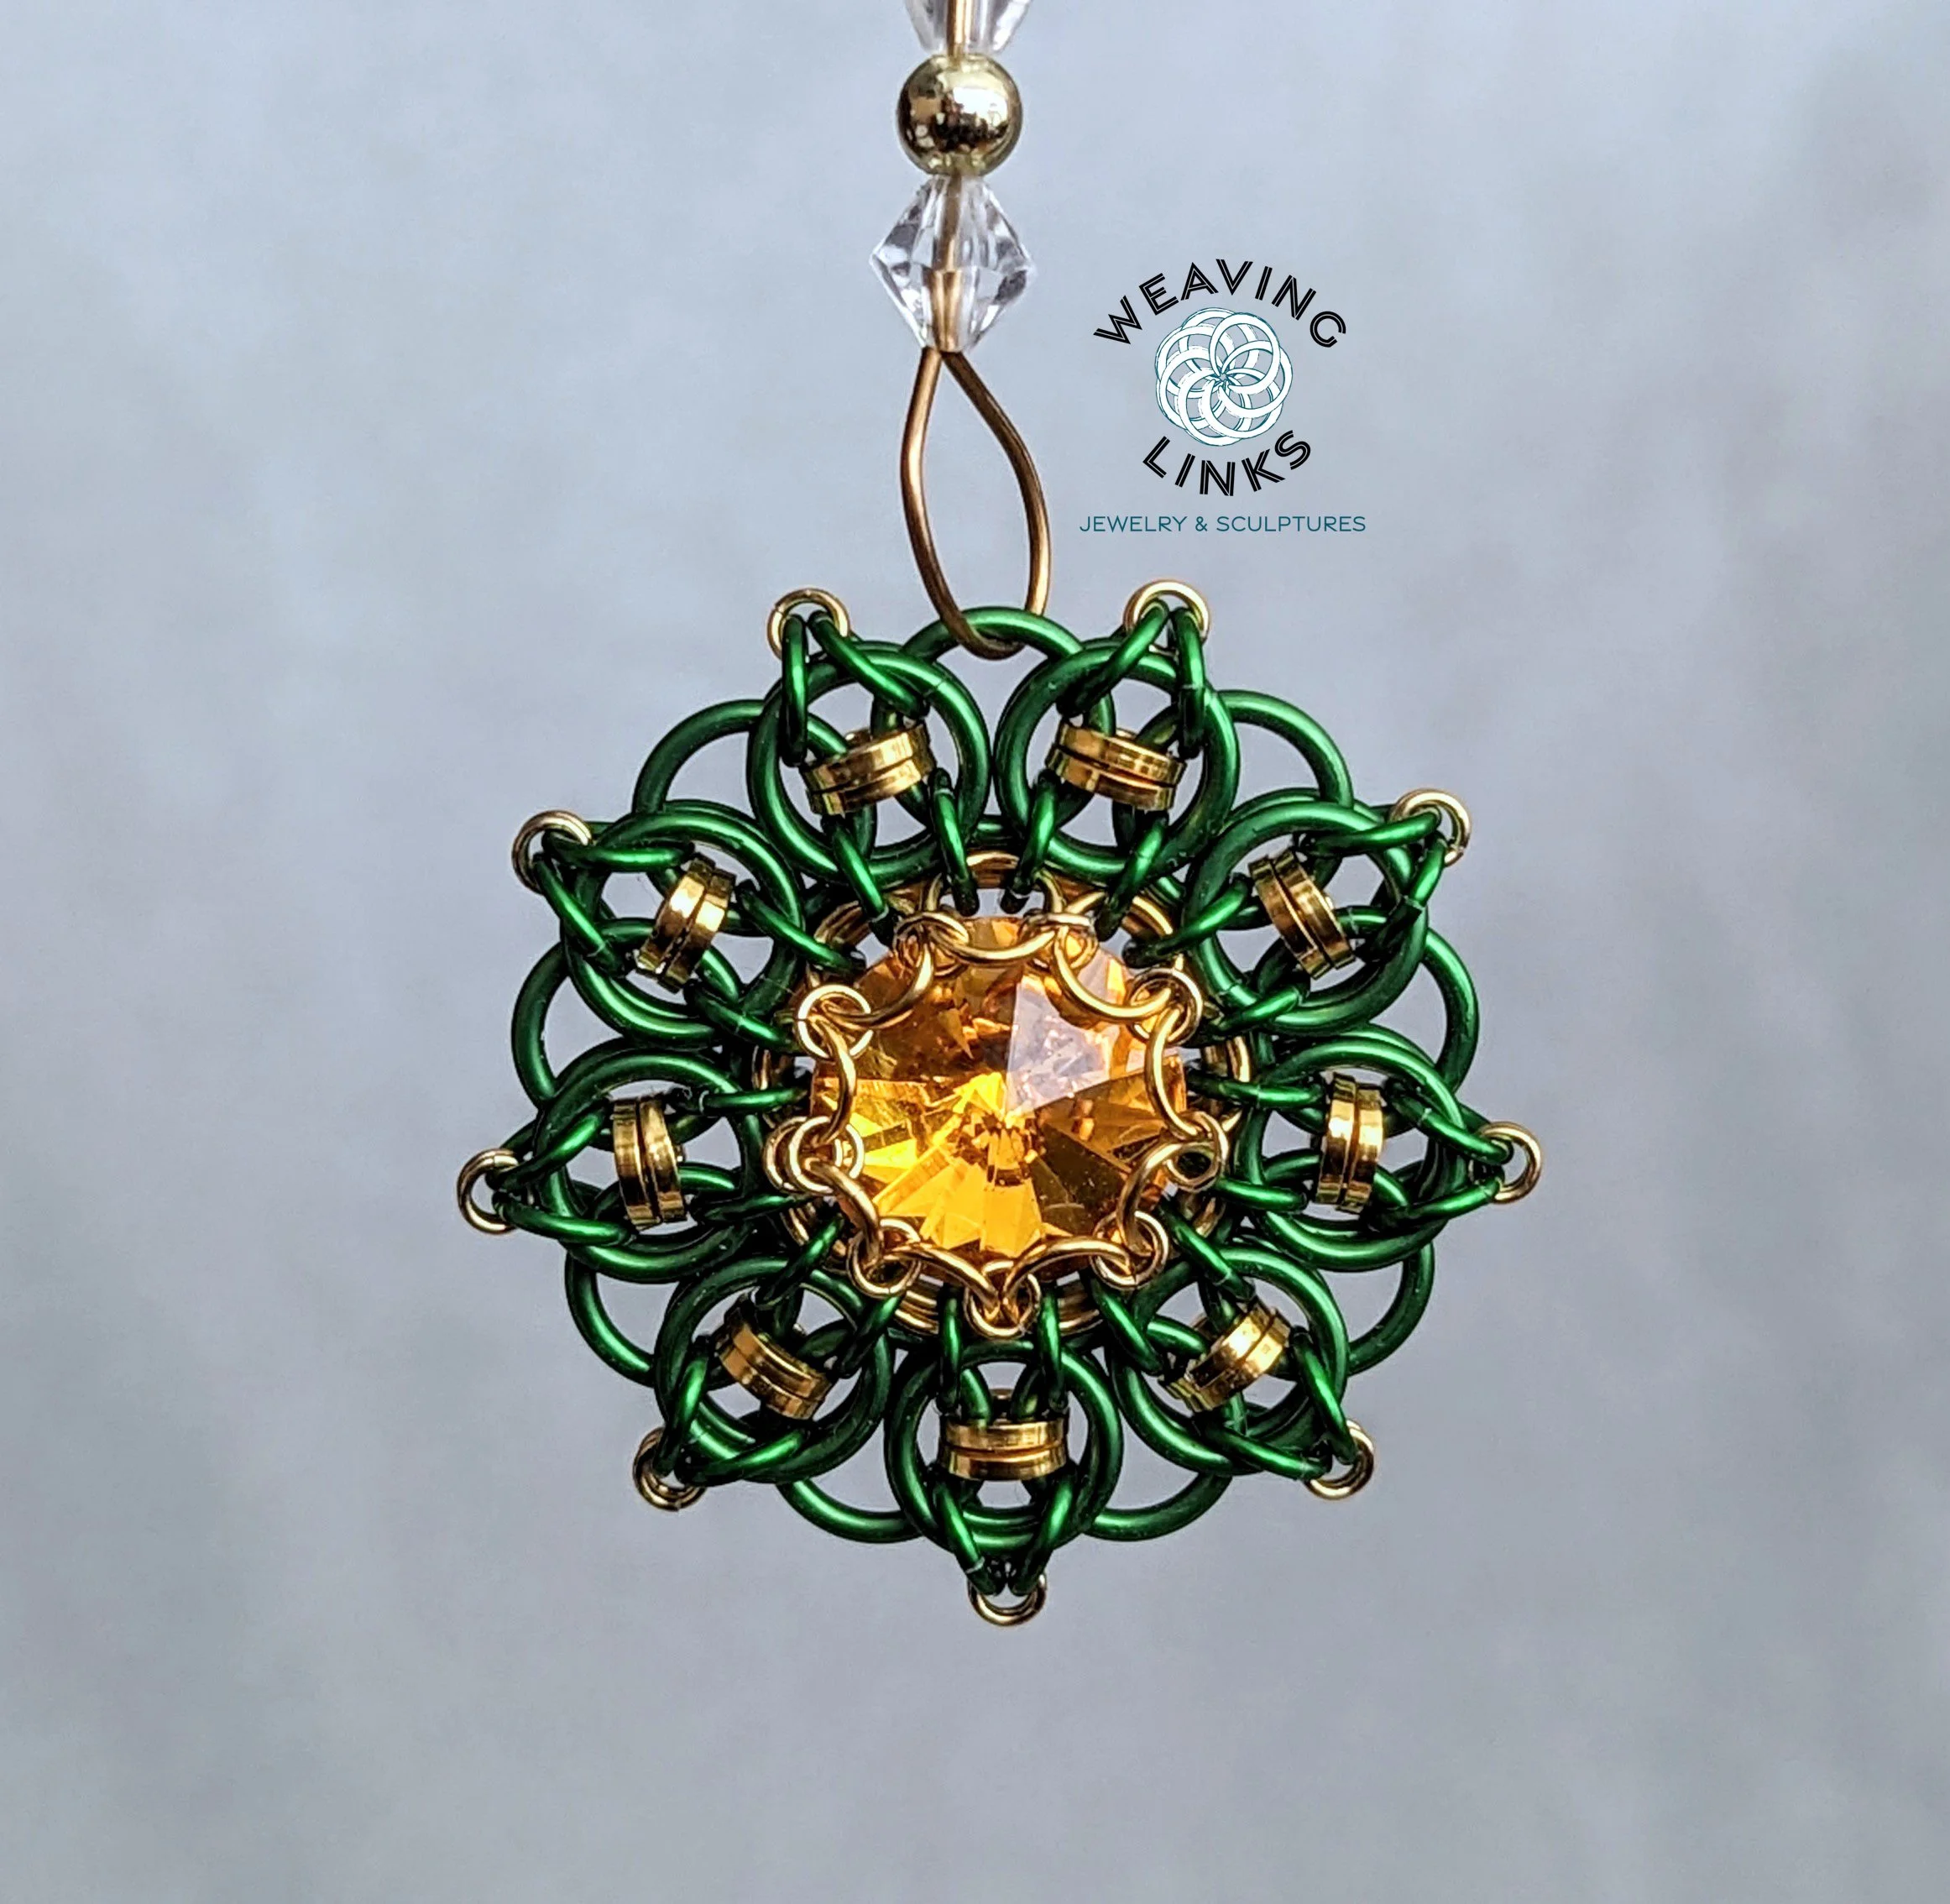
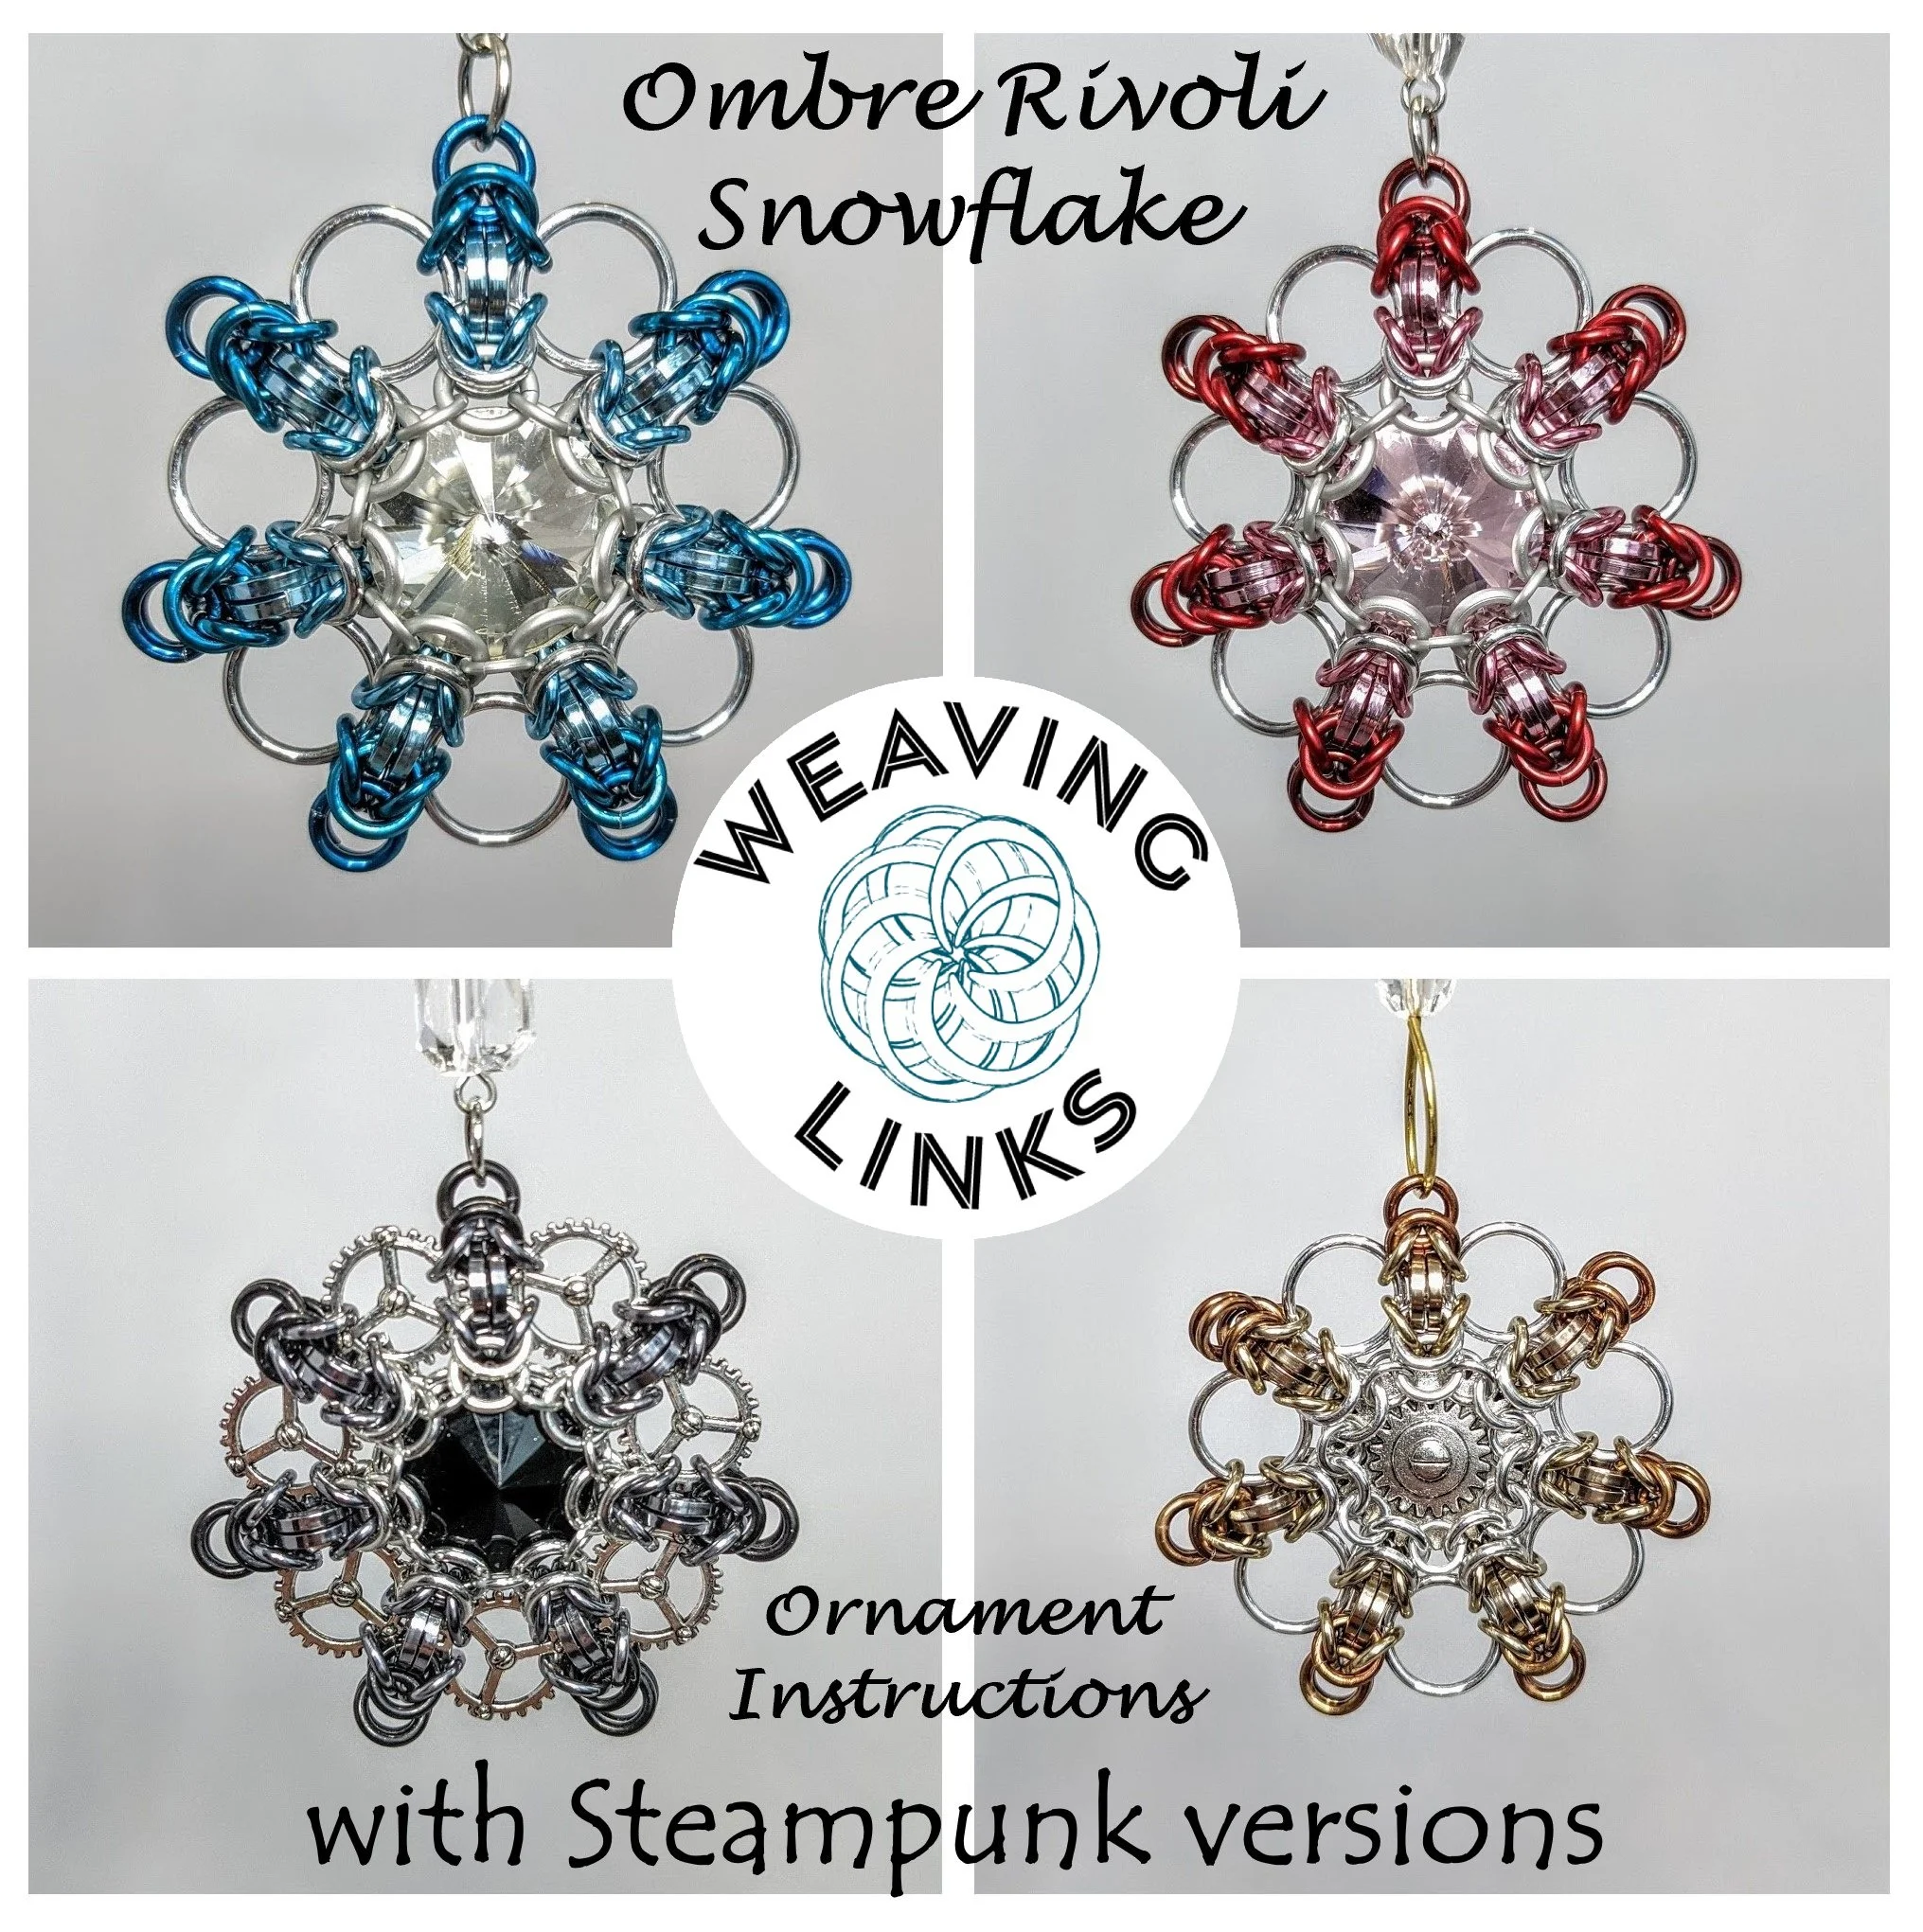
This is a set of instructions for building a snowflake ornament with a rivoli captured in the center. I like to play with color, so I created an ombre pattern with different shades of blue. Then, I made a steampunk version. There are both versions in these instructions, with multiple color options for each. I illustrate how to lay out the color in two different ways. I also lay out how to make this ornament in four different sizes with four different rivolis: 16mm, 14mm, 12mm, and 10mm.
This tutorial assumes that you can weave byzantine, or at least have some familiarity with it. If you don’t know this weave, there are free resources which can help you learn it. Chainmail 101 has a free tutorial, and Chainmailbasket.com also has plenty of resources. If you are new to byzantine, I recommend that you make the standard sized ornament first before trying any of the variations.
This tutorial has been tested with anodized aluminum rings from The Ring Lord and Chainmail Joe. Rings from The Ring Lord tend to give a looser weave than rings from Chainmail Joe. The tighter the snowflake is, you might need to use a smaller Rivoli. I indicate areas where you can make these adjustments.
This tutorial is for personal use only. It, or its contents, may not be reproduced or published without prior written consent.


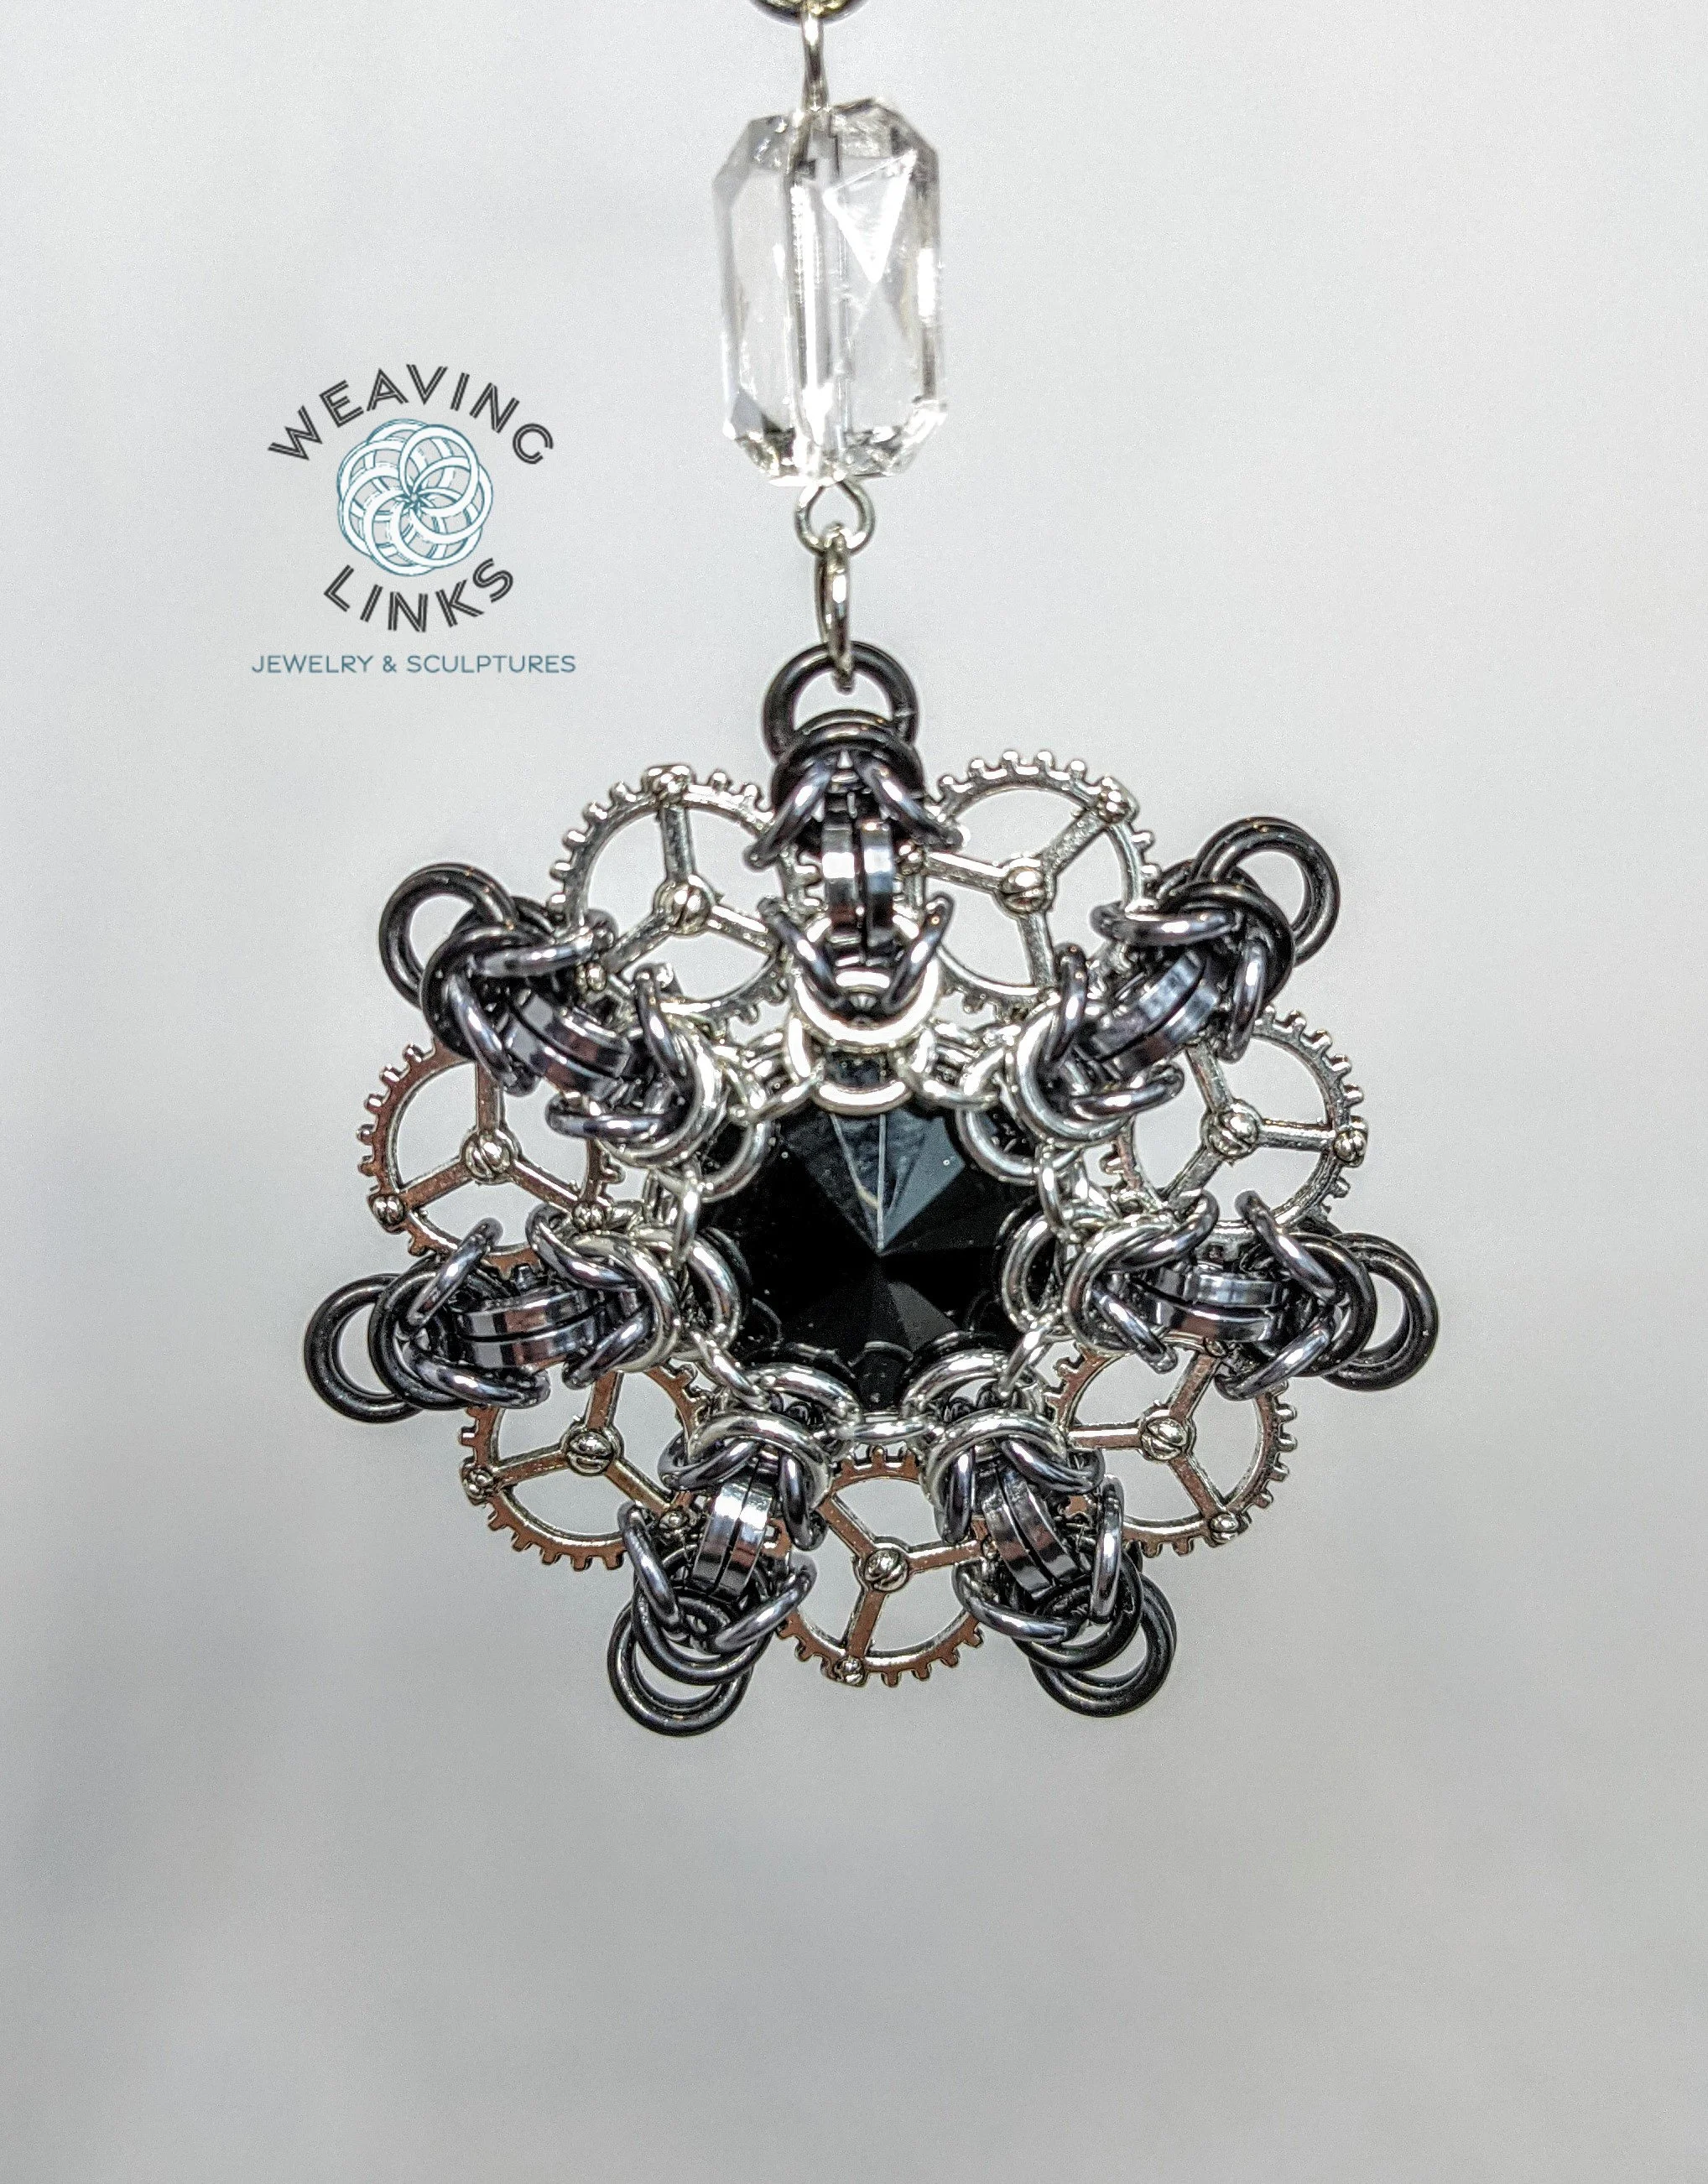
This is a set of instructions for building steampunk snowflake ornaments. This tutorial is similar to the other snowflake tutorial I wrote, but it uses square wire rings and has some structural differences. It’s also much tighter, so I’ve classified this one as intermediate simply because of how many small rings that need to go into tight spaces.
This tutorial assumes that you can weave full persian. If you don’t know this weave, there are free resources which can help you learn it. Chainmail 101 has a free tutorial, and Chainmailbasket.com also has plenty of resources.
This tutorial has been tested with anodized aluminum rings from The Ring Lord and Metal Designz. NOTE: different sized rings have not been tested with these instructions. If you change the sizes, it might not work out as well. I have not noticed a large difference in manufacturers, and I’ve also used Chainmail Joe rings to secure the gears in place.
If you have any questions, please don’t hesitate to send me a message via the Weaving Links Etsy page, Facebook page, or my Instagram.
This tutorial is for personal use only. It, or its contents, may not be reproduced or published without prior written consent.
You may sell the items you make with this tutorial, with design credit given to Weaving Links.


Skill level: experienced beginner
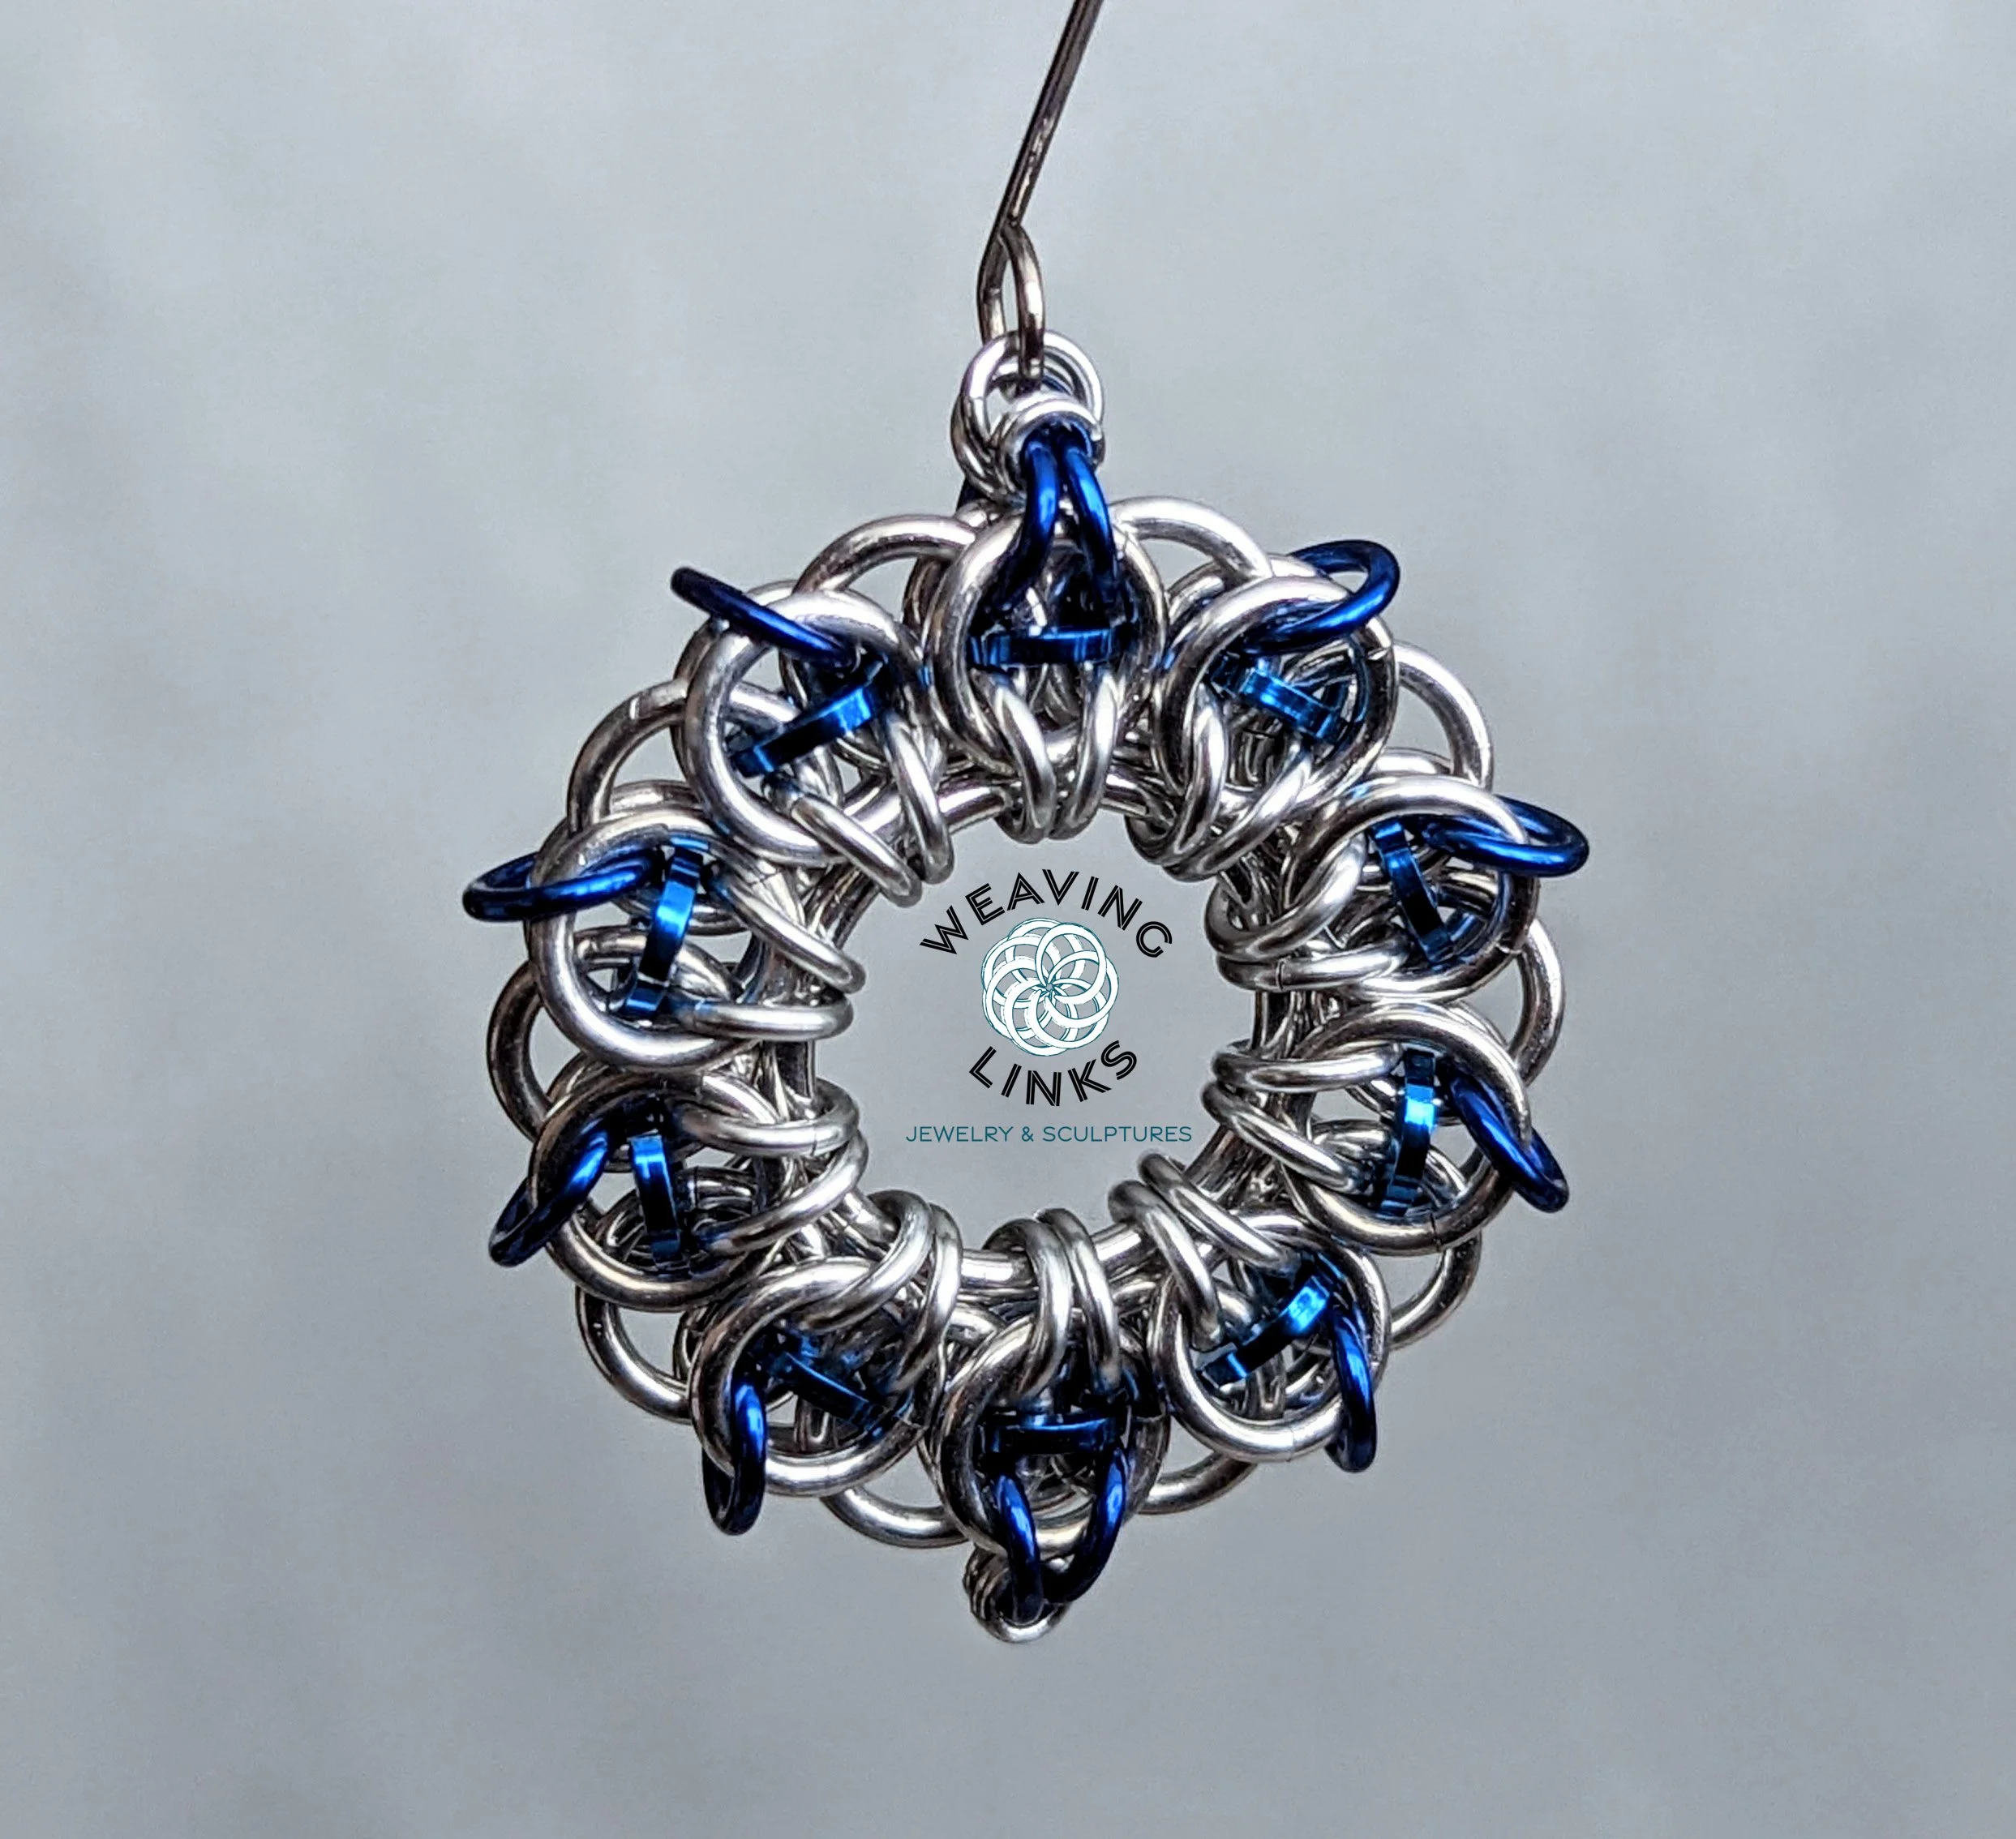
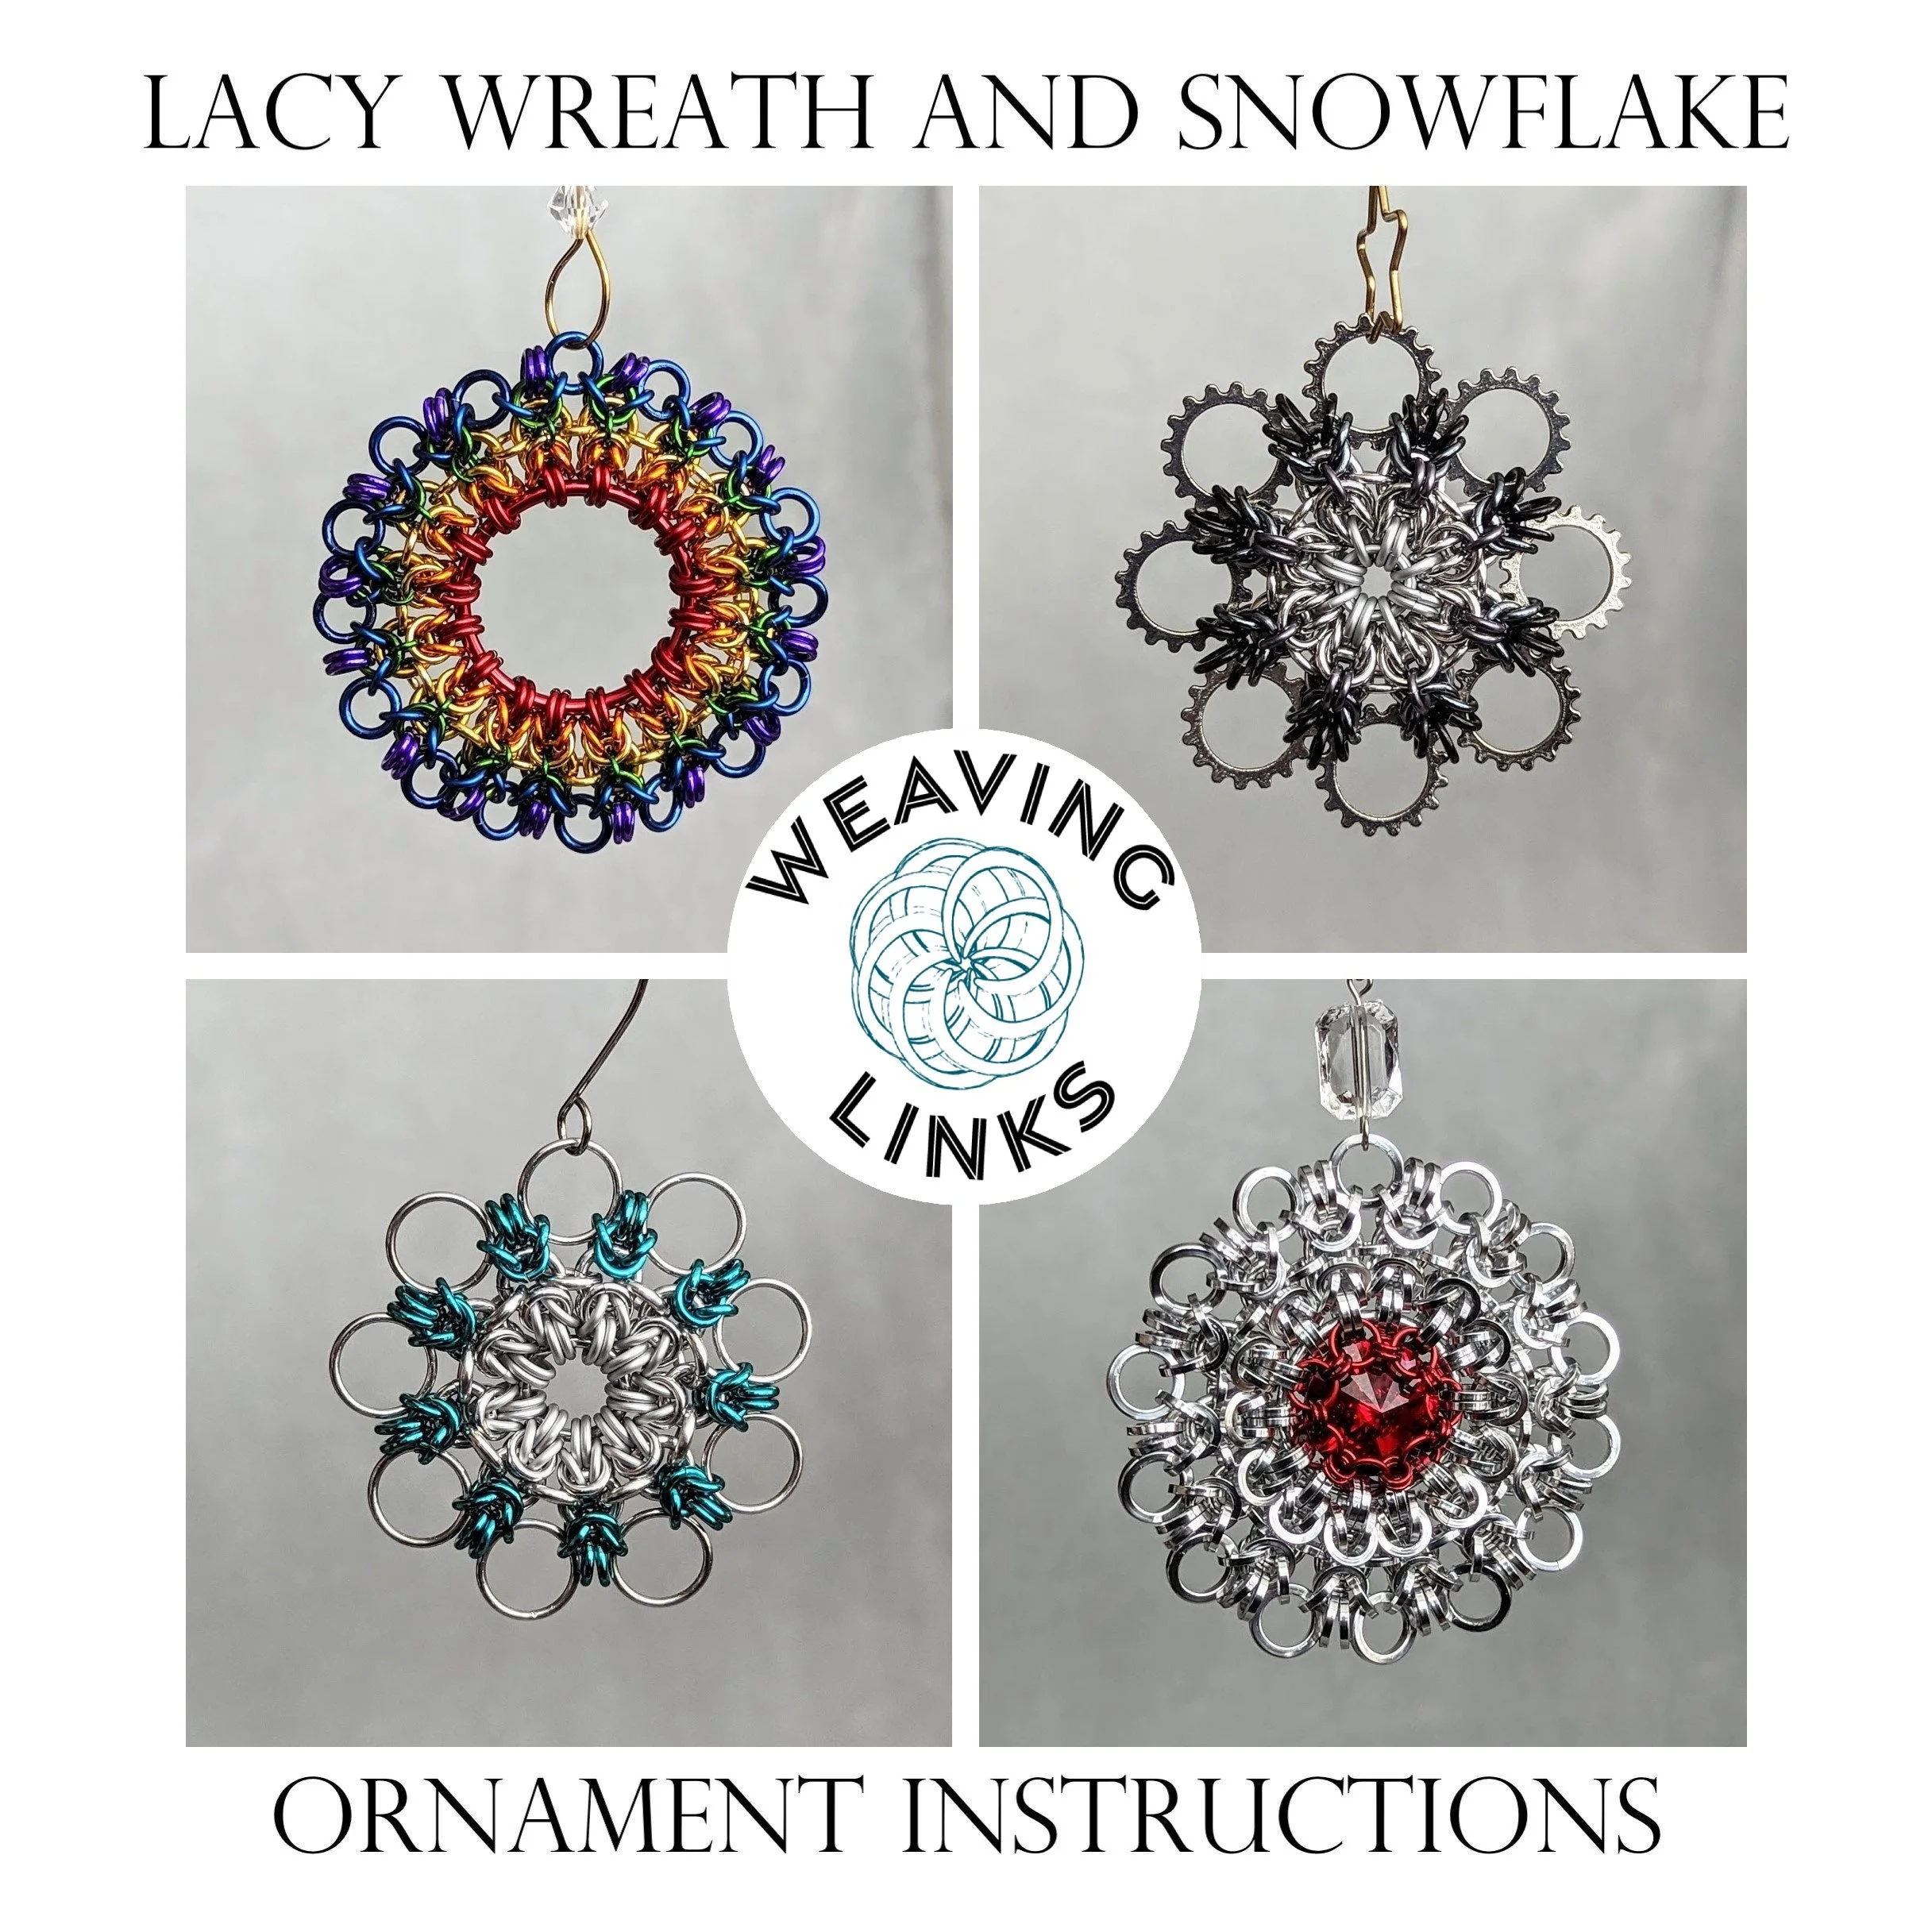
This is a set of instructions for building a wreath ornament and a snowflake ornament that has a lacy appearance.
Each of these ornaments also has multiple variations that you can make. There are five different designs for the snowflake and four different designs for the wreath. There is also a lot of overlap—most ring sizes will work for both the wreath and snowflake variations.
This tutorial assumes that you can weave byzantine and are comfortable capturing rivolis. That said, you do not have to add a rivoli to any of the ornaments if you don’t want to. They will be secure and stable enough on their own without one.
This tutorial has been tested with rings from Chainmail Joe and The Ring Lord, though the ring supplier used shouldn’t make that much of a difference. NOTE: this tutorial encourages creativity and trying out other ring sizes, but they might not always work out as you intend.
If you have any questions, please don’t hesitate to send me a message via the Weaving Links Etsy page, Facebook page, or Instagram.
This tutorial is for personal use only. It, or its contents, may not be reproduced or published without prior written consent. However, as always, you may sell what you make from this tutorial. Just give credit to Weaving Links.


This is a set of instructions for building a dice bag made entirely out of dragonscale. You can also use the techniques in this tutorial to make an amazing dragonscale cuff bracelet.
Skill Level: intermediate
This tutorial assumes that you know how to weave dragonscale.
These instructions will teach you how to weave dragonscale in an entirely different way, as well as how to connect to itself in the atypical way. This will allow you to form a bag without the assistance of an additional weave. But first, you should know how to weave dragonscale in the regular way.
This tutorial has been tested with rings from The Ring Lord, Chain Reaction Canada, and Chainmail Joe. NOTE: any ring sizes that work for dragonscale should also work in this tutorial.
If you have any questions, please don’t hesitate to send me a message via the Weaving Links Etsy page, Facebook page, or Instagram.
This tutorial is for personal use only. It, or its contents, may not be reproduced or published without prior written consent.


This is a set of instructions for building a shoulder pauldron that looks like a dragon wing.
Skill level: intermediate.
This tutorial assumes that you can weave dragonscale, scalemail, helm chain, half persian 3 in 1, and jens pind linkage3. The website artofmakingthings.com has free tutorials for dragonscale, helm, and half persian 3 in 1. So, if you don’t know these weaves, or want a refresher, this is a good resource. Chainmaillers.com is another good resource, and there are plenty of free videos on YouTube. AussieMaille has a great channel.
This tutorial has been tested with rings from The Ring Lord, Chainmail Joe, and Chain Reaction Canada. Scales have been tested from The Ring Lord, Steampunk Garage, and Meloria Maille. NOTE: different sized rings and scales have not been tested with these instructions. If you change the sizes, it might not work out well.
If you have any questions, please don’t hesitate to send me a message via the Weaving Links Facebook page, Etsy page, or Instagram.
These instructions are for personal use only. It, or its contents, may not be reproduced or published without prior written consent. You may sell what you make with these instructions, just give credit to the design by Weaving Links.


This tutorial contains 22 pages of detailed steps on how to build various aspects of Box Drops Swirl units and Box Drops Capture units. Included in this tutorial is how to make a small unit for lovely earrings or a pendant, a wide chain that makes a cuff bracelet or choker necklace, a slender chain, and an entire sheet that could be used to make interesting garments.
This is a versatile weave and works with a wide range of AR ring sizes. If you don’t understand AR, not to worry! I tested eight different ring sizes and included all of them in this document.
This tutorial assumes you know how to weave a chain of Box Drops. Everything in these instructions is built on that chain.
When building a box drops swirl unit, the rings that make up the swirl go into difficult places—especially when using rings for a tighter weave. I have rated that part of these instructions as Intermediate. For the capture section, I rate it as Experienced Beginner.
If you have any questions, please don’t hesitate to send me a message via the Weaving Links Etsy page, Facebook page, or Instagram.
Box Drops was discovered by Weaving Links. This tutorial is for personal use only. It, or its contents, may not be reproduced or published without prior written consent. However, you may sell what you make with it.


This is a set of instructions for building a unit of Box Drops Stars and a unit of Box Drops Vortex. Each of these units only requires two ring sizes, even though it looks like they use more.
Included in this tutorial is how to make a small unit for lovely earrings or a pendant, a wide chain that makes a cuff bracelet or choker necklace, and an entire sheet that could be used to make interesting decorative garments.
This tutorial assumes you know how to weave a chain of Box Drops. Everything in these instructions is built on that chain. It also assumes you know how to make a mobius ball.
The Box Drops Stars unit is straightforward but could be confusing for a brand-new beginner. The Box Drops Vortex unit looks really complicated, but assembling it is easier than it looks. However, it’s still not for a new beginner. Therefore, I rate these instructions as Experienced Beginner.
This tutorial has been tested with rings from Chain Reaction Canada, Chainmail Joe, and The Ring Lord. If you have any questions, please don’t hesitate to send me a message via the Weaving Links Etsy page, Facebook page, or Instagram.
Box Drops was discovered by Weaving Links. This tutorial is for personal use only. It, or its contents, may not be reproduced or published without prior written consent. However, you may sell what you make with it.


This is a set of instructions for building a chain of Box Drops and Alternating Box Drops. This is a versatile weave and works with a wide range of AR ring sizes. If you don’t understand AR, not to worry! I tested eight different ring sizes and included all of them in this tutorial.
This tutorial assumes you are familiar with either Byzantine or Box weaves. If you have never made a Box chain or a Byzantine chain, I highly recommend doing that before attempting Box Drops. There are lots of free resources on learning how to do this weave. If you search for Byzantine or Box 4-in-1, several things should come up. Chainmaillers.com and Joshua Dilberto’s Tome of Weaves are great resources.
When building the segments in box drops, it doesn’t have the same kind of structure as regular box weave. The rings can flop around a bit until the last two rings go into place, so I rate these instructions as Experienced Beginner.
This tutorial has been tested with rings from Chain Reaction Canada, Chainmail Joe, and The Ring Lord. The outer ranges of ring sizes that work for this weave are either very tight or very loose, depending on the manufacturer—especially if you are using anodized aluminum. If you have any questions, please don’t hesitate to send me a message via the Weaving Links Etsy page, Facebook page, or Instagram.
Box Drops was discovered by Weaving Links. This tutorial is for personal use only. It, or its contents, may not be reproduced or published without prior written consent. However, you can sell what you make with it.


This is a set of instructions for building three different sizes of the Aureus Pendant. Alternatively, the tiny versions are small enough to be worn as earrings. You could turn the larger versions into earrings as well, though if you use heavier materials, like stainless steel or copper, they might be a little hard on the ears. Titanium or aluminum should be a nice earring-weight for all sizes, though.
This tutorial assumes that you are familiar with capturing rivolis and/or chatons. It’s also best if you have experience working with very tiny rings. All three sizes of this piece have very small rings that go into difficult places. Because of this, I have classified this tutorial as intermediate to advanced.
This tutorial has been tested with stainless steel, copper, bronze, titanium, and aluminum. NOTE: different sized rings, other materials, and some manufacturers have not been tested with these instructions.
If you have any questions, please don’t hesitate to send me a message via the Weaving Links Etsy page, Facebook page, or my Instagram.
This tutorial is for personal use only. It, or its contents, may not be reproduced or published without prior written consent.


This is an add-on to the set of instructions for building two different types of chainmail dragon necklaces, plus variations like ear cuffs and headbands. If you do not have the original instructions, you can find them here.
The original instructions contain detailed steps on how to build these dragons in aluminum, but not for other materials like stainless steel, titanium, bronze, brass, copper, etc. This tutorial shows you how to adjust the ring sizes so that the original instructions will work for materials other than aluminum. However, it does not show details of how to build the entire dragon—you will still need the Tiny Chainmail Steampunk Dragon tutorial for that information. Instead, these instructions show you how to adjust the original design.
These dragons are a great fashion accessory, especially when made in a wide variety of materials, and can also sit up on their own. I recommend making a regular sized dragon before you try this one (The Ring Lord has a great tutorial). There are some very tiny rings that go into awkward spots, so I’ve classified these instructions as intermediate.
This tutorial has been tested with the following manufacturers:
-Rings from The Ring Lord
-Rings and scales from Metal Designz
-Scales from Steampunk Garage
-Stainless steel washers from my local hardware store
If you have any questions, please don’t hesitate to send me a message via the Weaving Links Etsy page, Facebook page, or Instagram. This tutorial is for personal use only. It, or its contents, may not be reproduced or published without prior written consent. You may sell the items you make with this tutorial, just give design credit to Weaving Links.


These instructions are an add-on to the original Winged Dragonscale Dragon tutorial. The head has been redesigned, so there are detailed steps and photos that show how to build it. But the steps for building the rest of the dragon are in the original tutorial, which is located here.
Skill Level: intermediate to advanced
I have recently tested larger sized rings and scales for this dragon, and that information is also in this tutorial. These new rings work with the original instructions, so only ring sizes are provided. When finished, this new dragon is flexible, poseable, can sit up tall, or lay down flat. It measures 34 inches from nose to tail, and the wingspan measures 32 inches at the widest points--this is almost a foot longer than the original dragon.
These instructions have been tested with anodized aluminum rings from The Ring Lord, Chain Reaction Canada, and from Chainmail Joe. Scales have been tested from The Ring Lord, Meloria Maille, Chainmaille Joe, Weave Got Maille, and Steampunk Garage.
If you have any questions, please don’t hesitate to send me a message via the Weaving Links Facebook page, Etsy page, or Instagram.
These instructions are for personal use only. It, or its contents, may not be reproduced or published without prior written consent. You may sell what you make with these instructions, just give credit to the design by Weaving Links.


This is a set of instructions for building a winged dragonscale dragon sculpture. It assumes you already know how to weave dragonscale and scalemail. This tutorial also assumes you have made a regular dragonback dragon before tackling this one.
When finished, the dragon is flexible, poseable, can sit up tall, or lay down flat. It measures 24 inches from nose to tail, and the wingspan measures 23 inches at the widest points. These instructions also assume that you can weave both dragonscale and scalemail. It does not teach you how to do either, it simply shows you how to shape each piece. It does, however, show you how to use two different colors in the larger rings for dragonscale.
All images are high quality so you can see exactly what you need to do and where.
Total number of rings (of all sizes) used in these instructions: 5462
Total number of scales (of all sizes) used in these instructions: 383
Total number of pages in these instructions: 27
Recommended skill level: intermediate to advanced (if you know dragonscale and are fine with putting rings into very tight spots, you can make this dragon)
These instructions have been tested with anodized aluminum rings from The Ring Lord, Chainmail Joe, and Chain Reaction Canada. The scales are from The Ring Lord, Chainmail Joe, Weave Got Maille, and Draconic Wares.
Have fun! I sure did!
**You may sell the dragons that you make from this tutorial, just credit Weaving Links as the designer. No part of this tutorial may be published or sold without written permission.
No results match your search. Try removing a few filters.

